取field2:
# echo field1 field2 field3 | awk '{print $2}'
取value:
# echo key:value | cut -d: -f2
组合使用 cut / awk 去除冒号后面值的空格
#echo namespace: lucky-cat | grep --max-count=1 namespace: | cut -d: -f2 | awk '{$1=$1;print}'
技术生活札记©Yaohui
取field2:
# echo field1 field2 field3 | awk '{print $2}'
取value:
# echo key:value | cut -d: -f2
组合使用 cut / awk 去除冒号后面值的空格
#echo namespace: lucky-cat | grep --max-count=1 namespace: | cut -d: -f2 | awk '{$1=$1;print}'
把网卡enp0s3改成eth0
# ip link set enp0s3 down
# ip link set enp0s3 name eth0
# ip link set eth0 up
但这样修改在系统重启后还是会回到原来的名字,因为系统启动后会按照规则重新进行硬件扫描并命名,所有有效的方法是修改/etc/sysconfig/network-scripts下以ifcfg-开头的文件,在网卡接口对应的文件中配置HWADDR:
...

HWADDR=xx:xx:xx:xx:xx:xx
DEVICE=eth0
...
如果系统过程中找到了与ifcfg-xx文件中HWADDR匹配MAC地址的网卡,则系统以ifcfg-xx文件中指定的DEVICE的值作为网卡名称。
网卡命名过程(以下内容摘自:http://blog.sina.com.cn/s/blog_704836f40102w36n.html):
==========================================
==========================================
常用的磁盘操作命令有fdisk, cfdisk, sfdisk, mkfs, parted, partprobe kpartx, 在Linux中挂载一个新磁盘时,常用到如下操作:
1. fdisk
fdisk可以用于查看指定硬盘的分区或对指定硬盘进行分区:
如显示所有分区:
# fdisk -l

Disk /dev/vda: 26.8 GB, 26843545600 bytes, 52428800 sectors
Units = sectors of 1 * 512 = 512 bytes
Sector size (logical/physical): 512 bytes / 512 bytes
I/O size (minimum/optimal): 512 bytes / 512 bytes
Disk label type: dos
Disk identifier: 0x0008f170

   Device Boot      Start         End      Blocks   Id  System
/dev/vda1   *        2048    52428749    26213351   83  Linux
查看帮助信息:
# fdisk -h
Usage:
 fdisk [options]     change partition table
 fdisk [options] -l  list partition table(s)
 fdisk -s       give partition size(s) in blocks

Options:
 -b              sector size (512, 1024, 2048 or 4096)
 -c[=]           compatible mode: 'dos' or 'nondos' (default)
 -h                    print this help text
 -u[=]           display units: 'cylinders' or 'sectors' (default)
 -v                    print program version
 -C            specify the number of cylinders
 -H            specify the number of heads
 -S            specify the number of sectors per track
根据向导对硬盘/dev/sdb进行分区:
# fdisk /dev/sdb
Welcome to fdisk (util-linux 2.23.2).

Changes will remain in memory only, until you decide to write them.
Be careful before using the write command.


Command (m for help): m
Command action
   a   toggle a bootable flag
   b   edit bsd disklabel
   c   toggle the dos compatibility flag
   d   delete a partition
   g   create a new empty GPT partition table
   G   create an IRIX (SGI) partition table
   l   list known partition types
   m   print this menu
   n   add a new partition
   o   create a new empty DOS partition table
   p   print the partition table
   q   quit without saving changes
   s   create a new empty Sun disklabel
   t   change a partition's system id
   u   change display/entry units
   v   verify the partition table
   w   write table to disk and exit
   x   extra functionality (experts only)
2. mkfs
用ext4格式格式化硬盘分区/dev/sdb1
# mkfs -t ext4 /dev/sdb1
或
# mkfs.ext4 /dev/sdb1
详细帮助信息:
# mkfs --help
Usage:
 mkfs [options] [-t ] [fs-options]  []

Options:
 -t, --type=  filesystem type; when unspecified, ext2 is used
     fs-options     parameters for the real filesystem builder
            path to the device to be used
              number of blocks to be used on the device
 -V, --verbose      explain what is being done;
                      specifying -V more than once will cause a dry-run
 -V, --version      display version information and exit;
                      -V as --version must be the only option
 -h, --help         display this help text and exit
3. df
查看磁盘使用情况:
# df -h
4. blkid
显示block devices信息:
# blkid
/dev/sda2: UUID="cc648f16-2695-451d-a133-e90b5ea8add3" TYPE="ext3"
/dev/sda1: UUID="3cb0a414-123d-4728-aca2-6d18e24e272e" TYPE="ext3"
/dev/sda3: UUID="dc6e8463-90c7-419b-8ce0-0f6adf6d870f" TYPE="swap"
/dev/sdb: UUID="840d4ffe-00ce-4a2e-83c8-b8b94e6d005b" TYPE="ext4"
5. mount
装载分区到指定目录。如装载ext4分区/dev/sdb1到/data目录:
# mount -t ext4 /dev/sdb1 /data
/data目录要事先存在。
[source]支持多种标识,如:# mount -t ext4 -U 840d4ffe-00ce-4a2e-83c8-b8b94e6d005b /data
或
# mount -t ext4 UUID="840d4ffe-00ce-4a2e-83c8-b8b94e6d005b" /data
mount –all则装载/etc/fstab中的所有配置。
5. /etc/fstab
mount指令装载在重启后会丢失,修改/etc/fstab文件可在系统重启后保持装载:
UUID=cc648f16-2695-451d-a133-e90b5ea8add3   /                       ext3    defaults        1 1
UUID=3cb0a414-123d-4728-aca2-6d18e24e272e   /boot                   ext3    defaults        1 2
UUID=dc6e8463-90c7-419b-8ce0-0f6adf6d870f   swap                    swap    defaults        0 0
UUID=840d4ffe-00ce-4a2e-83c8-b8b94e6d005b   /var/opt                ext4    defaults        1 0
fstab文件也支持Label和UUID多种分区标识。详见:http://man7.org/linux/man-pages/man5/fstab.5.html
# timedatectl set-timezone Asia/Shanghai
OR
# rm -f /etc/localtime
# ln -s /usr/share/zoneinfo/Asia/Shanghai /etc/localtime
有这样一个组织为了推动整个互联网环境的安全,免费提供跟你网站域名匹配的并且被各大浏览器信任的SSL证书,这个组织的名称叫做ISRG — Internet Security Research Group,ISGR提供了一个服务叫Let’s Encrypt (https://letsencrypt.org),网民们可以方便的使用该网站免费创建属于自己的SSL证书。并且ISGR允许免费创建泛域名SSL证书。
下面就来说说怎样使用Let’s Encrypt提供的服务免费创建泛域名证书。
假设场景:
一个支持多域名的证书可以满足上述需求,该证书需要绑定两个域名example.com和*.example.com, 下面详表过程:
关系到数据安装的一个Key, 千万不能泄漏。使用openssl生成2048位私钥,输出文件名为example.com.key:
# openssl genrsa -out example.com.key 2048
从/etc/pki/tls/openssl.cnf复制一个文件example.com.cnf
# cp /etc/pki/tls/openssl.cnf example.com.cnf
修改example.com.cnf:
1. 找到[ req ]节中被注释掉的req_extensions = v3_req,去除行首的#使其生效,或添加对应内容:
[ req ]
...
req_extensions = v3_req # The extensions to add to a certificate request
...
2. 找到[ v3_req ]节添加subjectAltName,内容如下:
[ v3_req ]
subjectAltName = @alt_names
3. 添加[ alt_names ]小节,并在下面添加DNS.1 和 DNS.2分别等天example.com和*.example.com:
[ alt_names ]
DNS.1 = example.com
DNS.2 = *.example.com
保存退出编辑器。
使用前面步骤创建的Private Key和cnf文件作为输入参数,生成CSR, 过程中需要填写证书申请的相关信息,包括国家代码,州省,城市,证书所属组织名称,证书显示名称等,按向导依次填即可:
# openssl req -new -key example.com.key -out example.com.csr -config example.com.cnf
You are about to be asked to enter information that will be incorporated
into your certificate request.
What you are about to enter is what is called a Distinguished Name or a DN.
There are quite a few fields but you can leave some blank
For some fields there will be a default value,
If you enter '.', the field will be left blank.
-----
Country Name (2 letter code) [XX]:CN
State or Province Name (full name) []:Guangdong
Locality Name (eg, city) [Default City]:Shenzhen
Organization Name (eg, company) [Default Company Ltd]:
Organizational Unit Name (eg, section) []: Thomas
Common Name (eg, your name or your server's hostname) []:example.com
Email Address []:

Please enter the following 'extra' attributes
to be sent with your certificate request
A challenge password []:
An optional company name []:
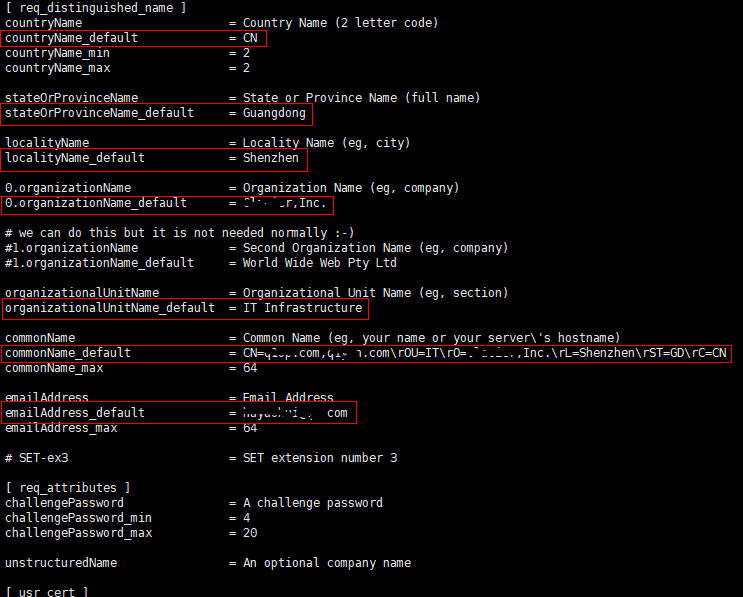
还有一种更快捷的方法是在cnf文件中把所有内容填好,在向导中就只需要按回车就好了:
查验Request文件:
# openssl req -in example.com.csr -noout -text
1. 在浏览器中输入网址:https://www.sslforfree.com, 然后在sslforfree的网站的域名输入框中输入example.com *.example.com,点击Create Free SSL Certificate按钮继续:

2. 然后sslforfree网站会提示你需要验证该域名是否为你所有,点击Manually Verify Domain按钮继续:
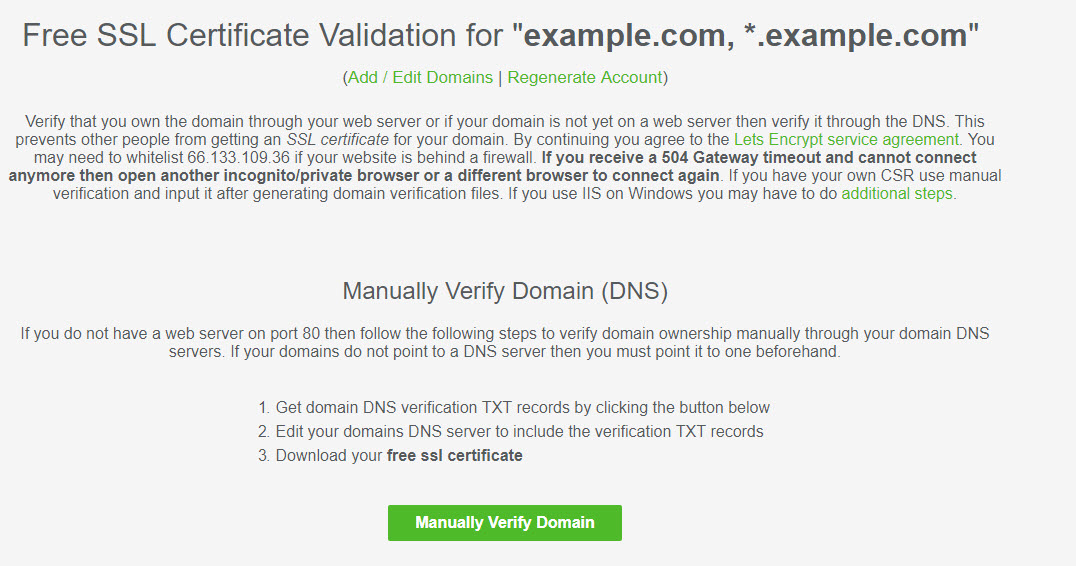
3. 你需要根据网站给出的值,在你的域名注册商那里添加两个TXT记录,添加完成等该记录生效后,勾选I Have My Own CSR复选框,把前面使用openssl创建的CSR文件的内容粘贴到下面的文本框里,然后点击Download SSL Certificate按钮

如果TXT记录校验通过,ssoforfree网站就会显示出颁发的证书内容了。你可以从文本框中复制PEM格式的证书内容,也可以直接点击下载包含证书文件的ZIP包。
注意,如果CSR文件是你自己提供的,那么下载的ZIP包中是不包含你的Private Key的,你需要保存好你之前使用openssl生成的Private Key文件。
1. 生成dhparam文件:
# openssl dhparam -out dhparam.pem 2048
2. 把完整证书链保存在一个文件中
sslforfree网站提供的证书的证书路径如下:
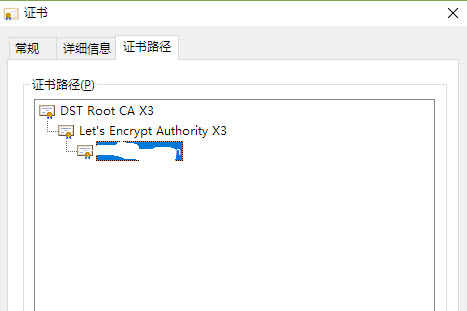
如果要想你的网站证书能受到信任并兼容所有设备(如Android设备上的浏览器),必须要把你的证书和根证书所有颁发机构的证书放在一个文件中,提供给客户端下载。从sslforfree下载的ZIP包中有ca-bundle.crt和certificate.crt, 把这两个文件的内容粘贴到一个文件中。把certificate.crt文件中的内容放前面,ca-bundle.crt中的内容放后面。根据我们的假设的例子,文件另存为example.com.pem。示例内容如下:
-----BEGIN CERTIFICATE-----
[example.com证书内容]
-----END CERTIFICATE-----
-----BEGIN CERTIFICATE-----
[ca_bundle.crt证书链内容]
-----END CERTIFICATE-----
2. 在nginx.conf中添加ssl配置,包括 HTTP Header: Strict-Transport-Security, 指定ssl_certificate, ssl_certificate_key,ssl_dhparam, 支持的协议:TLSv1 TLSv1.1 TLSv1.2等,如下所示:
server {
    listen 443 ssl;
    server_name example.com www.example.com blog.example.com forum.example.com;

    add_header Strict-Transport-Security max-age=31536000;
    add_header X-Frame-Options DENY;
    add_header X-Content-Type-Options nosniff;

    ssl on;
    ssl_certificate /etc/ssl/example.com.pem;
    ssl_certificate_key /etc/example.com.key;

    ssl_prefer_server_ciphers on;
    ssl_dhparam /etc/ssl/dhparam.pem;
    ssl_protocols TLSv1 TLSv1.1 TLSv1.2;
    ssl_ciphers "EECDH+ECDSA+AESGCM EECDH+aRSA+AESGCM EECDH+ECDSA+SHA384 EECDH+ECDSA+SHA256 EECDH+aRSA+SHA384 EECDH+aRSA+SHA256 EECDH+aRSA+RC4 EECDH EDH+aRSA !aNULL !eNULL !LOW !3DES !MD5 !EXP !PSK !SRP !DSS !RC4";
    keepalive_timeout 70;
    ssl_session_cache shared:SSL:10m;
    ssl_session_timeout 10m;
配置完成让nginx reload配置文件,访问网站就可以看到期待的锁图标及“安全”标识了。
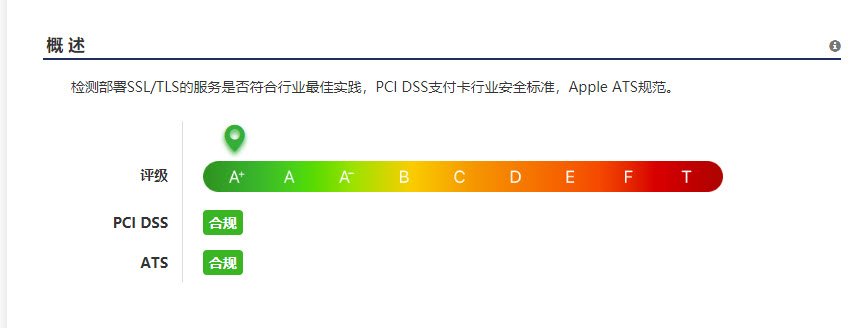
打开网站https://myssl.com/输入你的网址检测一下,看是不是达到的A+级安全标准:).
在CentOS中,由于相关组件比较齐全,可直接下载docker的发布包直接启动,可以从下面的网页中找到下载链接:
https://docs.docker.com/install/linux/docker-ce/binaries/
https://download.docker.com/linux/static/stable/x86_64/
下载:
# curl -#O https://download.docker.com/linux/static/stable/`uname -m`/docker-17.12.1-ce.tgz
解压并Copy到/usr/bin/:
# tar xzvf docker-17.12.1-ce.tgz
# cp docker/* /usr/bin/
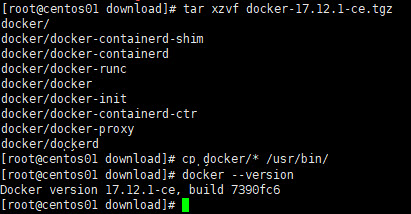
其他机器不用重复下载,sftp到第一台机器直接copy过来:
#sftp [email protected]:/root/download/
sftp> get docker/*
sftp> exit
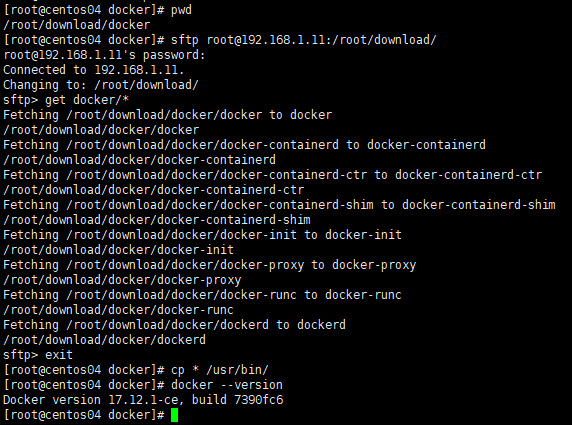
直接运行dockerd
测试一下看能否成功启动docker daemon:
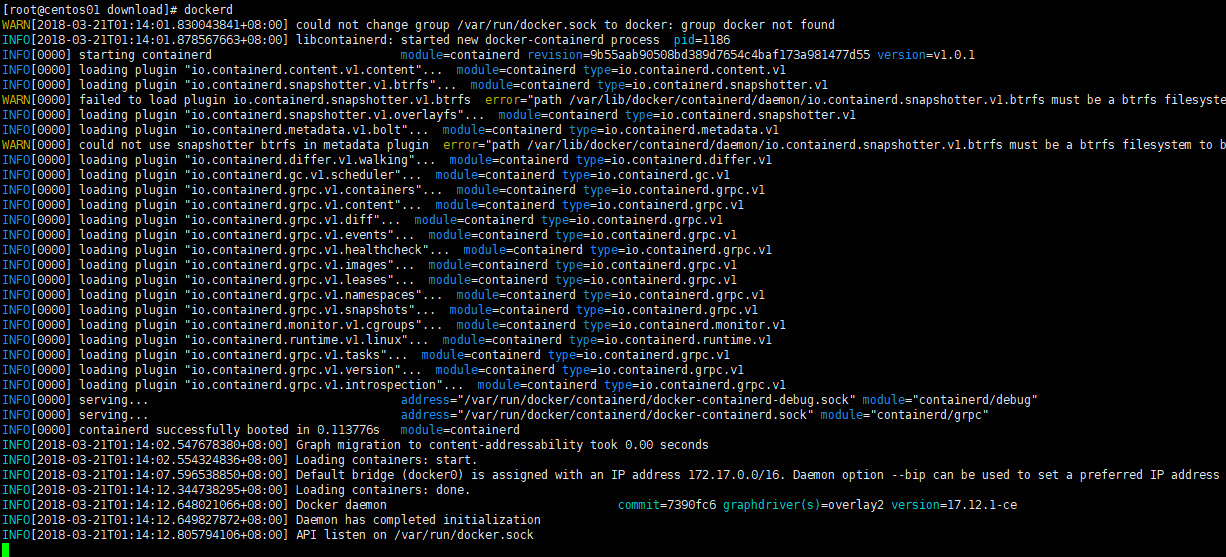
接下来需要把dockerd配置成系统服务自动启动。
参照官方文档:https://docs.docker.com/config/daemon/systemd/#manually-create-the-systemd-unit-files
从https://github.com/moby/moby/tree/master/contrib/init/systemd把docker.service和docker.socket下载到/etc/systemd/system/目录
# curl -o /etc/systemd/system/docker.service https://raw.githubusercontent.com/moby/moby/master/contrib/init/systemd/docker.service
# curl -o /etc/systemd/system/docker.socket https://raw.githubusercontent.com/moby/moby/master/contrib/init/systemd/docker.socket

# systemctl daemon-reload
# systemctl enable docker

然后通过# systemctl start docker 启动docker服务,如果在启动过程中遇到如下错误:
- Unit docker.socket has begun starting up.
3月 22 00:47:07 centos02 systemd[1148]: Failed to chown socket at step GROUP: No such process
3月 22 00:47:07 centos02 systemd[1]: docker.socket control process exited, code=exited status=216
3月 22 00:47:07 centos02 systemd[1]: Failed to listen on Docker Socket for the API.
-- Subject: Unit docker.socket has failed
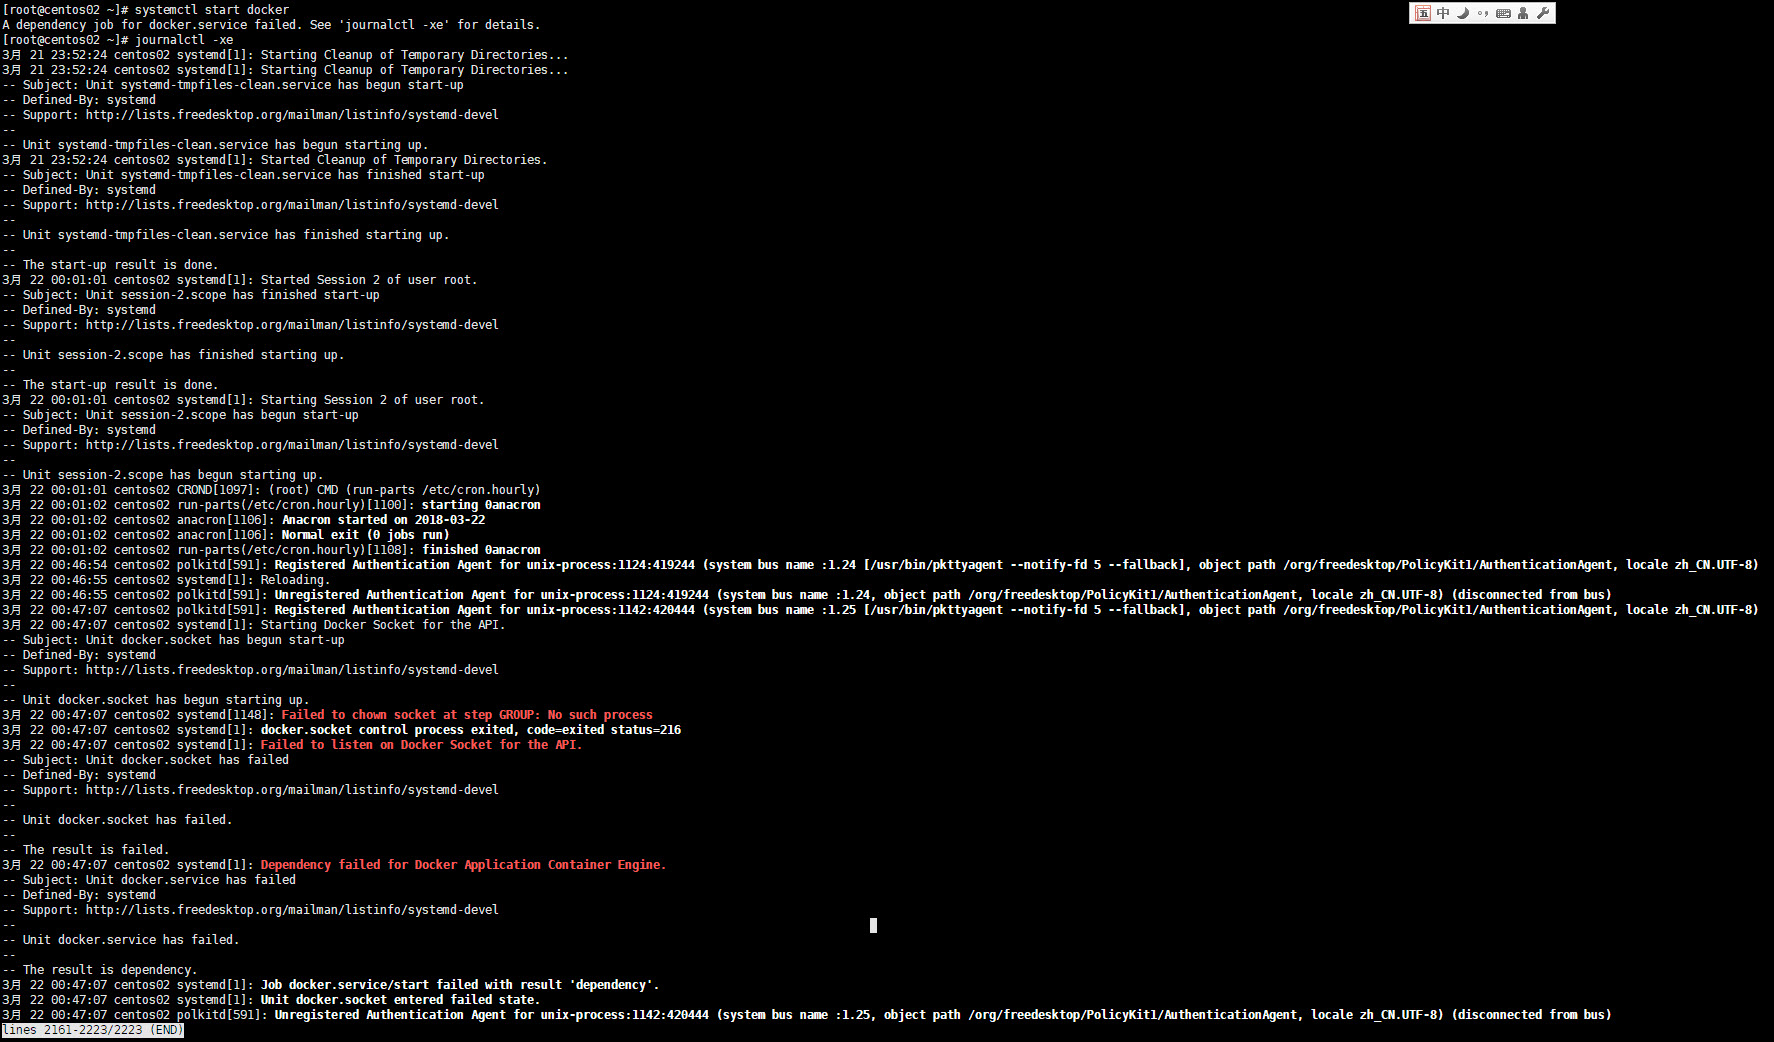
请检查/etc/systemd/system/docker.socket文件中配置的SockerGroup对应的组是否存在,如果不存在则通过# groupadd添加后再启动docker服务,从github上下载的docker.socket中配置的SockerGroup是docker,需要先添加该group:
# groupadd docker
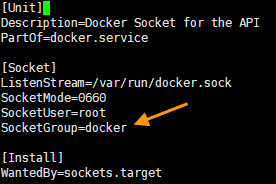
然后再启动docker服务,启动成功:
docker服务启动后,通过#docker version查询client与server端版本信息:
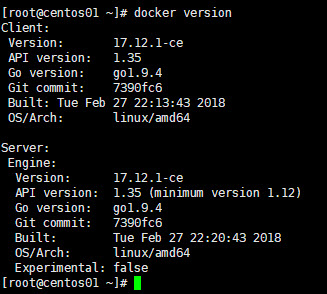
其它自定义的docker daemon启动参数及环境变量可参考官方文档:https://docs.docker.com/config/daemon/systemd/, 通过systemd drop-in和 /etc/docker/daemon.json配置。
手动下载binary包的安装方式略显繁琐,通过yum安装的方式就会自动化和简单很多:
a) 添加yum repo
# tee /etc/yum.repos.d/docker.repo <<-'EOF'
[dockerrepo]
name=Docker Repository
baseurl=https://yum.dockerproject.org/repo/main/centos/$releasever/
enabled=1
gpgcheck=1
gpgkey=https://yum.dockerproject.org/gpg
EOF
b) 安装docker
# yum install docker-engine
c) 启动docker服务并开机自动启动
# systemctl start docker
# systemctl enable docker
运行docker info, 查看是否有提示bridge-nf-call-iptables is disabled和bridge-nf-call-ip6tables is disabled 的 WARNNING:
# docker info
Containers: 0
 Running: 0
 Paused: 0
 Stopped: 0
Images: 1
Server Version: 17.12.1-ce
Storage Driver: overlay2
 Backing Filesystem: xfs
 Supports d_type: true
 Native Overlay Diff: true
Logging Driver: json-file
Cgroup Driver: cgroupfs
Plugins:
 Volume: local
 Network: bridge host macvlan null overlay
 Log: awslogs fluentd gcplogs gelf journald json-file logentries splunk syslog
Swarm: inactive
Runtimes: runc
Default Runtime: runc
Init Binary: docker-init
containerd version: 9b55aab90508bd389d7654c4baf173a981477d55
runc version: 9f9c96235cc97674e935002fc3d78361b696a69e
init version: 949e6fa
Security Options:
 seccomp
  Profile: default
Kernel Version: 3.10.0-862.2.3.el7.x86_64
Operating System: CentOS Linux 7 (Core)
OSType: linux
Architecture: x86_64
CPUs: 1
Total Memory: 991.7MiB
Name: centos01
ID: KL2R:7F52:M5SV:T3U7:GL3Y:UU6F:KGE2:DM3Y:STSY:MLEZ:XXEL:EWG3
Docker Root Dir: /var/lib/docker
Debug Mode (client): false
Debug Mode (server): false
Registry: https://index.docker.io/v1/
Labels:
Experimental: false
Insecure Registries:
 127.0.0.0/8
Live Restore Enabled: false

WARNING: bridge-nf-call-iptables is disabled
WARNING: bridge-nf-call-ip6tables is disabled
通过添加以下配置解决:
# tee -a /etc/sysctl.conf <<-'EOF'
net.bridge.bridge-nf-call-iptables=1
net.bridge.bridge-nf-call-ip6tables=1
EOF
# sysctl -p
详细参见:关于bridge-nf-call-iptables的设计问题
有时候docker环境会运行在一个代理或防火墙内部,为了让docker daemon从外网pull镜像,就需要给docker daemon配置代理。有两种配置方式:
a) 通过Service Drop-In文件
例如我的代理地址为http://192.168.1.3:1080/:
# mkdir -p /etc/systemd/system/docker.service.d/
# tee /etc/systemd/system/docker.service.d/http-proxy.conf <<-'EOF'
[Service]
Environment="HTTP_PROXY=http://192.168.1.3:1080/" "HTTPS_PROXY=http://192.168.1.3:1080/" "NO_PROXY=192.168.1.1,192.168.1.3,192.168.1.11,192.168.1.12,192.168.1.13,192.168.1.14,192.168.1.99,127.0.0.1,localhost"
EOF
# systemctl daemon-reload
# systemctl restart docker
b) 修改/etc/systemd/system/docker.service文件,在[Service]配置节添加Environment:
[Service]
Environment="HTTP_PROXY=http://192.168.1.3:1080/" "HTTPS_PROXY=http://192.168.1.3:1080/" "NO_PROXY=192.168.1.1,192.168.1.3,192.168.1.11,192.168.1.12,192.168.1.13,192.168.1.14,192.168.1.99,127.0.0.1,localhost"
如果代理服务器需要认证,则配置格式为:http://username:[email protected]:1080/, 如果username或password中有特殊字符,则必须进行encode。 如#要改成%23
c) 验证
# systemctl show --property Environment docker
Environment=HTTP_PROXY=http://192.168.1.3:1080/ HTTPS_PROXY=http://192.168.1.3:1080/ NO_PROXY=192.168.1.1,192.168.1.3,192.168.1.11,192.168.1.12,192.168.1.13,192.168.1.14,192.168.1.99,127.0.0.1,localhost
如果你的代理服务器是HTTPS的,有自己的HTTPS证书,那就更麻烦一些,你需要:
详见:
docker服务还有很多其它参数可以通过Drop-In, docker.service或/etc/docker/daemon.json进行配置,如添加一个本地镜像库,可以通过几种方式进行配置 :
a) 修改docker.service文件,在dockerd后面添加一个或多个–insecure-registry 192.168.1.3:10000
b) 修改/etc/docker/daemon.json,添加insecure-registries配置
{
    "insecure-registries": ["192.168.1.3:10000"]
}
更新配置参数请参见:
https://docs.docker.com/engine/reference/commandline/dockerd/#daemon
https://docs.docker.com/engine/reference/commandline/dockerd/#daemon-configuration-file
# curl -L https://github.com/docker/compose/releases/download/1.21.0/docker-compose-$(uname -s)-$(uname -m) -o /usr/bin/docker-compose
# chmod +x /usr/bin/docker-compose
# docker-compose --version
docker-compose version 1.21.0, build 5920eb0
# yum remove docker \
                  docker-client \
                  docker-client-latest \
                  docker-common \
                  docker-latest \
                  docker-latest-logrotate \
                  docker-logrotate \
                  docker-engine

# yum install -y yum-utils \
  device-mapper-persistent-data \
  lvm2

# yum-config-manager \
    --add-repo \
    https://download.docker.com/linux/centos/docker-ce.repo

# yum list docker-ce --showduplicates | sort -r

# yum install docker-ce docker-ce-cli containerd.io
上一篇文章中描述了LVS的配置,但LVS有一个缺陷:不探测Real Server的状态,就算是Real Server宕机,LVS也会把请求转发过去。
使用Keepalived可以弥补LVS的缺陷,还可以实现LVS Director的冗余备份,keepalived会根据主机的健康状况让VIP在LVS Director之间漂移。同时Keepalived还可以替代ipvsadm工具,在keepalived配置文件中直接完成LVS的配置。
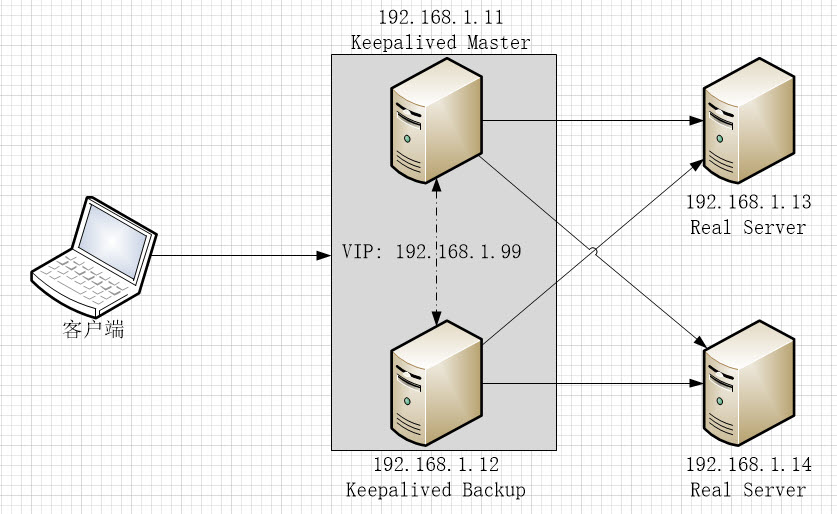
1. 在192.168.1.11和192.168.1.12上安装keepalived, 安装完成后修改配置文件/etc/keepalived/keepalived.conf。
# yum install keepalived -y
# vi /etc/keepalived/keepalived.conf
详细配置参数说明请参见官方文档:http://www.keepalived.org/doc/configuration_synopsis.html
2. 配置MASTER节点(192.168.1.11),配置文件内容如下。关键配置内容添加了注释:
! Configuration File for keepalived

global_defs {
   router_id LVS_11                         #节点ID,每个节点的值唯一
   vrrp_skip_check_adv_addr
   vrrp_strict                              #严格遵守VRRP,三种情况将会阻止keepalived (1.无VIPs, 2.unicast peers,3.IPv6 addresses in VRRP version 2)
   vrrp_garp_interval 0
   vrrp_gna_interval 0
}

vrrp_instance VI_1 {                        #定义一个实例(高可用集群)
    state MASTER                            #节点在Keepalived中定义为MASTER
    interface enp0s3                        #指定节点发送ARP数据报时使用的网关设备
    virtual_router_id 51                    #Virtual Router ID, 数字格式,集群中的所有节点值要相同,
    priority 101                            #节点优先级,MASTER节点要比其它节点的值大
    advert_int 1
    authentication {
        auth_type PASS                      #节点间的认证方式,支持PASS, HEAD
        auth_pass keepsync                  #auth_type为PASS时的主证密码,超过8位则keepalived只取前8位
    }
    virtual_ipaddress {
        192.168.1.99                        #配置虚拟IP
    }
}

--------------------------------------分割线,如果只配置Keepalived主备集群,上面的配置就可以了,下面的配置用于配置LVS--------------------------------

virtual_server 192.168.1.99 80 {            #配置LVS集群服务地址及端口
    delay_loop 6
    lb_algo lc                              #LVS请求分配算法,当前为LC,详见LVS文档
    lb_kind DR                              #LVS工作模式为DR
    persistence_timeout 50
    protocol TCP                            #LVS服务协议为TCP

    real_server 192.168.1.13 80 {           #Real Server 1 地址及端口
        weight 1                            #Real Server 1权重
        TCP_CHECK {                         #Real Server健康诊断方式为TCP_CHECK, 支持的方式有TCP_CHECK, HTTP_GET, SSL_GET, MISC_CHECK
            connect_timeout 3               #诊断间隔为3秒
            connect_port 80                 #诊断连接端口为80
        }
    }

    real_server 192.168.1.14 80 {           #Real Server 1 配置
        weight 1
        TCP_CHECK {
            connect_timeout 3
            connect_port 80
        }
    }
}
3. 配置BACKUP节点(192.168.1.12):
! Configuration File for keepalived

global_defs {
   router_id LVS_12                #每个节点唯一,与其它节点不周
   vrrp_skip_check_adv_addr
   vrrp_strict
   vrrp_garp_interval 0
   vrrp_gna_interval 0
}

vrrp_instance VI_1 {
    state BACKUP                   #指定为BACKUP模式
    interface enp0s3
    virtual_router_id 51           #与其它节点相同
    priority 100                   #优先级比MASTER低
    advert_int 1
    authentication {
        auth_type PASS
        auth_pass keepsync
    }
    virtual_ipaddress {
        192.168.1.99
    }
}

virtual_server 192.168.1.99 80 {
    delay_loop 6
    lb_algo lc
    lb_kind DR
    persistence_timeout 50
    protocol TCP

    real_server 192.168.1.13 80 {
        weight 1
        TCP_CHECK {
            connect_timeout 3
            connect_port 80
            nb_get_retry 3
            delay_before_retry 3
        }
    }

    real_server 192.168.1.14 80 {
        weight 1
        TCP_CHECK {
            connect_timeout 3
            connect_port 80
        }
    }
}
Keepalived会按TCP_CHECK中配置的connect_timeout时间间隔尝试连接real server的connect_port指定的端口,如果指定server的指定端口不可达,该real server会被从LVS集群中移除,待该server恢复后又会被自动加入到集群。
关于Health Check的详细信息请参见:http://www.keepalived.org/doc/software_design.html#healthcheck-framework
4. 在MASTER和BACKUP节点上启动并启用keepalived服务:
# systemctl start keepalived
# systemctl enable keepalived
如果Keepalived MASTER节点上安装了ipvsadm管理工具,可以看到LVS配置已经生成:
[root@centos01 ~]# ipvsadm -Ln
IP Virtual Server version 1.2.1 (size=4096)
Prot LocalAddress:Port Scheduler Flags
  -> RemoteAddress:Port           Forward Weight ActiveConn InActConn
TCP  192.168.1.99:80 lc persistent 50
  -> 192.168.1.13:80              Route   1      0          0
  -> 192.168.1.14:80              Route   1      0          6
5. 在MASTER和BACKUP节点上启用ip_forward:
# cat << EOF > /etc/sysctl.d/zz-keepalived.conf
net.ipv4.ip_forward = 1
EOF
# sysctl --system
/etc/sysctl.d目录下, 文件名排序越靠后,优先级越高, 所以以zz-..作为文件名前缀
LVS工作在DR模式时,Real Server需要直接与客户端通讯,因此需要把VIP配置在Real Server上,并且不允许以该VIP的名义向广播网段发送ARP数据包,做如下配置:
# ifconfig enp0s3:0 192.168.1.99 netmask 255.255.255.255 up
# echo "1" > /proc/sys/net/ipv4/conf/enp0s3/arp_ignore
# echo "1" > /proc/sys/net/ipv4/conf/all/arp_ignore
# echo "2" > /proc/sys/net/ipv4/conf/enp0s3/arp_announce
# echo "2" > /proc/sys/net/ipv4/conf/all/arp_announce
至此,相关配置全部完成。如果Real Server上的Web服务工作正常,通过浏览器访问VIP就可以正常打开Real Server上的Web服务了,如果MASTER节点停止服务,BACKUP节点会立即接管,待MASTER恢复后则重新接管服务。如果某一个Real Server停止,则该Real Server则会被从LVS集群中移动,恢复后又会被自动加入到LVS集群中。
如果keepalived.conf文件中不配置virtual_server, keepalived就单纯提供双机热备服务,让VIP在主备机之间漂移。
为保证Keepalived 节点和Real Server之间通讯正常,最好停掉各个Server上的和防火墙(firewalld)服务,或者每改动一次配置都需要重新执行一下iptables -F。
LVS有三种工作模式:NAT, TUN, DR. DR是三种工作模式中性能最高的,TUN次之。
本文记录LVS/TUN和LVS/DR工作模式的配置过程。
环境:
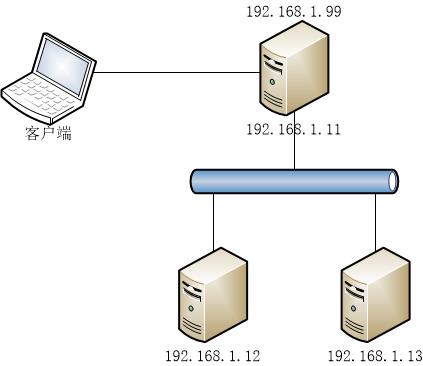
Director(192.168.1.11)上的配置:
为tunl0设备配置VIP:
# ifconfig tunl0 192.168.1.99 broadcast 192.168.1.99 netmask 255.255.255.255 up
安装ipvsadm工具:
# yum install ipvsadm
用ipvsadm配置LVS转发器:
# ipvsadm -C
# ipvsadm -A -t 192.168.1.99:80 -s rr
# ipvsadm -a -t 192.168.1.99:80 -r 192.168.1.12 -i
# ipvsadm -a -t 192.168.1.99:80 -r 192.168.1.13 -i
# iptables -F
配置完成后使用ipvsadm -Ln查看:
# ipvsadm -Ln
IP Virtual Server version 1.2.1 (size=4096)
Prot LocalAddress:Port Scheduler Flags
  -> RemoteAddress:Port           Forward Weight ActiveConn InActConn
TCP  192.168.1.99:80 rr
  -> 192.168.1.12:80              Route   1      0          0
  -> 192.168.1.13:80              Route   1      0          0
Real Server(192.168.1.12,192.168.1.13)上的配置:
# ifconfig tunl0 192.168.1.99 broadcast 192.168.1.99 netmask 255.255.255.255 up
# echo "1" > /proc/sys/net/ipv4/conf/tunl0/arp_ignore
# echo "2" > /proc/sys/net/ipv4/conf/tunl0/arp_announce
# echo "0" > /proc/sys/net/ipv4/conf/tunl0/rp_filter
# echo "1" > /proc/sys/net/ipv4/conf/all/arp_ignore
# echo "2" > /proc/sys/net/ipv4/conf/all/arp_announce
# echo "0" > /proc/sys/net/ipv4/conf/all/rp_filter
# iptables -F
1. 在192.168.1.12和192.168.1.13上直接通过rpm包安装nginx, 在192.168.1.12和192.168.1.13上配置两个web server显示两个可识别的web页面:
# rpm -Uvh http://nginx.org/packages/centos/7/x86_64/RPMS/nginx-1.14.0-1.el7_4.ngx.x86_64.rpm
2. 通过docker使用默认NAT网络启动一个nginx实例,在192.168.1.12和192.168.1.13上配置两个nginx实例显示两个可识别的web页面。通过docker启动web服务时要在Real Server上开启ip_forward, 因为docker run默认使用的NAT网络依赖ip_forward:
# docker run --name nginx -d -p 80:80 -v /etc/nginx/:/etc/nginx/ -v /var/www/html/:/usr/share/nginx/html/ -v /var/log/nginx/:/var/log/nginx/ nginx:1.13.12
# echo "1" > /proc/sys/net/ipv4/ip_forward
最后执行iptables -F确保所有通信不被防火墙阻挡。
LVS/TUN模式配置完成,通过在另一个linux 虚拟机中通过curl访问192.168.1.99, 可以看到http请求会以轮询的方式被分别转发到的192.168.1.12和192.168.1.13:
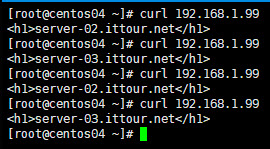
在浏览器中访问时由于浏览器缓存可能没那么明显。
Director(192.168.1.11)上的配置:
# ifconfig enp0s3:0 192.168.1.99 netmask 255.255.255.255 up
# ipvsadm -C
# ipvsadm -A -t 192.168.1.99:80 -s rr
# ipvsadm -a -t 192.168.1.99:80 -r 192.168.1.12 -g
# ipvsadm -a -t 192.168.1.99:80 -r 192.168.1.13 -g
# iptables -F
DR模式不使用隧道设备tunl0, 而是把虚拟IP配置本地网卡别名enp0s3:0上,添加Real Server时指定模式为-g。也有人说把虚拟IP配置在lookback别名上,实测配置在loopback好像对real server的轮询切换并不那么及时。
Real Server(192.168.1.12,192.168.1.13)上的配置:
# ifconfig enp0s3:0 192.168.1.99 netmask 255.255.255.255 up
# echo "1" > /proc/sys/net/ipv4/conf/enp0s3/arp_ignore
# echo "2" > /proc/sys/net/ipv4/conf/enp0s3/arp_announce
# echo "1" > /proc/sys/net/ipv4/conf/all/arp_ignore
# echo "2" > /proc/sys/net/ipv4/conf/all/arp_announce
# iptables -F
如需网络内核参数永久生效请修改/etc/sysctl.conf (最好这样做):
# cat <<EOF >> /etc/sysctl.conf
net.ipv4.conf.enp0s3.arp_ignore = 1
net.ipv4.conf.enp0s3.arp_announce = 2
net.ipv4.conf.all.arp_ignore = 1
net.ipv4.conf.all.arp_announce = 2
EOF
# sysctl -p
Real Server中同样要配置虚拟IP,并设置不响应对192.168.1.99的arp查询,Web Server的配置与TUN模式相同。
配置完成。
Tips:
如果在Director上也有web服务,还可以把Director(192.168.1.11)也作为Real Server使用。
关于arp_ignore, arp_announce, rp_filter参数的作用,请参见:
上述配置在firewalld为运行状态并且SELinux为Enforcing状态时测试通过。
所有的网络参数配置均为临时立即生效,若要长久生效,请修改/etc/sysctl.conf文件,并执行sysctl -p
# vi /etc/sysctl.conf
# sysctl -p
ipvsadm配置的内容在系统重启后也会丢失,可能通过ipvsadm -Sn保存到文件,然后可通过ipvsadm –restore加载。
注意ipvsadm的-S(–save)一起要跟上n参数,否则会保存错误的IP地址。
[root@centos01 ~]# ipvsadm -Ln
IP Virtual Server version 1.2.1 (size=4096)
Prot LocalAddress:Port Scheduler Flags
 -> RemoteAddress:Port Forward Weight ActiveConn InActConn
TCP 192.168.1.99:80 rr
 -> 192.168.1.12:80 Route 1 0 7
 -> 192.168.1.13:80 Route 1 0 4
[root@centos01 ~]# ipvsadm -Sn > ipvsadm.conf
[root@centos01 ~]# cat ipvsadm.conf
-A -t 192.168.1.99:80 -s rr
-a -t 192.168.1.99:80 -r 192.168.1.12:80 -g -w 1
-a -t 192.168.1.99:80 -r 192.168.1.13:80 -g -w 1
[root@centos01 ~]# ipvsadm -C
[root@centos01 ~]# cat ipvsadm.conf | ipvsadm --restore
[root@centos01 ~]# ipvsadm -Ln
IP Virtual Server version 1.2.1 (size=4096)
Prot LocalAddress:Port Scheduler Flags
 -> RemoteAddress:Port Forward Weight ActiveConn InActConn
TCP 192.168.1.99:80 rr
 -> 192.168.1.12:80 Route 1 0 4
 -> 192.168.1.13:80 Route 1 0 4
如果遇到转发故障可通过tcpdump进行诊断。如:监听接口enp0s3,抓取host为192.168.1.99并且目的端口为80,或host为192.168.1.12并且源端口为80的数据包:
# tcpdump -i enp0s3 '((dst port 80) and (host 192.168.1.99)) or ((src port 80) and (host 192.168.1.12))'
关于LVS的调度算法请参见:LVS集群的负载调度
如下代码片断展示了怎样在C#中使用反射调用参数中包含Lambda表达式的方法: GetData(Expression<Func<ExampleEntity, bool>>), 以及根据条件动态选择无参和有参方法:
using System;
using System.Linq;
using System.Linq.Expressions;
using System.Reflection;

namespace ReflectCallGenericMethod
{
    class Program
    {
        static void Main(string[] args)
        {
            Assembly assembly = Assembly.GetExecutingAssembly();
            Type typeService = assembly.GetTypes()
                .Where(t => t.IsClass && t.Name == "ExampleService").SingleOrDefault();
            Type typeEntity = assembly.GetTypes()
                .Where(t => t.IsClass && t.Name == "ExampleEntity").SingleOrDefault();

            ParameterExpression paramExp = Expression.Parameter(typeEntity);
            Expression expression = null;
            Type[] types = Type.EmptyTypes;
            object[] parameters = null;

            var condition = Console.ReadLine();

            if (condition.Length > 0)//如果需要过滤数据
            {
                Expression propExp = Expression.Property(paramExp, "ID");
                Expression constExp = Expression.Constant(3);
                expression = Expression.Equal(propExp, constExp);

                Type delegateType = typeof(Func<,>).MakeGenericType(typeEntity, typeof(bool));
                LambdaExpression lambda = Expression.Lambda(delegateType, expression, paramExp);
                types = new[] { lambda.GetType() };
                parameters = new[] { lambda };
            }

            MethodInfo methodGetInstance = typeService.GetMethod("GetInstance");
            MethodInfo methodGetData = typeService.GetMethod("GetData", types);

            var instanceService = methodGetInstance.Invoke(null, null);
            string result = methodGetData.Invoke(instanceService, parameters) as string;

            Console.WriteLine(result);
            Console.ReadLine();
        }
    }

    public class ExampleService
    {
        private static readonly Object _mutex = new Object();
        volatile static ExampleService _instance;

        public static ExampleService GetInstance()
        {
            if (_instance == null)
            {
                lock (_mutex)
                {
                    if (_instance == null)
                    {
                        _instance = new ExampleService();
                    }
                }
            }

            return _instance;
        }

        public string GetData()
        {
            return "无参方法被调用";
        }

        public string GetData(Expression<Func<ExampleEntity, bool>> lambda)
        {
            return "有参方法被调用";
        }

        public string GetGenericData<ExampleEntity>()
        {
            return "无参泛型方法被调用";
        }

        public string GetGenericData<ExampleEntity>(Expression<Func<ExampleEntity, bool>> lambda)
        {
            return "有参泛型方法被调用";
        }
    }

    public class ExampleEntity
    {
        public int ID { get; set; }
        public string Name { get; set; }
    }
}
但这种却不能用于有Generic Arguments的方法,如上面代码片断中的GetGenericData方法,有Generic Arguments只能通过GetMember方法迂回的解决,详细参见: https://blogs.msdn.microsoft.com/yirutang/2005/09/14/getmethod-limitation-regarding-generics/