有这样一个组织为了推动整个互联网环境的安全,免费提供跟你网站域名匹配的并且被各大浏览器信任的SSL证书,这个组织的名称叫做ISRG — Internet Security Research Group,ISGR提供了一个服务叫Let’s Encrypt (https://letsencrypt.org),网民们可以方便的使用该网站免费创建属于自己的SSL证书。并且ISGR允许免费创建泛域名SSL证书。
下面就来说说怎样使用Let’s Encrypt提供的服务免费创建泛域名证书。
假设场景:
- 小张注册了一个域名:example.com
- 小张想建一个网站,域名为 www.example.com和example.com
- 小张又想建一个博客,域名为blog.example.com
- 小张又想建一个论坛,域名为forum.example.com
- 以上网址都以HTTPS的方式访问
- 环境: CentOS 7 + Nginx 1.13
- 工具: openssl, https://www.sslforfree.com
一个支持多域名的证书可以满足上述需求,该证书需要绑定两个域名example.com和*.example.com, 下面详表过程:
一、创建Private Key(私钥)
关系到数据安装的一个Key, 千万不能泄漏。使用openssl生成2048位私钥,输出文件名为example.com.key:
# openssl genrsa -out example.com.key 2048
二、为绑定多域名创建配置文件
从/etc/pki/tls/openssl.cnf复制一个文件example.com.cnf
# cp /etc/pki/tls/openssl.cnf example.com.cnf
修改example.com.cnf:
1. 找到[ req ]节中被注释掉的req_extensions = v3_req,去除行首的#使其生效,或添加对应内容:
[ req ]
...
req_extensions = v3_req # The extensions to add to a certificate request
...
2. 找到[ v3_req ]节添加subjectAltName,内容如下:
[ v3_req ]
subjectAltName = @alt_names
3. 添加[ alt_names ]小节,并在下面添加DNS.1 和 DNS.2分别等天example.com和*.example.com:
[ alt_names ]
DNS.1 = example.com
DNS.2 = *.example.com
保存退出编辑器。
三、使用openssl创建CSR (Certificate Signing Request)文件
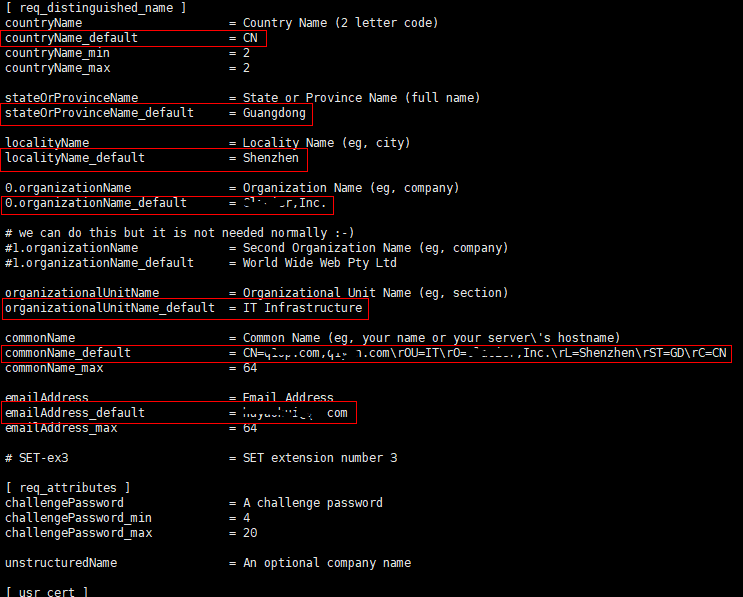
使用前面步骤创建的Private Key和cnf文件作为输入参数,生成CSR, 过程中需要填写证书申请的相关信息,包括国家代码,州省,城市,证书所属组织名称,证书显示名称等,按向导依次填即可:
# openssl req -new -key example.com.key -out example.com.csr -config example.com.cnf
You are about to be asked to enter information that will be incorporated
into your certificate request.
What you are about to enter is what is called a Distinguished Name or a DN.
There are quite a few fields but you can leave some blank
For some fields there will be a default value,
If you enter '.', the field will be left blank.
-----
Country Name (2 letter code) [XX]:CN
State or Province Name (full name) []:Guangdong
Locality Name (eg, city) [Default City]:Shenzhen
Organization Name (eg, company) [Default Company Ltd]:
Organizational Unit Name (eg, section) []: Thomas
Common Name (eg, your name or your server's hostname) []:example.com
Email Address []:

Please enter the following 'extra' attributes
to be sent with your certificate request
A challenge password []:
An optional company name []:
还有一种更快捷的方法是在cnf文件中把所有内容填好,在向导中就只需要按回车就好了:
查验Request文件:
# openssl req -in example.com.csr -noout -text
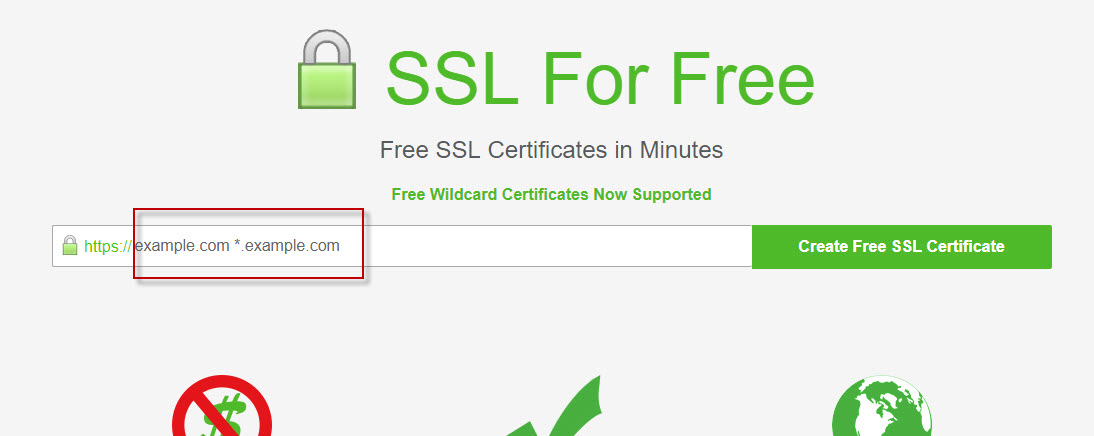
四、访问sslforfree.com,生成证书:
1. 在浏览器中输入网址:https://www.sslforfree.com, 然后在sslforfree的网站的域名输入框中输入example.com *.example.com,点击Create Free SSL Certificate按钮继续:
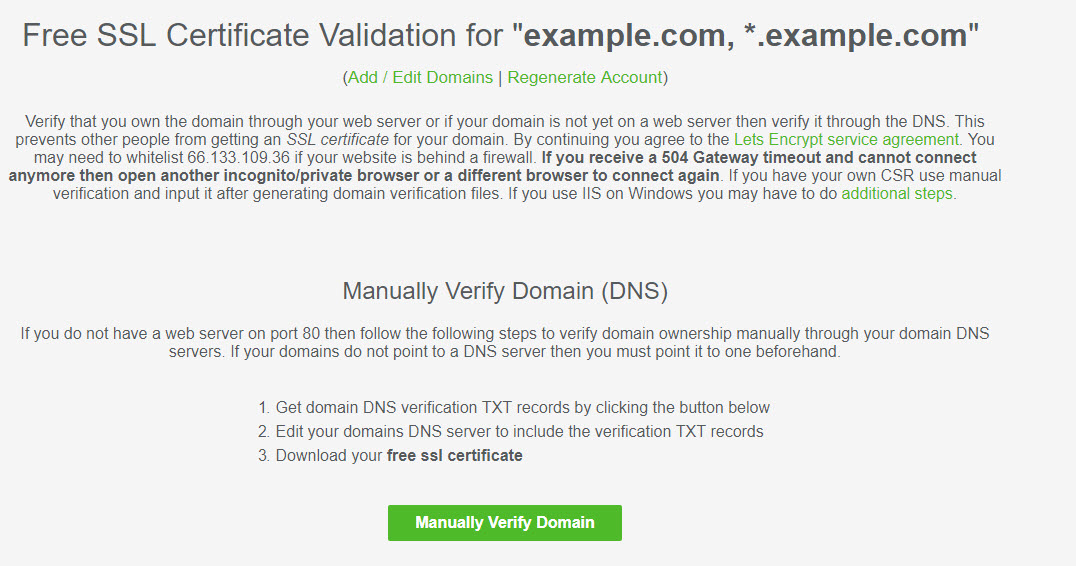
2. 然后sslforfree网站会提示你需要验证该域名是否为你所有,点击Manually Verify Domain按钮继续:
3. 你需要根据网站给出的值,在你的域名注册商那里添加两个TXT记录,添加完成等该记录生效后,勾选I Have My Own CSR复选框,把前面使用openssl创建的CSR文件的内容粘贴到下面的文本框里,然后点击Download SSL Certificate按钮
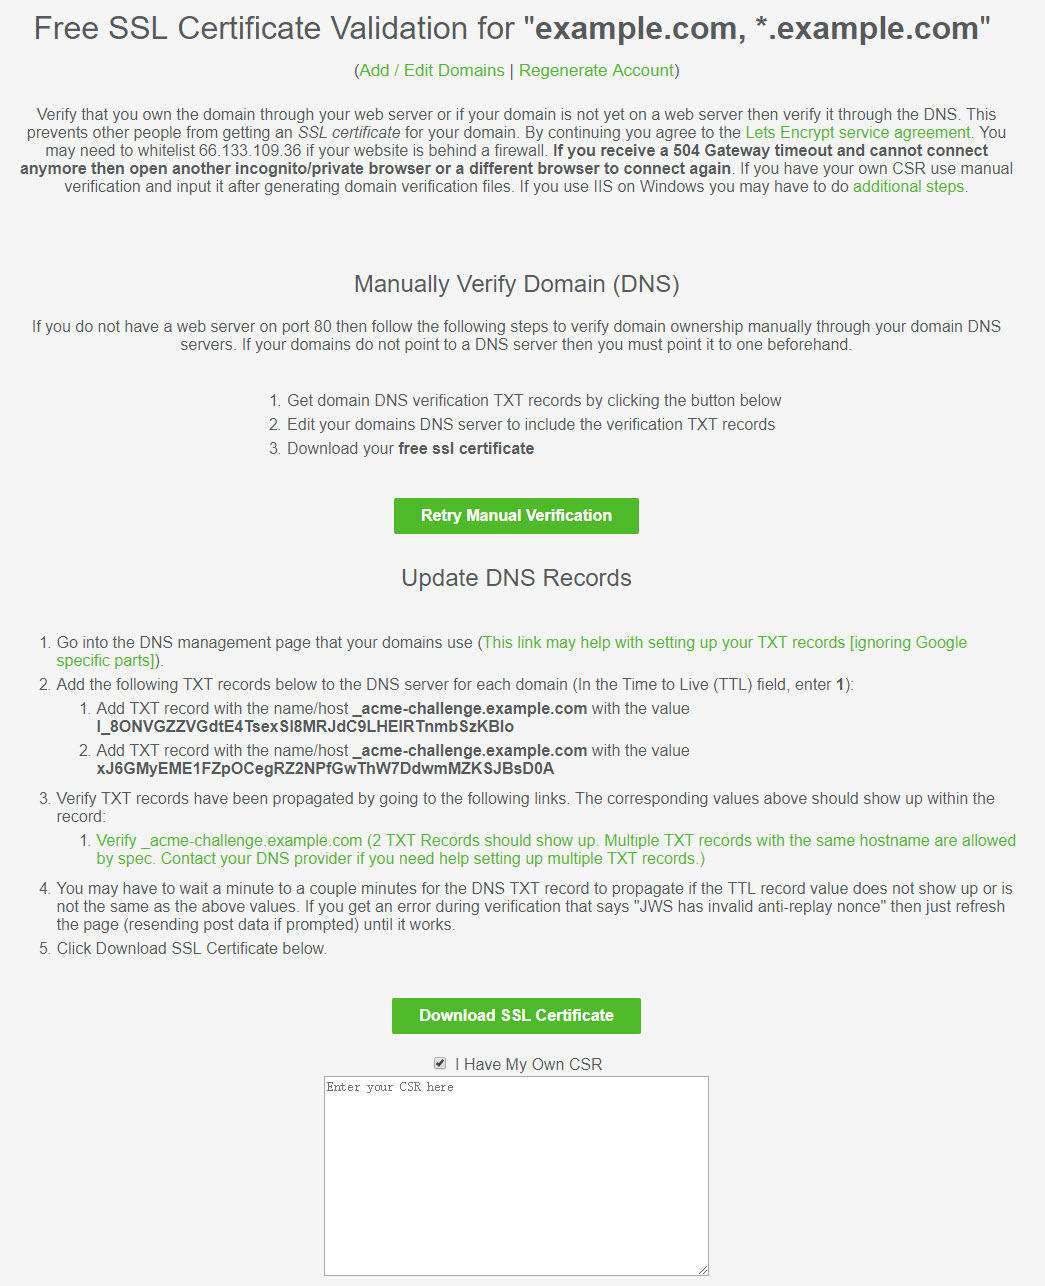
如果TXT记录校验通过,ssoforfree网站就会显示出颁发的证书内容了。你可以从文本框中复制PEM格式的证书内容,也可以直接点击下载包含证书文件的ZIP包。
注意,如果CSR文件是你自己提供的,那么下载的ZIP包中是不包含你的Private Key的,你需要保存好你之前使用openssl生成的Private Key文件。
五、在nginx中配置SSL证书
1. 生成dhparam文件:
# openssl dhparam -out dhparam.pem 2048
2. 把完整证书链保存在一个文件中
sslforfree网站提供的证书的证书路径如下:

如果要想你的网站证书能受到信任并兼容所有设备(如Android设备上的浏览器),必须要把你的证书和根证书所有颁发机构的证书放在一个文件中,提供给客户端下载。从sslforfree下载的ZIP包中有ca-bundle.crt和certificate.crt, 把这两个文件的内容粘贴到一个文件中。把certificate.crt文件中的内容放前面,ca-bundle.crt中的内容放后面。根据我们的假设的例子,文件另存为example.com.pem。示例内容如下:
-----BEGIN CERTIFICATE-----
[example.com证书内容]
-----END CERTIFICATE-----
-----BEGIN CERTIFICATE-----
[ca_bundle.crt证书链内容]
-----END CERTIFICATE-----
2. 在nginx.conf中添加ssl配置,包括 HTTP Header: Strict-Transport-Security, 指定ssl_certificate, ssl_certificate_key,ssl_dhparam, 支持的协议:TLSv1 TLSv1.1 TLSv1.2等,如下所示:
server {
    listen 443 ssl;
    server_name example.com www.example.com blog.example.com forum.example.com;

    add_header Strict-Transport-Security max-age=31536000;
    add_header X-Frame-Options DENY;
    add_header X-Content-Type-Options nosniff;

    ssl on;
    ssl_certificate /etc/ssl/example.com.pem;
    ssl_certificate_key /etc/example.com.key;

    ssl_prefer_server_ciphers on;
    ssl_dhparam /etc/ssl/dhparam.pem;
    ssl_protocols TLSv1 TLSv1.1 TLSv1.2;
    ssl_ciphers "EECDH+ECDSA+AESGCM EECDH+aRSA+AESGCM EECDH+ECDSA+SHA384 EECDH+ECDSA+SHA256 EECDH+aRSA+SHA384 EECDH+aRSA+SHA256 EECDH+aRSA+RC4 EECDH EDH+aRSA !aNULL !eNULL !LOW !3DES !MD5 !EXP !PSK !SRP !DSS !RC4";
    keepalive_timeout 70;
    ssl_session_cache shared:SSL:10m;
    ssl_session_timeout 10m;
配置完成让nginx reload配置文件,访问网站就可以看到期待的锁图标及“安全”标识了。
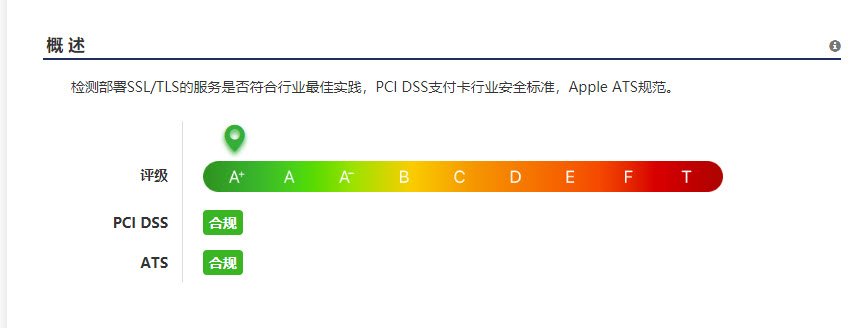
六、安全检测
打开网站https://myssl.com/输入你的网址检测一下,看是不是达到的A+级安全标准:).
参考:
- 国家代码列表: https://www.digicert.com/ssl-certificate-country-codes.htm
- Nginx 配置 SSL 证书 + 搭建 HTTPS 网站教程: https://www.cnblogs.com/chjbbs/p/5748369.html
- 使用Alternative Name创建多域名SSL证书:
从Private key导出Public Key
PEM格式转为ssh-rsa格式:
使用ssh-keygen生成SSH Key Pair: