Create a custom Application icon on Ubuntu

Create text file like below:

[Desktop Entry]
Type=Application
Encoding=UTF-8
Name=MyApplication
Comment=My fancy new application
Exec=my_application
Icon=my_application.png
Terminal=false

Name it as YOUR_APP_NAME.desktop, and then put it into /usr/share/applications for anyone; or put it into ~/.local/share/applications for current user only. Then you will see it in the Applications list

Ref: https://askubuntu.com/questions/1026528/adding-custom-programs-to-favourites-of-ubuntu-dock

NTP synchronized cannot set to yes

CentOS 7.5, 配置过ntpd与某个时间服务器同步后,偶然发现某一个节点的NTP synchronized一直是no:

# timedatectl
      Local time: 二 2019-07-30 09:41:08 CST
  Universal time: 二 2019-07-30 01:41:08 UTC
        RTC time: 二 2019-07-30 01:08:13
       Time zone: Asia/Shanghai (CST, +0800)
     NTP enabled: yes
NTP synchronized: no
 RTC in local TZ: no
      DST active: n/a

停掉ntpd, 执行ntpd -gq重新调整时间后,再启动ntpd:

# systemctl stop ntpd
# ntpd -gq
ntpd: time slew +0.000041s
# systemctl start ntpd

等待一会儿后,NTP synchronized恢复成yes:

# timedatectl
      Local time: 二 2019-07-30 09:44:28 CST
  Universal time: 二 2019-07-30 01:44:28 UTC
        RTC time: 二 2019-07-30 01:44:28
       Time zone: Asia/Shanghai (CST, +0800)
     NTP enabled: yes
NTP synchronized: yes
 RTC in local TZ: no
      DST active: n/a

Ref: https://askubuntu.com/questions/929805/timedatectl-ntp-sync-cannot-set-to-yes

Disable Out of memory killer in linux

By default Linux has a somewhat brain-damaged concept of memory management: it lets you allocate more memory than your system has, then randomly shoots a process in the head when it gets in trouble. (The actual semantics of what gets killed are more complex than that – Google “Linux OOM Killer” for lots of details and arguments about whether it’s a good or bad thing).


To restore some semblance of sanity to your memory management:

  1. Disable the OOM Killer (Put vm.oom-kill = 0 in /etc/sysctl.conf)
  2. Disable memory overcommit (Put vm.overcommit_memory = 2 in /etc/sysctl.conf)
    Note that this is a trinary value: 0 = “estimate if we have enough RAM”, 1 = “Always say yes”, 2 = “say no if we don’t have the memory”)

These settings will make Linux behave in the traditional way (if a process requests more memory than is available malloc() will fail and the process requesting the memory is expected to cope with that failure).

Reboot your machine to make it reload /etc/sysctl.conf, or use the proc file system to enable right away, without reboot:

echo 2 > /proc/sys/vm/overcommit_memory 


refer: https://serverfault.com/questions/141988/avoid-linux-out-of-memory-application-teardown

Split string to array by delimiter in shell

#!/bin/bash

STR="Sarah,Lisa,Jack,Rahul,Johnson" #String with names
IFS=',' read -ra NAMES <<< "$STR" #Convert string to array

#Print all names from array
for name in "${NAMES[@]}"; do
  echo $name
done

#Print index from array
for name in "${!NAMES[@]}"; do
  echo $name
done

ref: https://tecadmin.net/split-a-string-on-a-delimiter-in-bash-script/

cut与awk


取field2:

# echo field1 field2 field3 | awk '{print $2}'


取value:

# echo key:value | cut -d: -f2

组合使用 cut / awk 去除冒号后面值的空格

#echo namespace: lucky-cat | grep --max-count=1 namespace: | cut -d: -f2 | awk '{$1=$1;print}'

CentOS 7重命名一个网卡

把网卡enp0s3改成eth0

# ip link set enp0s3 down
# ip link set enp0s3 name eth0
# ip link set eth0 up

但这样修改在系统重启后还是会回到原来的名字,因为系统启动后会按照规则重新进行硬件扫描并命名,所有有效的方法是修改/etc/sysconfig/network-scripts下以ifcfg-开头的文件,在网卡接口对应的文件中配置HWADDR:

...

HWADDR=xx:xx:xx:xx:xx:xx
DEVICE=eth0
...

如果系统过程中找到了与ifcfg-xx文件中HWADDR匹配MAC地址的网卡,则系统以ifcfg-xx文件中指定的DEVICE的值作为网卡名称。


网卡命名过程(以下内容摘自:http://blog.sina.com.cn/s/blog_704836f40102w36n.html):

==========================================

按照如下顺序执行udev的rule
1./usr/lib/udev/rules.d/60-net.rules
2./usr/lib/udev/rules.d/71-biosdevname.rules
3./lib/udev/rules.d/75-net-description.rules
4./usr/lib/udev/rules.d/80-net-name-slot.rules
60-net.rules 
使用/lib/udev/rename_device这个程序,去查询/etc/sysconfig/network-scripts/下所有以ifcfg-开头的文件
如果在ifcfg-xx中匹配到HWADDR=xx:xx:xx:xx:xx:xx参数的网卡接口
则选取DEVICE=yyyy中设置的名字作为网卡名称。
71-biosdevname.rules
如果系统中安装了biosdevname,且内核参数未指定biosdevname=0,且上一步没有重命名网卡,则按照biosdevname的命名规范,从BIOS中取相关信息来命名网卡。
主要是取SMBIOS中的type 9 (System Slot) 和 type 41 (Onboard Devices Extended Information)
不过要求SMBIOS的版本要高于2.6,且系统中要安装biosdevname程序。
75-net-description.rules
udev通过检查网卡信息,填写如下这些udev的属性值
ID_NET_NAME_ONBOARD
ID_NET_NAME_SLOT
ID_NET_NAME_PATH
ID_NET_NAME_MAC 
80-net-name-slot.rules
如果在60-net.rules ,71-biosdevname.rules这两条规则中没有重命名网卡,且内核未指定net.ifnames=0参数
则udev依次尝试使用以下属性值来命名网卡,如果这些属性值都没有,则网卡不会被重命名。
ID_NET_NAME_ONBOARD
ID_NET_NAME_SLOT
ID_NET_NAME_PATH
上边的71-biosdevname.rules 是实际执行biosdevname的policy
75-net-description.rules和80-net-name-slot.rules实际执行Scheme 1,2,3
根据上述的过程,可见网卡命名受 biosdevname和net.ifnames这两个内核参数影响。
这两个参数都可以在grub配置中提供。

==========================================

CentOS7中的几个磁盘操作指令

常用的磁盘操作命令有fdisk, cfdisk, sfdisk, mkfs, parted, partprobe kpartx, 在Linux中挂载一个新磁盘时,常用到如下操作:

1. fdisk

fdisk可以用于查看指定硬盘的分区或对指定硬盘进行分区:

如显示所有分区:

# fdisk -l

Disk /dev/vda: 26.8 GB, 26843545600 bytes, 52428800 sectors
Units = sectors of 1 * 512 = 512 bytes
Sector size (logical/physical): 512 bytes / 512 bytes
I/O size (minimum/optimal): 512 bytes / 512 bytes
Disk label type: dos
Disk identifier: 0x0008f170

   Device Boot      Start         End      Blocks   Id  System
/dev/vda1   *        2048    52428749    26213351   83  Linux

查看帮助信息:

# fdisk -h
Usage:
 fdisk [options]     change partition table
 fdisk [options] -l  list partition table(s)
 fdisk -s       give partition size(s) in blocks

Options:
 -b              sector size (512, 1024, 2048 or 4096)
 -c[=]           compatible mode: 'dos' or 'nondos' (default)
 -h                    print this help text
 -u[=]           display units: 'cylinders' or 'sectors' (default)
 -v                    print program version
 -C            specify the number of cylinders
 -H            specify the number of heads
 -S            specify the number of sectors per track

根据向导对硬盘/dev/sdb进行分区:

# fdisk /dev/sdb
Welcome to fdisk (util-linux 2.23.2).

Changes will remain in memory only, until you decide to write them.
Be careful before using the write command.


Command (m for help): m
Command action
   a   toggle a bootable flag
   b   edit bsd disklabel
   c   toggle the dos compatibility flag
   d   delete a partition
   g   create a new empty GPT partition table
   G   create an IRIX (SGI) partition table
   l   list known partition types
   m   print this menu
   n   add a new partition
   o   create a new empty DOS partition table
   p   print the partition table
   q   quit without saving changes
   s   create a new empty Sun disklabel
   t   change a partition's system id
   u   change display/entry units
   v   verify the partition table
   w   write table to disk and exit
   x   extra functionality (experts only)

2. mkfs 

用ext4格式格式化硬盘分区/dev/sdb1

# mkfs -t ext4 /dev/sdb1

# mkfs.ext4 /dev/sdb1

详细帮助信息:

# mkfs --help
Usage:
 mkfs [options] [-t ] [fs-options]  []

Options:
 -t, --type=  filesystem type; when unspecified, ext2 is used
     fs-options     parameters for the real filesystem builder
            path to the device to be used
              number of blocks to be used on the device
 -V, --verbose      explain what is being done;
                      specifying -V more than once will cause a dry-run
 -V, --version      display version information and exit;
                      -V as --version must be the only option
 -h, --help         display this help text and exit

3. df
查看磁盘使用情况:

# df -h

4. blkid
显示block devices信息:

# blkid
/dev/sda2: UUID="cc648f16-2695-451d-a133-e90b5ea8add3" TYPE="ext3"
/dev/sda1: UUID="3cb0a414-123d-4728-aca2-6d18e24e272e" TYPE="ext3"
/dev/sda3: UUID="dc6e8463-90c7-419b-8ce0-0f6adf6d870f" TYPE="swap"
/dev/sdb: UUID="840d4ffe-00ce-4a2e-83c8-b8b94e6d005b" TYPE="ext4"

5. mount
装载分区到指定目录。如装载ext4分区/dev/sdb1到/data目录:

# mount -t ext4 /dev/sdb1 /data

/data目录要事先存在。

[source]支持多种标识,如:

# mount -t ext4 -U 840d4ffe-00ce-4a2e-83c8-b8b94e6d005b /data

# mount -t ext4 UUID="840d4ffe-00ce-4a2e-83c8-b8b94e6d005b" /data

mount –all则装载/etc/fstab中的所有配置。

5. /etc/fstab
mount指令装载在重启后会丢失,修改/etc/fstab文件可在系统重启后保持装载:

UUID=cc648f16-2695-451d-a133-e90b5ea8add3   /                       ext3    defaults        1 1
UUID=3cb0a414-123d-4728-aca2-6d18e24e272e   /boot                   ext3    defaults        1 2
UUID=dc6e8463-90c7-419b-8ce0-0f6adf6d870f   swap                    swap    defaults        0 0
UUID=840d4ffe-00ce-4a2e-83c8-b8b94e6d005b   /var/opt                ext4    defaults        1 0

fstab文件也支持Label和UUID多种分区标识。详见:http://man7.org/linux/man-pages/man5/fstab.5.html

CentOS 7中配置Keepalived-LVS高可用集群

上一篇文章中描述了LVS的配置,但LVS有一个缺陷:不探测Real Server的状态,就算是Real Server宕机,LVS也会把请求转发过去。

使用Keepalived可以弥补LVS的缺陷,还可以实现LVS Director的冗余备份,keepalived会根据主机的健康状况让VIP在LVS Director之间漂移。同时Keepalived还可以替代ipvsadm工具,在keepalived配置文件中直接完成LVS的配置。

1. 配置网络结构:
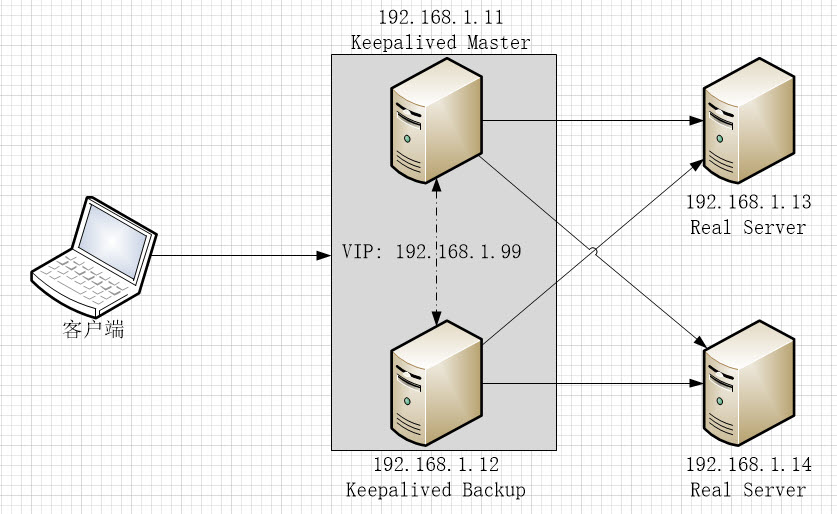
  • 192.168.1.11和192.168.1.12是互为备份的LVS Director, 192.168.1.11默认为MASTER, 192.168.1.12为BACKUP
  • 192.168.1.99是LVS Director的虚拟IP,当192.168.1.11正常工作时,它会通过VRRPv2协议向广播网段发送ARP数据包,声明192.168.1.99为其所有,当192.168.1.11宕机时,192.168.1.12会立即接管该工作,声明192.168.1.99的所有权并响应用户请求
  • 192.168.1.13和192.168.1.14是 Real Server,  上面有监听在80端的Web 服务

2. Keepalived主机安装配置

1. 在192.168.1.11和192.168.1.12上安装keepalived, 安装完成后修改配置文件/etc/keepalived/keepalived.conf。

# yum install keepalived -y
# vi /etc/keepalived/keepalived.conf

详细配置参数说明请参见官方文档:http://www.keepalived.org/doc/configuration_synopsis.html

2. 配置MASTER节点(192.168.1.11),配置文件内容如下。关键配置内容添加了注释:

! Configuration File for keepalived

global_defs {
   router_id LVS_11                         #节点ID,每个节点的值唯一
   vrrp_skip_check_adv_addr
   vrrp_strict                              #严格遵守VRRP,三种情况将会阻止keepalived (1.无VIPs, 2.unicast peers,3.IPv6 addresses in VRRP version 2)
   vrrp_garp_interval 0
   vrrp_gna_interval 0
}

vrrp_instance VI_1 {                        #定义一个实例(高可用集群)
    state MASTER                            #节点在Keepalived中定义为MASTER
    interface enp0s3                        #指定节点发送ARP数据报时使用的网关设备
    virtual_router_id 51                    #Virtual Router ID, 数字格式,集群中的所有节点值要相同,
    priority 101                            #节点优先级,MASTER节点要比其它节点的值大
    advert_int 1
    authentication {
        auth_type PASS                      #节点间的认证方式,支持PASS, HEAD
        auth_pass keepsync                  #auth_type为PASS时的主证密码,超过8位则keepalived只取前8位
    }
    virtual_ipaddress {
        192.168.1.99                        #配置虚拟IP
    }
}

--------------------------------------分割线,如果只配置Keepalived主备集群,上面的配置就可以了,下面的配置用于配置LVS--------------------------------

virtual_server 192.168.1.99 80 {            #配置LVS集群服务地址及端口
    delay_loop 6
    lb_algo lc                              #LVS请求分配算法,当前为LC,详见LVS文档
    lb_kind DR                              #LVS工作模式为DR
    persistence_timeout 50
    protocol TCP                            #LVS服务协议为TCP

    real_server 192.168.1.13 80 {           #Real Server 1 地址及端口
        weight 1                            #Real Server 1权重
        TCP_CHECK {                         #Real Server健康诊断方式为TCP_CHECK, 支持的方式有TCP_CHECK, HTTP_GET, SSL_GET, MISC_CHECK
            connect_timeout 3               #诊断间隔为3秒
            connect_port 80                 #诊断连接端口为80
        }
    }

    real_server 192.168.1.14 80 {           #Real Server 1 配置
        weight 1
        TCP_CHECK {
            connect_timeout 3
            connect_port 80
        }
    }
}

3. 配置BACKUP节点(192.168.1.12):

! Configuration File for keepalived

global_defs {
   router_id LVS_12                #每个节点唯一,与其它节点不周
   vrrp_skip_check_adv_addr
   vrrp_strict
   vrrp_garp_interval 0
   vrrp_gna_interval 0
}

vrrp_instance VI_1 {
    state BACKUP                   #指定为BACKUP模式
    interface enp0s3
    virtual_router_id 51           #与其它节点相同
    priority 100                   #优先级比MASTER低
    advert_int 1
    authentication {
        auth_type PASS
        auth_pass keepsync
    }
    virtual_ipaddress {
        192.168.1.99
    }
}

virtual_server 192.168.1.99 80 {
    delay_loop 6
    lb_algo lc
    lb_kind DR
    persistence_timeout 50
    protocol TCP

    real_server 192.168.1.13 80 {
        weight 1
        TCP_CHECK {
            connect_timeout 3
            connect_port 80
            nb_get_retry 3
            delay_before_retry 3
        }
    }

    real_server 192.168.1.14 80 {
        weight 1
        TCP_CHECK {
            connect_timeout 3
            connect_port 80
        }
    }
}

Keepalived会按TCP_CHECK中配置的connect_timeout时间间隔尝试连接real server的connect_port指定的端口,如果指定server的指定端口不可达,该real server会被从LVS集群中移除,待该server恢复后又会被自动加入到集群。

关于Health Check的详细信息请参见:http://www.keepalived.org/doc/software_design.html#healthcheck-framework

4. 在MASTER和BACKUP节点上启动并启用keepalived服务:

# systemctl start keepalived
# systemctl enable keepalived

如果Keepalived MASTER节点上安装了ipvsadm管理工具,可以看到LVS配置已经生成:

[root@centos01 ~]# ipvsadm -Ln
IP Virtual Server version 1.2.1 (size=4096)
Prot LocalAddress:Port Scheduler Flags
  -> RemoteAddress:Port           Forward Weight ActiveConn InActConn
TCP  192.168.1.99:80 lc persistent 50
  -> 192.168.1.13:80              Route   1      0          0         
  -> 192.168.1.14:80              Route   1      0          6         

5. 在MASTER和BACKUP节点上启用ip_forward:

# cat << EOF > /etc/sysctl.d/zz-keepalived.conf
net.ipv4.ip_forward = 1
EOF
# sysctl --system

/etc/sysctl.d目录下, 文件名排序越靠后,优先级越高, 所以以zz-..作为文件名前缀

3. Real Server配置

LVS工作在DR模式时,Real Server需要直接与客户端通讯,因此需要把VIP配置在Real Server上,并且不允许以该VIP的名义向广播网段发送ARP数据包,做如下配置:

# ifconfig enp0s3:0 192.168.1.99 netmask 255.255.255.255 up
# echo "1" > /proc/sys/net/ipv4/conf/enp0s3/arp_ignore
# echo "1" > /proc/sys/net/ipv4/conf/all/arp_ignore
# echo "2" > /proc/sys/net/ipv4/conf/enp0s3/arp_announce
# echo "2" > /proc/sys/net/ipv4/conf/all/arp_announce


至此,相关配置全部完成。如果Real Server上的Web服务工作正常,通过浏览器访问VIP就可以正常打开Real Server上的Web服务了,如果MASTER节点停止服务,BACKUP节点会立即接管,待MASTER恢复后则重新接管服务。如果某一个Real Server停止,则该Real Server则会被从LVS集群中移动,恢复后又会被自动加入到LVS集群中。

如果keepalived.conf文件中不配置virtual_server, keepalived就单纯提供双机热备服务,让VIP在主备机之间漂移。

为保证Keepalived 节点和Real Server之间通讯正常,最好停掉各个Server上的和防火墙(firewalld)服务,或者每改动一次配置都需要重新执行一下iptables -F。