Add File Extension to Windows IIS Container during image build

Let’s say: we need to add json file extension to the containerized IIS.

Dockerfile:

FROM {imageRegistry}/mcr.microsoft.com/dotnet/framework/aspnet:4.8-20200114-windowsservercore-ltsc2019
COPY . /inetpub/wwwroot
WORKDIR /inetpub/wwwroot

RUN C:\windows\system32\inetsrv\appcmd.exe set config "Default Web Site" -section:system.webServer/security/requestFiltering /+"fileExtensions.[fileExtension='json',allowed='True']"

ENV ASPNETCORE_URLS http://+:80
EXPOSE 80/tcp

An error occurs during build docker image:

Step 1/6 : FROM repo.q1lan.k8s:9999/mcr.microsoft.com/dotnet/framework/aspnet:4.8-20200114-windowsservercore-ltsc2019
 ---> a5bc996f06b3
Step 2/6 : COPY . /inetpub/wwwroot
 ---> bdb9536e506a
Step 3/6 : WORKDIR /inetpub/wwwroot
 ---> Running in f7666a9ffd0b
Removing intermediate container f7666a9ffd0b
 ---> c9fe76854f6c
Step 4/6 : RUN C:\windows\system32\inetsrv\appcmd.exe set config "Default Web Site" -section:system.webServer/security/requestFiltering /+"fileExtensions.[fileExtension='json',allowed='True']"
 ---> Running in 1c74d16420c2
Failed to process input: The parameter 'Web' must begin with a / or - (HRESULT=80070057).

Try to escape all double-quotes in Dockerfile:

RUN C:\windows\system32\inetsrv\appcmd.exe set config \"Default Web Site\" -section:system.webServer/security/requestFiltering /+\"fileExtensions.[fileExtension='json',allowed='True']\"

It works like a charm:

Step 1/6 : FROM repo.q1lan.k8s:9999/mcr.microsoft.com/dotnet/framework/aspnet:4.8-20200114-windowsservercore-ltsc2019
 ---> a5bc996f06b3
Step 2/6 : COPY . /inetpub/wwwroot
 ---> 646bbf3d5def
Step 3/6 : WORKDIR /inetpub/wwwroot
 ---> Running in 584471c0524a
Removing intermediate container 584471c0524a
 ---> 54f6a3ade821
Step 4/6 : RUN C:\windows\system32\inetsrv\appcmd.exe set config \"Default Web Site\" -section:system.webServer/security/requestFiltering /+\"fileExtensions.[fileExtension='json',allowed='True']\"
 ---> Running in f84c38da656a
Applied configuration changes to section "system.webServer/security/requestFiltering" for "MACHINE/WEBROOT/APPHOST/Default Web Site" at configuration commit path "MACHINE/WEBROOT/APPHOST/Default Web Site"
Removing intermediate container f84c38da656a
 ---> 7dfffe2d9813
Step 5/6 : ENV ASPNETCORE_URLS http://+:80
 ---> Running in dff81c8282f1
Removing intermediate container dff81c8282f1
 ---> cbd697556dd7
Step 6/6 : EXPOSE 80/tcp
 ---> Running in d10903bec188
Removing intermediate container d10903bec188
...

Describe Kubelet Service Parameters on Azure Windows node

Query Kubelet service

Managed by nssm

C:\k>sc qc kubelet
[SC] QueryServiceConfig SUCCESS

SERVICE_NAME: kubelet
        TYPE               : 10  WIN32_OWN_PROCESS
        START_TYPE         : 2   AUTO_START
        ERROR_CONTROL      : 1   NORMAL
        BINARY_PATH_NAME   : C:\k\nssm.exe
        LOAD_ORDER_GROUP   :
        TAG                : 0
        DISPLAY_NAME       : Kubelet
        DEPENDENCIES       : docker
        SERVICE_START_NAME : LocalSystem

Query kubelet AppParameters by nssm

C:\k>nssm get kubelet Application
C:\Windows\System32\WindowsPowerShell\v1.0\powershell.exe

C:\k>nssm get kubelet AppParameters
c:\k\kubeletstart.ps1

Powershell scripts to start kubelet

$global:MasterIP = "q1game-q1game-6adca6-e3314a8c.hcp.westus2.azmk8s.io"
$global:KubeDnsSearchPath = "svc.cluster.local"
$global:KubeDnsServiceIp = "10.0.0.10"
$global:MasterSubnet = "10.240.0.0/16"
$global:KubeClusterCIDR = "10.240.0.0/16"
$global:KubeServiceCIDR = "10.0.0.0/16"
$global:KubeBinariesVersion = "1.17.3"
$global:CNIPath = "c:\k\cni"
$global:NetworkMode = "L2Bridge"
$global:ExternalNetwork = "ext"
$global:CNIConfig = "c:\k\cni\config\$global:NetworkMode.conf"
$global:HNSModule = "c:\k\hns.psm1"
$global:VolumePluginDir = "c:\k\volumeplugins"
$global:NetworkPlugin="azure"
$global:KubeletNodeLabels="kubernetes.azure.com/role=agent,agentpool=q1win,storageprofile=managed,storagetier=Premium_LRS,kubernetes.azure.com/cluster=MC_q1game_q1game_westus2"
Write-Host "NetworkPlugin azure, starting kubelet."

# Turn off Firewall to enable pods to talk to service endpoints. (Kubelet should eventually do this)
netsh advfirewall set allprofiles state off
# startup the service

# Find if network created by CNI exists, if yes, remove it
# This is required to keep the network non-persistent behavior
# Going forward, this would be done by HNS automatically during restart of the node

$hnsNetwork = Get-HnsNetwork | ? Name -EQ azure
if ($hnsNetwork)
{
    # Cleanup all containers
    docker ps -q | foreach {docker rm $_ -f}

    Write-Host "Cleaning up old HNS network found"
    Remove-HnsNetwork $hnsNetwork
    # Kill all cni instances & stale data left by cni
    # Cleanup all files related to cni
    taskkill /IM azure-vnet.exe /f
    taskkill /IM azure-vnet-ipam.exe /f
    $cnijson = [io.path]::Combine("c:\k", "azure-vnet-ipam.json")
    if ((Test-Path $cnijson))
    {
        Remove-Item $cnijson
    }
    $cnilock = [io.path]::Combine("c:\k", "azure-vnet-ipam.json.lock")
    if ((Test-Path $cnilock))
    {
        Remove-Item $cnilock
    }

    $cnijson = [io.path]::Combine("c:\k", "azure-vnet.json")
    if ((Test-Path $cnijson))
    {
        Remove-Item $cnijson
    }
    $cnilock = [io.path]::Combine("c:\k", "azure-vnet.json.lock")
    if ((Test-Path $cnilock))
    {
        Remove-Item $cnilock
    }
}

# Restart Kubeproxy, which would wait, until the network is created
# This was fixed in 1.15, workaround still needed for 1.14 https://github.com/kubernetes/kubernetes/pull/78612
Restart-Service Kubeproxy

$env:AZURE_ENVIRONMENT_FILEPATH="c:\k\azurestackcloud.json"

c:\k\kubelet.exe --address=0.0.0.0 --anonymous-auth=false --authentication-token-webhook=true --authorization-mode=Webhook --azure-container-registry-config=c:\k\azure.json --cgroups-per-qos=false --client-ca-file=c:\k\ca.crt --cloud-config=c:\k\azure.json --cloud-provider=azure --cluster-dns=10.0.0.10 --cluster-domain=cluster.local --dynamic-config-dir=/var/lib/kubelet --enforce-node-allocatable="" --event-qps=0 --eviction-hard="" --feature-gates=RotateKubeletServerCertificate=true --hairpin-mode=promiscuous-bridge --image-gc-high-threshold=85 --image-gc-low-threshold=80 --image-pull-progress-deadline=20m --keep-terminated-pod-volumes=false --kube-reserved=cpu=100m,memory=1843Mi --kubeconfig=c:\k\config --max-pods=30 --network-plugin=cni --node-status-update-frequency=10s --non-masquerade-cidr=0.0.0.0/0 --pod-infra-container-image=kubletwin/pause --pod-max-pids=-1 --protect-kernel-defaults=true --read-only-port=0 --resolv-conf="" --rotate-certificates=false --streaming-connection-idle-timeout=4h --system-reserved=memory=2Gi --tls-cipher-suites=TLS_ECDHE_ECDSA_WITH_AES_128_GCM_SHA256,TLS_ECDHE_RSA_WITH_AES_128_GCM_SHA256,TLS_ECDHE_ECDSA_WITH_CHACHA20_POLY1305,TLS_ECDHE_RSA_WITH_AES_256_GCM_SHA384,TLS_ECDHE_RSA_WITH_CHACHA20_POLY1305,TLS_ECDHE_ECDSA_WITH_AES_256_GCM_SHA384,TLS_RSA_WITH_AES_256_GCM_SHA384,TLS_RSA_WITH_AES_128_GCM_SHA256 --node-labels=$global:KubeletNodeLabels --volume-plugin-dir=$global:VolumePluginDir --cni-bin-dir=c:\k\azurecni\bin --cni-conf-dir=c:\k\azurecni\netconf

Enable Hyper-V Isolation by modify kubelet parameters

1. Modify c:\k\kubeletstart.ps1 to add parameter to kubelet

--feature-gates="XXX=true,HyperVContainer=true"

2. Restart kubelet
C:\k>nssm restart kubelet
Kubelet: STOP: A stop control has been sent to a service that other running services are dependent on.

C:\k>sc queryex kubelet

SERVICE_NAME: kubelet
        TYPE               : 10  WIN32_OWN_PROCESS
        STATE              : 4  RUNNING
                                (STOPPABLE, PAUSABLE, ACCEPTS_SHUTDOWN)
        WIN32_EXIT_CODE    : 0  (0x0)
        SERVICE_EXIT_CODE  : 0  (0x0)
        CHECKPOINT         : 0x0
        WAIT_HINT          : 0x0
        PID                : 4044
        FLAGS              :

C:\k>taskkill /PID 4044 /F

C:\k>sc start kubelet

Restart the Windows node if necessary

Run Windows container with Hyper-V isolation mode in Kubernetes

Windows Container有两种隔离运行模式Hyper-V和Process, 参见:Isolation Modes

两种模式下的host的OS版本与containter的OS版本存在兼容性又不相同,参见:Windows container version compatibility

很明显Hyper-V模式的兼容性要比Process模式要好,向下兼容,也就是高版本的host OS可以运行低版本的container OS, 反之不行;

而Process模式下Windows Server中则要求host OS与container OS的版本完全相同, Windows 10中则不支持Process模式.


某一天,我想在Kubernetes Windows 节点中以Hyper-V模式运行Container, 于是乎发现1.17的文档中写道:

Note: In this document, when we talk about Windows containers we mean Windows containers with process isolation. Windows containers with Hyper-V isolation is planned for a future release.

不甘心又google了一下,发现:

1. 有人提了bug, 已经被修复了: https://github.com/kubernetes/kubernetes/issues/58750
2. 代码也merge了: https://github.com/kubernetes/kubernetes/pull/58751
3. 有人在测试过程中遇到问题,也解决了: https://github.com/kubernetes/kubernetes/issues/62812

但我测试的过程中却提示:

Error response from daemon: CreateComputeSystem test: The container operating system does not match the host operating system.

我的环境:

Kubernetes Ver: 1.14.8

Kubernetes Node OS Ver: Windows Server Datacenter 10.0.17763.504, 属于1809的版本

Container Base Image: windowsservercore-1709

Deployment yaml:

apiVersion: apps/v1beta2
kind: Deployment
metadata:
  labels:
    app: test
  name: test
  namespace: default
spec:
  replicas: 1
  selector:
    matchLabels:
      app: test
  template:
    metadata:
      annotations:
        experimental.windows.kubernetes.io/isolation-type: hyperv
      labels:
        app: test
...


然后对比了下github别人试成功的deployment yaml, 发现人家用的是apps/v1

apiVersion: apps/v1
kind: Deployment
metadata:
  name: whoami
  labels:
    app: whoami
spec:
  ...


目前在k8s中启用hyperv isolation的三个条件:

  1. kubelet 启用参数:  –feature-gates=HyperVContainer=true
  2. Pod/Deployment apiVersion: apps/v1
  3. spec.template.metadata.annotations[].experimental.windows.kubernetes.io/isolation-type:hyperv

参见: https://kubernetes.io/docs/setup/production-environment/windows/intro-windows-in-kubernetes/#hyper-v-isolation


目前我的云提供商给的kubernetes 1.14.8又不支持apps/v1 …

于是乎,我要么等提供商升级kubernetes,要么自己升级container OS跟kubernetes node OS一样…

Enable LFS (Large File Storage) in GitLab

Refer to official docs: https://docs.gitlab.com/ce/administration/lfs/manage_large_binaries_with_git_lfs.html

Requirements

  • Git LFS is supported in GitLab starting with version 8.2
  • Git LFS must be enabled under project settings
  • Git LFS client version 1.0.1 and up  

1. Enable LFS on GitLab Server

a). Configuration for Omnibus installations In 

/etc/gitlab/gitlab.rb:

# Change to true to enable lfs - enabled by default if not defined
gitlab_rails['lfs_enabled]=false

# Optionally, change the storage path location. Defaults to
# `#{gitlab_rails['shared_path']}/lfs-objects`. Which evaluates to
# `/var/opt/gitlab/gitlab-rails/shared/lfs-objects` by default.
gitlab_rails['lfs_storage_path']"/mnt/storage/lfs-objects"

b). Configuration for installations from source In 

config/gitlab.yml:

# Change to true to enable lfs
  lfs:
    enabled: false
    storage_path:/mnt/storage/lfs-objects

2. Submit LFS object to Git project Initialize LFS support in the project, and mark the file extensions for tracking as LFS object:

$ git clone [email protected]:group/project.git
$ git lfs install # initialize the Git LFS project
$ git lfs track "*.out" "*.so" "*.dll" "*.meta" "*.dat" "/bin/**" # select the file extensions that you want to treat as large files

Details for lfs track partten please refer to : https://git-scm.com/docs/gitignore#_pattern_format

Make sure that .gitattributes is tracked by Git. Otherwise Git LFS will not be working properly for people cloning the project:

$ git add .gitattributes
$ git commit -m "Submit lfs settings"
$ git push -u origin master

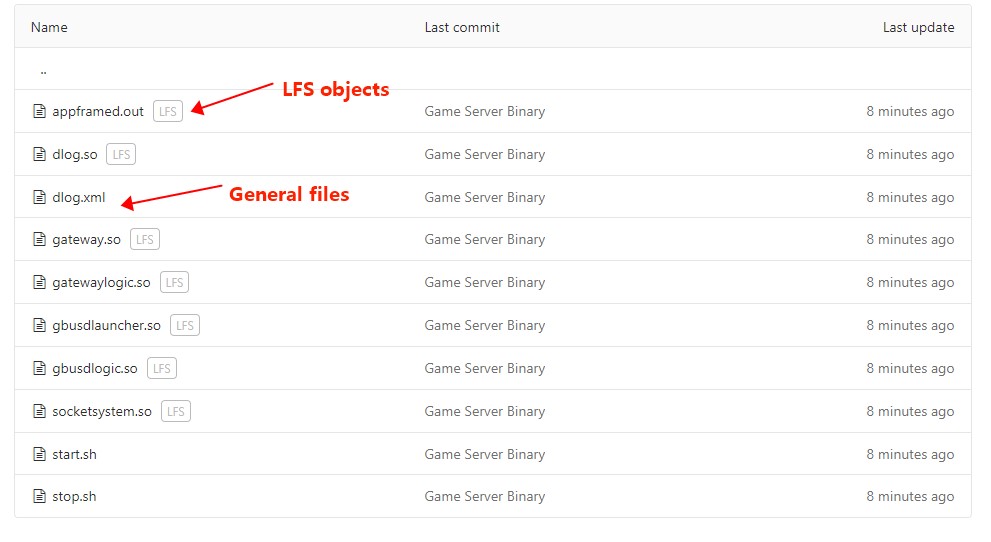
  An LFS icon is shown on files tracked by Git LFS to denote if a file is stored as a blob or as an LFS pointer. Example:

3. Pull LFS object from Git project Other user need to install git-lfs package and execute git lfs pull after clone the prjoect:

$ git clone [email protected]:group/project.git
$ git lfs pull

General “git pull” will only download index data of LFS object:

# cat appframed.out 
version https://git-lfs.github.com/spec/v1
oid sha256:e8eef08ead6e6f3ad021ba798b35d2da59f804e9dbe8aace7ed4b66d3ede1054
size 6766944

In jenkins, it needs to enable “

Git LFS pull after checkout” addtional behavior for Git repo.

Gitlab Omnisharp package – Change LDAP DN for external user

Scenario:

Change DN from “cn=李小李,ou=IT中心,ou=XX公司,dc=xx,dc=com” to “cn=李小李,ou=HR Dept,ou=XX公司,dc=xx,dc=com” for user #11.

Step 1 – Connect to boundled PostgreSQL database

# sudo gitlab-psql -d gitlabhq_production
psql (10.9)
Type "help" for help.

gitlabhq_production=#

Refer to: https://docs.gitlab.com/omnibus/settings/database.html#connecting-to-the-bundled-postgresql-database

Step 2 – Search user DN by user id in the psql shell

gitlabhq_production=# select * from identities where provider = 'ldapmain' and user_id = 11;
 id |                           extern_uid                           | provider | user_id |         created_at         |         updated_at         | saml_provider_id | secondary_extern_uid 
----+----------------------------------------------------------------+----------+---------+----------------------------+----------------------------+------------------+----------------------
  9 | cn=李小李,ou=IT中心,ou=XX公司,dc=xx,dc=com | ldapmain |      11 | 2018-06-27 15:01:13.457313 | 2019-12-19 03:26:00.777429 |                  | 
(1 row)

gitlabhq_production=#

Step 3 – Update user DN

update identities set extern_uid = CONCAT('cn=',E'\u674e',E'\u5c0f',E'\u674e',',ou='HR Dept',',ou=XX',E'\u516c',E'\u53f8',',dc=q1oa,dc=com') where provider = 'ldapmain' and user_id = 11;
UPDATE 1
gitlabhq_production=#

Notes: You can’t input chinese characters in the psql shell, so you need encode the chinese chars in unicode format and use CONCAT function to concat ascii and unicode characters in the update SQL statement. Refer to: https://kb.objectrocket.com/postgresql/use-psql-to-insert-a-record-with-unicode-characters-845

PS: In GitLab ver 12.2.5 (09f8edbc29a), it is able to modify user’s DN by : Admin Area -> Overview -> Users -> find user and switch to “Identities” tab -> Edit

Install Python 3.7.5 on CentOS 7 by source tarball

目前CentOS 7的 yum repo中只有Python 3.6.8, 项目中要使用3.7.5, 只能从源码安装

1) 安装依赖组件

# yum install gcc openssl-devel bzip2-devel libffi-devel

2) 下载Python 3.7.5源码包, 解压
From https://www.python.org/downloads/release/python-375/

# cd /usr/src
# curl https://www.python.org/ftp/python/3.7.5/Python-3.7.5.tgz -O
# tar zxvf Python-3.7.5.tgz

3) 配置安装

# cd /usr/src/Python-3.7.5
# ./configure --enable-optimizations
# make altinstall

4) 创建python软链接

安装后的Python 3.7 执行文件位于: /usr/local/bin/python3.7

# ln -s /usr/local/bin/python3.7 /usr/bin/python3
# ln -s /usr/bin/python3 /usr/bin/python

# python -V
Python 3.7.5

5) 清理

# rm -f /usr/src/Python-3.7.5.tgz

ernel:unregister_netdevice: waiting for eth0 to become free. Usage count = 1

[Copied from]: https://access.redhat.com/solutions/3659011

RHEL7 and kubernetes: kernel:unregister_netdevice: waiting for eth0 to become free. Usage count = 1

 SOLUTION VERIFIED – Updated  –

Issue

  • We are trying to prototype kubernetes on top of RHEL and encounter the situation that the device seems to be frozen. There are repeated messages similar to:
[1331228.795391] unregister_netdevice: waiting for eth0 to become free. Usage count = 1
[1331238.871337] unregister_netdevice: waiting for eth0 to become free. Usage count = 1
[1331248.919329] unregister_netdevice: waiting for eth0 to become free. Usage count = 1
[1331258.964322] unregister_netdevice: waiting for eth0 to become free. Usage count = 1
  • This problem occurs when scaling down pods in kubernetes. A reboot of the node is required to rectify.
  • This has been seen after customers upgraded to a kernel with the fix for https://access.redhat.com/solutions/3105941 But after that the messages appear on ethX instead of lo.

Environment

  • Red Hat Enterprise Linux 7
    • kernel-3.10.0-862.el7.x86_64
    • kernel-3.10.0-957.el7.x86_64
  • upstream Kubernetes
  • upstream docker

refer:

https://github.com/kubernetes/kubernetes/issues/70427


[Airflow] Change default sqlite to mysql database and manage services with systemd

上一篇文章介绍了怎样在CentOS7上快速安装airflow: /2019/10/29/setup-apache-airflow-on-centos-7

一、使用systemd管理airflow服务

1、为airflow创建user和group:

# useradd -U airflow

2、创建pid和log目录:

# mkdir -p /run/airflow
# chown airflow:airflow /run/airflow
# chmod 755 /run/airflow

# mkdir -p /var/log/airflow
# chown airflow:airflow /var/log/airflow
# chmod 755 /var/log/airflow

3、生成环境变量文件:

# cat <<EOF > /etc/sysconfig/airflow
AIRFLOW_CONFIG=/etc/airflow/airflow.cfg
AIRFLOW_HOME=/etc/airflow
EOF

4、把之前安装在~/airflow目录下的airflow移动到/etc:

# mv ~/airflow /etc/

5、修改/etc/airflow/airflow.cfg

a. 修改dags_folder, plugins_folder:

dags_folder = $AIRFLOW_HOME/dags
plugins_folder = $AIRFLOW_HOME/plugins

b. 修改各个log目录的路径:

base_log_folder = /var/log/airflow
dag_processor_manager_log_location = /var/log/airflow/dag_processor_manager/dag_processor_manager.log
child_process_log_directory = /var/log/airflow/scheduler

6、创建各个服务的systemd文件, 从github airflow代码库(https://github.com/apache/airflow/tree/master/scripts/systemd)找systemd文件模板, 创建各个服务的systemd文件, 注意修改各个文件的路径:

a. airflow webserver:

# cat <<EOF > /usr/lib/systemd/system/airflow-webserver.service
[Unit]
Description=Airflow webserver daemon
After=network.target
Wants=

[Service]
EnvironmentFile=/etc/sysconfig/airflow
User=airflow
Group=airflow
Type=simple
ExecStart=/usr/local/bin/airflow webserver --pid /run/airflow/webserver.pid
Restart=on-failure
RestartSec=5s
PrivateTmp=true

[Install]
WantedBy=multi-user.target
EOF

b. airflow scheduler:

cat <<EOF > /usr/lib/systemd/system/airflow-scheduler.service
[Unit]
Description=Airflow scheduler daemon
After=network.target
Wants=

[Service]
EnvironmentFile=/etc/sysconfig/airflow
User=airflow
Group=airflow
Type=simple
ExecStart=/usr/local/bin/airflow scheduler
Restart=always
RestartSec=5s

[Install]
WantedBy=multi-user.target
EOF

c. 其他…

二、使用MySql数据库

1、使用charset “utf8mb4″和collation “utf8mb4_general_ci”为airflow创建MySql数据库

2、安装MySql for Python的驱动pymysql

# pip3 install pymysql

3、修改/etc/airflow/airflow.cfg

a. 修改sql_alchemy_conn, 把默认的sqlite数据库修改为MySql:

sql_alchemy_conn = mysql+pymysql://{username}:{password}@{hostname}:3306/airflow

格式:{数据库类型}+{驱动}://{用户名}:{密码}@{MySql服务器地址}:{端口}/{数据库名}, 更多信息参见SqlAlchemy文档: https://docs.sqlalchemy.org/

b. 修改executor为LocalExecutor:

executor = LocalExecutor

c. 初始化MySql数据库:

# airflow initdb

三、启动webserver, scheduler等服务

# systemctl enable airflow-webserver && systemctl start airflow-webserver
# systemctl enable airflow-scheduler && systemctl start airflow-scheduler

四、其他

检查/var/log/messages查看各服务的状态,发现scheduler有奇怪错误:

Oct 31 05:56:35 build-node airflow: Traceback (most recent call last):
Oct 31 05:56:35 build-node airflow: File "/usr/lib64/python3.6/multiprocessing/process.py", line 258, in _bootstrap
Oct 31 05:56:35 build-node airflow: self.run()
Oct 31 05:56:35 build-node airflow: File "/usr/lib64/python3.6/multiprocessing/process.py", line 93, in run
Oct 31 05:56:35 build-node airflow: self._target(*self._args, **self._kwargs)
Oct 31 05:56:35 build-node airflow: File "/usr/local/lib/python3.6/site-packages/airflow/jobs/scheduler_job.py", line 128, in _run_file_processor
Oct 31 05:56:35 build-node airflow: set_context(log, file_path)
Oct 31 05:56:35 build-node airflow: File "/usr/local/lib/python3.6/site-packages/airflow/utils/log/logging_mixin.py", line 170, in set_context
Oct 31 05:56:35 build-node airflow: handler.set_context(value)
Oct 31 05:56:35 build-node airflow: File "/usr/local/lib/python3.6/site-packages/airflow/utils/log/file_processor_handler.py", line 65, in set_context
Oct 31 05:56:35 build-node airflow: local_loc = self._init_file(filename)
Oct 31 05:56:35 build-node airflow: File "/usr/local/lib/python3.6/site-packages/airflow/utils/log/file_processor_handler.py", line 141, in _init_file
Oct 31 05:56:35 build-node airflow: os.makedirs(directory)
Oct 31 05:56:35 build-node airflow: File "/usr/lib64/python3.6/os.py", line 210, in makedirs
Oct 31 05:56:35 build-node airflow: makedirs(head, mode, exist_ok)
Oct 31 05:56:35 build-node airflow: File "/usr/lib64/python3.6/os.py", line 210, in makedirs
Oct 31 05:56:35 build-node airflow: makedirs(head, mode, exist_ok)
Oct 31 05:56:35 build-node airflow: File "/usr/lib64/python3.6/os.py", line 210, in makedirs
Oct 31 05:56:35 build-node airflow: makedirs(head, mode, exist_ok)
Oct 31 05:56:35 build-node airflow: [Previous line repeated 3 more times]
Oct 31 05:56:35 build-node airflow: File "/usr/lib64/python3.6/os.py", line 220, in makedirs
Oct 31 05:56:35 build-node airflow: mkdir(name, mode)
Oct 31 05:56:35 build-node airflow: PermissionError: [Errno 13] Permission denied: '/var/log/airflow/scheduler/2019-10-31/../../../usr'

airflow scheduler尝试在/var/log/目录下创建目录, 用户airflow没有权限, 所以出现PermissionError, 如果在/var/log/目录下创建usr目录并把owner分配给airflow, 在目录 “/var/log/airflow/scheduler/2019-10-31/../../../usr/local/lib/python3.6/site-packages/airflow/example_dags/”会产生很多log文件:

# ls -la /var/log/airflow/scheduler/2019-10-31/../../../usr/local/lib/python3.6/site-packages/airflow/example_dags/
total 2212
drwxr-xr-x. 3 airflow airflow   4096 Oct 31 06:04 .
drwxr-xr-x. 3 airflow airflow     26 Oct 31 06:04 ..
-rw-r--r--. 1 airflow airflow  90610 Oct 31 06:18 docker_copy_data.py.log
-rw-r--r--. 1 airflow airflow  93636 Oct 31 06:18 example_bash_operator.py.log
-rw-r--r--. 1 airflow airflow  95777 Oct 31 06:18 example_branch_operator.py.log
-rw-r--r--. 1 airflow airflow  50840 Oct 31 06:18 example_branch_python_dop_operator_3.py.log
-rw-r--r--. 1 airflow airflow  93480 Oct 31 06:18 example_docker_operator.py.log
-rw-r--r--. 1 airflow airflow  94792 Oct 31 06:18 example_http_operator.py.log
-rw-r--r--. 1 airflow airflow  93152 Oct 31 06:18 example_latest_only.py.log
-rw-r--r--. 1 airflow airflow  98334 Oct 31 06:18 example_latest_only_with_trigger.py.log
-rw-r--r--. 1 airflow airflow 103648 Oct 31 06:18 example_passing_params_via_test_command.py.log
-rw-r--r--. 1 airflow airflow  93150 Oct 31 06:18 example_pig_operator.py.log
-rw-r--r--. 1 airflow airflow  67744 Oct 31 06:18 example_python_operator.py.log
-rw-r--r--. 1 airflow airflow  49610 Oct 31 06:18 example_short_circuit_operator.py.log
-rw-r--r--. 1 airflow airflow  92332 Oct 31 06:18 example_skip_dag.py.log
-rw-r--r--. 1 airflow airflow 101844 Oct 31 06:18 example_subdag_operator.py.log
-rw-r--r--. 1 airflow airflow  99220 Oct 31 06:18 example_trigger_controller_dag.py.log
-rw-r--r--. 1 airflow airflow  97252 Oct 31 06:18 example_trigger_target_dag.py.log
-rw-r--r--. 1 airflow airflow  90364 Oct 31 06:18 example_xcom.py.log
drwxr-xr-x. 2 airflow airflow     27 Oct 31 06:04 subdags
-rw-r--r--. 1 airflow airflow  55590 Oct 31 06:18 test_utils.py.log
-rw-r--r--. 1 airflow airflow  86240 Oct 31 06:18 tutorial.py.log

绝对路径是: “/var/log/usr/local/lib/python3.6/site-packages/airflow/example_dags/”, 搞不懂airflow scheduler为什么没有使用airflow.cfg中的log目录配置,而是使用一个相对路径. 应该是scheduler的bug, 有人已经在Airflow JIRA中提了issue, 我也把遇到的问题写在了Comment里, 见: https://issues.apache.org/jira/browse/AIRFLOW-4719
[Kubernetes] Create deployment, service by Python client

Install Kubernetes Python Client and PyYaml:

# pip install kubernetes pyyaml

1. Get Namespaces or Pods by CoreV1Api:

# -*- coding: utf-8 -*-
from kubernetes import client, config, utils

config.kube_config.load_kube_config(config_file="../kubecfg.yaml")
coreV1Api = client.CoreV1Api()

print("\nListing all namespaces")
for ns in coreV1Api.list_namespace().items:
    print(ns.metadata.name)

print("\nListing pods with their IP, namespace, names:")
for pod in coreV1Api.list_pod_for_all_namespaces(watch=False).items:
    print("%s\t\t%s\t%s" % (pod.status.pod_ip, pod.metadata.namespace, pod.metadata.name))

2. Create Deployment and Service by AppsV1Api:

# -*- coding: utf-8 -*-
from kubernetes import client, config, utils
import yaml

config.kube_config.load_kube_config(config_file="../kubecfg.yaml")
yamlDeploy = open( r'deploy.yaml')
jsonDeploy = yaml.load(yamlDeploy, Loader = yaml.FullLoader)

yamlService = open(r'service.yaml')
jsonService = yaml.load(yamlService, Loader = yaml.FullLoader)

appsV1Api = client.AppsV1Api()

if jsonDeploy['kind'] == 'Deployment':
    appsV1Api.create_namespaced_deployment(
        namespace="default", body = jsonDeploy
    )

if jsonService['kind'] == 'Service':
    coreV1Api.create_namespaced_service(
        namespace="default",
        body=jsonService
    )

3. Create ANY type of objects from a yaml file by utils.create_from_yaml, you can put multiple resources in one yaml file:

# -*- coding: utf-8 -*-
from kubernetes import client, config, utils

config.kube_config.load_kube_config(config_file="../kubecfg.yaml")

k8sClient = client.ApiClient()
utils.create_from_yaml(k8sClient, "deploy-service.yaml")

Reference:
https://github.com/kubernetes-client/python/blob/6709b753b4ad2e09aa472b6452bbad9f96e264e3/examples/create_deployment_from_yaml.py
https://stackoverflow.com/questions/56673919/kubernetes-python-api-client-execute-full-yaml-file