Install nvidia-340 driver on Ubuntu 20.04.3 LTS

在一台旧PC上安装了Ubuntu 20.04.3 LTS, 显卡是”微星N240GT-MD 暴雪512/D5″, 芯片是 Nvidia Geforce GT240, 需要安装显卡驱动

》 先是从nvidia官方网站根据显卡型号下载了NVIDIA-Linux-x86_64-340.108.run 安装过程中提示: asm/kmap_types.h: No such file or directory 没有找到有效解决办法

》 google一番后尝试直接安装nvidia-340驱动

sudo apt install nvidia-340

也是安装失败, 主要的错误是: dpkg: error: version ‘-‘ has bad syntax: revision number is empty

Setting up lib32gcc-s1 (10.3.0-1ubuntu1~20.04) ...
Setting up vdpau-driver-all:amd64 (1.3-1ubuntu2) ...
Setting up nvidia-340 (340.108-0ubuntu5.20.04.2) ...
dpkg: error: version '-' has bad syntax: revision number is empty
update-initramfs: deferring update (trigger activated)
INFO:Enable nvidia-340
DEBUG:Parsing /usr/share/ubuntu-drivers-common/quirks/dell_latitude
DEBUG:Parsing /usr/share/ubuntu-drivers-common/quirks/lenovo_thinkpad
DEBUG:Parsing /usr/share/ubuntu-drivers-common/quirks/put_your_quirks_here
Adding system user `nvidia-persistenced' (UID 127) ...
Adding new group`nvidia-persistenced' (GID 134) ...
Adding new user `nvidia-persistenced' (UID 127) with group`nvidia-persistenced' ...
Not creating home directory `/'.
Loading new nvidia-340-340.108 DKMS files...
Building for 5.11.0-40-generic Building for architecture x86_64 Building initial module for 5.11.0-40-generic
Error! Bad return status for module build on kernel: 5.11.0-40-generic (x86_64)
Consult /var/lib/dkms/nvidia-340/340.108/build/make.log for more information.
dpkg: error processing package nvidia-340 (--configure):
  installed nvidia-340 package post-installation script subprocess returned error exit status 10
Processing triggers for mime-support (3.64ubuntu1) ...
Processing triggers for gnome-menus (3.36.0-1ubuntu1) ...
Processing triggers for libc-bin (2.31-0ubuntu9.2) ...
Processing triggers for man-db (2.9.1-1) ...
Processing triggers for desktop-file-utils (0.24-1ubuntu3) ...
Processing triggers for initramfs-tools (0.136ubuntu6.6) ...
update-initramfs: Generating /boot/initrd.img-5.11.0-40-generic
I: The initramfs will attempt to resume from /dev/sda2
I: (UUID=de437dbe-e6b9-4aad-a865-3b9c62bcb807)
I: Set the RESUME variable to override this. 
Errors were encountered while processing:
  nvidia-340
E: Sub-process /usr/bin/dpkg returned an error code (1)

》 继续查找资料
* 有说是postinstall scripts中的一个bug: https://bugs.launchpad.net/ubuntu/+source/linux/+bug/1853977 第#3个回复
* 有说是nvidia-340不支持Ubuntu 20.04.3 LTS 最新的内核 5.11.0-40-generic, 后来按照 (https://askubuntu.com/questions/1284266/the-installation-of-the-nvidia-display-driver-340-fails-in-kubuntu-20-10)的说法

卸载5.11.0-40-generic, 安装5.4.0-90-generic内核后解决:

sudo apt install linux-generic
sudo apt-get remove --purge linux-*-5.11.*

重启后重新安装nvidia-340:

sudo apt install -y nvidia-340

成功!!

$ ubuntu-drivers devices
== /sys/devices/pci0000:00/0000:00:1c.0/0000:01:00.0 ==
modalias : pci:v000010DEd00000CA3sv00001462sd00002072bc03sc00i00
vendor   : NVIDIA Corporation
model    : GT215 [GeForce GT 240]
driver   : nvidia-340 - distro non-free recommended
driver   : xserver-xorg-video-nouveau - distro free builtin
A config file for Raspberry Pi 4B with OpenWrt to working as an AP

# cat /etc/config/wireless

config wifi-device 'radio0'
        option type 'mac80211'
        option path 'platform/soc/fe300000.mmcnr/mmc_host/mmc1/mmc1:0001/mmc1:0001:1'
        option hwmode '11a'
        option htmode 'VHT40'
        option channel 'auto'
        option country '00'

config wifi-iface 'wifinet0'
        option ssid 'OpenWrt'
        option encryption 'none'
        option device 'radio0'
        option mode 'ap'
        list maclist 'XX:XX:XX:XX:XX:XX'
        option macfilter 'allow'
        option network 'lan'

Gitlab Omnisharp package – Change LDAP DN for external user

Scenario:

Change DN from “cn=李小李,ou=IT中心,ou=XX公司,dc=xx,dc=com” to “cn=李小李,ou=HR Dept,ou=XX公司,dc=xx,dc=com” for user #11.

Step 1 – Connect to boundled PostgreSQL database

# sudo gitlab-psql -d gitlabhq_production
psql (10.9)
Type "help" for help.

gitlabhq_production=#

Refer to: https://docs.gitlab.com/omnibus/settings/database.html#connecting-to-the-bundled-postgresql-database

Step 2 – Search user DN by user id in the psql shell

gitlabhq_production=# select * from identities where provider = 'ldapmain' and user_id = 11;
 id |                           extern_uid                           | provider | user_id |         created_at         |         updated_at         | saml_provider_id | secondary_extern_uid 
----+----------------------------------------------------------------+----------+---------+----------------------------+----------------------------+------------------+----------------------
  9 | cn=李小李,ou=IT中心,ou=XX公司,dc=xx,dc=com | ldapmain |      11 | 2018-06-27 15:01:13.457313 | 2019-12-19 03:26:00.777429 |                  | 
(1 row)

gitlabhq_production=#

Step 3 – Update user DN

update identities set extern_uid = CONCAT('cn=',E'\u674e',E'\u5c0f',E'\u674e',',ou='HR Dept',',ou=XX',E'\u516c',E'\u53f8',',dc=q1oa,dc=com') where provider = 'ldapmain' and user_id = 11;
UPDATE 1
gitlabhq_production=#

Notes: You can’t input chinese characters in the psql shell, so you need encode the chinese chars in unicode format and use CONCAT function to concat ascii and unicode characters in the update SQL statement. Refer to: https://kb.objectrocket.com/postgresql/use-psql-to-insert-a-record-with-unicode-characters-845

PS: In GitLab ver 12.2.5 (09f8edbc29a), it is able to modify user’s DN by : Admin Area -> Overview -> Users -> find user and switch to “Identities” tab -> Edit

yum is broken after upgrade python from 2.x to 3.x on CentOS 7

yum is broken after upgrade python from 2.x to 3.x on CentOS7:

# yum
  File "/usr/bin/yum", line 30
    except KeyboardInterrupt, e:
                            ^

Resolution: modify /usr/bin/yum and /usr/libexec/urlgrabber-ext-down, change first line from “#!/usr/bin/python” to “#!/usr/bin/python2”:

#!/usr/bin/python2
import sys
try:
    import yum
except ImportError:
    print >> sys.stderr, """\
...
#! /usr/bin/python2
#  A very simple external downloader
#  Copyright 2011-2012 Zdenek Pavlas

#   This library is free software; you can redistribute it and/or
#   modify it under the terms of the GNU Lesser General Public


Setup Windows development environment for Tencent-BlueKing Standard OPS

1. Install Python 2.7 and npm tool

2. Clone source code from: https://github.com/Tencent/bk-sops

3. Run cmd shell, change current directory to root path of bk-sops

4. Install required packages by run:

pip install --proxy={proxy if any} -r requirements.txt

5. Open url “http://{BK_PAAS_HOST}/admin/app/app/” of your BlueKing paas platform, copy app-code and token for app “标准运维”(bk_sops)

6. Create a bat file and replace these variables marked with {} to real values in your environment. Run the bat file to setup env variables:

env.bat

set APP_ID=bk_sops
set APP_TOKEN={APP_TOKEN}
set BK_PAAS_HOST={BK_PAAS_HOST}
set BK_CC_HOST={BK_CC_HOST}
set BK_JOB_HOST={BK_JOB_HOST}

7. Other steps please refer to: https://github.com/Tencent/bk-sops/blob/master/docs/install/dev_deploy.md

At last, you canc reate a bat file to run local development environment quickly:

run-local-sops.bat

start cmd.exe /c "env.bat & python manage.py celery worker -l info"
start cmd.exe /c "env.bat & python manage.py celery beat -l info"
env.bat & python manage.py runserver 8000

Create standard component by run:

python manage.py create_atoms_app docker_image_tags

# Issues

1. Please download and install C++ Compiler for Python 2.7: http://aka.ms/vcpython27 if you meet the error below:

    Running setup.py install for ujson ... error
    ERROR: Command errored out with exit status 1:
     command: 'd:\python27\python.exe' -u -c 'import sys, setuptools, tokenize; sys.argv[0] = '"'"'c:\\users\\admini~1\\appdata\\local\\temp\\pip-install-jnby9g\\ujson\\setup.py'"'"'; __file__='"'"'c:\\users\\admini~1\\appdata\\local\\temp\\pip-install-jnby9g\\ujson\\setup.py'"'"';f=getattr(tokenize, '"'"'open'"'"', open)(__file__);code=f.read().replace('"'"'\r\n'"'"', '"'"'\n'"'"');f.close();exec(compile(code, __file__, '"'"'exec'"'"'))' install --record 'c:\users\admini~1\appdata\local\temp\pip-record-4zcz9a\install-record.txt' --single-version-externally-managed --compile
         cwd: c:\users\admini~1\appdata\local\temp\pip-install-jnby9g\ujson\
    Complete output (5 lines):
    running install
    running build
    running build_ext
    building 'ujson' extension
    error: Microsoft Visual C++ 9.0 is required. Get it from http://aka.ms/vcpython27
    ----------------------------------------
ERROR: Command errored out with exit status 1: 'd:\python27\python.exe' -u -c 'import sys, setuptools, tokenize; sys.argv[0] = '"'"'c:\\users\\admini~1\\appdata\\local\\temp\\pip-install-jnby9g\\ujson\\setup.py'"'"'; __file__='"'"'c:\\users\\admini~1\\appdata\\local\\temp\\pip-install-jnby9g\\ujson\\setup.py'"'"';f=getattr(tokenize, '"'"'open'"'"', open)(__file__);code=f.read().replace('"'"'\r\n'"'"', '"'"'\n'"'"');f.close();exec(compile(code, __file__, '"'"'exec'"'"'))' install --record 'c:\users\admini~1\appdata\local\temp\pip-record-4zcz9a\install-record.txt' --single-version-externally-managed --compile Check the logs for full command output.

2. Remove double quote sign from env variable values if you meet the kind of error like below:

  File "D:\Projects\BlueKing\bk-sops\blueapps\conf\log.py", line 47, in get_logging_config_dict
    os.makedirs(log_dir)
  File "D:\Python27\lib\os.py", line 157, in makedirs
    mkdir(name, mode)
WindowsError: [Error 123] The filename, directory name, or volume label syntax is incorrect: 'D:\\Projects\\BlueKing\\logs\\"bk_sops"'

3. Please install python-magic-bin if you meet the issue below:

  File "D:\Projects\BlueKing\bk-sops\gcloud\contrib\appmaker\api.py", line 16, in 
    import magic
  File "D:\Python27\lib\site-packages\magic.py", line 181, in 
    raise ImportError('failed to find libmagic.  Check your installation')
ImportError: failed to find libmagic.  Check your installation

install python-magic-bin

pip install python-magic-bin==0.4.14

4. Run `npm rebuild node-sass` to download node sass binding if you meet error during running: npm run build — –STATIC_ENV=dev

This usually happens because your environment has changed since running `npm install`.
Run `npm rebuild node-sass` to download the binding for your current environment.


Win10打开休眠模式

升级正式版win10以后,发现竟然没有休眠选项,从电源管理器里面也没有找到,有时候有些重要的工作,希望第二天打开直接在第一天的状态,不用重新打开各种文件,而电脑又没必要开一整夜,于是必需要打开休眠选项。

以管理员权限进入命令行
输入命令:

powercfg /a

查看电脑支持的睡眠模式,是否休眠未打开
如果未打开,然后输入

powercfg /h on

最后再用命令:powercfg /a 查看是否打开了休眠。
如果已经打开了,就可以去电源管理器中去设置了。

在开始菜单上右键,选择电源选项,
  选择“选择电源按钮的功能”,
  单击“更改当前不可用的设置,
  单击“更改当前不可用的设置”,
  选择需要的设置“休眠”,
  最后 “保存修改”
这样打开开始菜单,选择“电源”现在可以休眠了
———————
Refer:https://blog.csdn.net/saindy5828/article/details/72857332

What is the difference between services.AddTransient, service.AddScoped and service.AddSingleton methods in ASP.NET Core?


1. Transient objects are always different; a new instance is provided to every controller and every service.
2. Scoped objects are the same within a request, but different across different requests.
3. Singleton objects are the same for every object and every request.

Refs:
https://docs.microsoft.com/en-us/aspnet/core/fundamentals/dependency-injection?view=aspnetcore-2.2#service-lifetimes-and-registration-options
https://stackoverflow.com/questions/38138100/what-is-the-difference-between-services-addtransient-service-addscoped-and-serv

基于docker stack部署wordpress

1. Docker Hub上有关于wordpress部署方式的说明,我们使用docker stack方式部署wordpress,为便于部署其它应用,在wordpress前面部署了nginx进行反向代理,docker-compose.yml文件内容如下:

    • nginx处在frontend和backend网络中
    • wordpress处在backend网络中
    • mysql处在backend网络中
    • nginx的配置文件夹,html目录内容,log文件夹镜像到主机上(文件夹映射会自动在host与container之间同步,文件则不会,所以volumes bind最好用文件夹)
    • mysql的数据文件夹镜像到主机上
    • wordpress的完整目录(/var/www/html)镜像到主机上
    • wordpress安装目录下的wp-content文件夹保存了所有的插件及上传文件,但主程序(.php文件)在上层文件位中,为了以后的主程序升级,我们把整个目录镜像出去备份
    version: "3.3"
    services:
      nginx:
        image: nginx:1.13.8
        deploy:
          mode: "global"
          labels:
            - "position=frontend"
          resources:
            limits:
              cpus: "0.1"
              memory: 50M
          restart_policy:
            condition: any
        ports:
          - "80:80"
        volumes:
          - type: "bind"
            source: "/etc/nginx/"
            target: "/etc/nginx/"
            read_only: true
          - type: "bind"
            source: "/var/www/html/"
            target: "/usr/share/nginx/html"
            read_only: true
          - type: "bind"
            source: "/var/log/nginx/"
            target: "/var/log/nginx/"
        networks:
          - frontend
          - backend
    
      mysql5_7:
        image: mysql:5.7
        deploy:
          labels:
            - "position=backend"
          placement:
            constraints:
              - "node.role == manager"
          restart_policy:
            condition: any
        volumes:
          - type: "bind"
            source: "/var/lib/mysql5_7"
            target: "/var/lib/mysql"
        #restart: always
        environment:
          MYSQL_ROOT_PASSWORD: "**********"
          MYSQL_DATABASE: wordpress
          MYSQL_USER: wordpress
          MYSQL_PASSWORD: "**********"
        networks:
          - backend
    
      wordpress:
        depends_on:
          - mysql5_7
        image: wordpress:4.9.5-apache
        deploy:
          labels:
            - "position=backend"
          restart_policy:
            condition: any
        volumes:
          - type: "bind"
            source: "/var/lib/wordpress"
            target: "/var/www/html"
        environment:
          WORDPRESS_DB_HOST: mysql5_7:3306
          WORDPRESS_DB_USER: wordpress
          WORDPRESS_DB_PASSWORD: "***************"
        networks:
          - backend
    
    networks:
      frontend:
      backend:

    2. nginx中配置转发

    nginx.conf内容

    http {
        server {
            listen 80;
            location / {
                proxy_pass http://wordpress:80;
                proxy_set_header Host www.blog.org;
                proxy_pass_request_headers on;
            }
        }
    }
    

    3. 以stack方式部署, stack名称为web

    #docker stack deploy -c docker-compose.yml web
    

    4. 问题解决

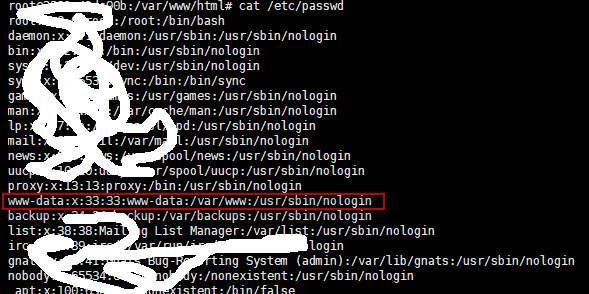
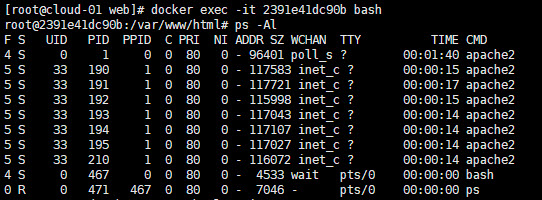
    wordpress实例在docker container中以www-data用户运行,用户id为33,如下图,在文件上传或插件更新时会提示没有文件夹写权限


    通过修改主机上的镜像文件夹owner解决,虽然该用户id在主机上并不存在:

    #chown -R 33:33 /var/lib/wordpress/
    

    5. 不提供FTP信息自动完成WordPress更新

    WordPress默认更新时需要提供FTP信息远程更新, 通过配置可能设置自动更新:
    修改wp-config.php, 添加如下内容:

    define('FS_METHOD','direct');
    同时确保wordpress根目录的Owner已经修改为33

Git常用操作

  1. 有新代码提交后文件冲突,不能pull代码,Git不能像SVN那样自动Merge,可:
    1. git stash
    2. git pull
    3. git stash pop
  2. 比较两个commit之前的修改,生成patch文件并apply到其它地方:
    1. git diff {较早commit hash} {较新commit hash} > MyPatch.diff
    2. git apply MyPatch.diff
  3. 从其它分支提取某一个提交并apply到当前分支:
    1. git cherry pick {某次commit hash}
  4. git reset [<mode>] [<commit>]
    1. mode:
      1. –hard 放弃本地修改, 重置所有文件状态和修改内容
      2. –mixed 重置所有文件状态, 保留文件内容
      3. –soft 保留本地文件状态和内容
    2. commit commit hash, HEAD, origin/<branch name>