1. 通过下载Binary包安装docker
在CentOS中,由于相关组件比较齐全,可直接下载docker的发布包直接启动,可以从下面的网页中找到下载链接:
https://docs.docker.com/install/linux/docker-ce/binaries/
https://download.docker.com/linux/static/stable/x86_64/
下载:
# curl -#O https://download.docker.com/linux/static/stable/`uname -m`/docker-17.12.1-ce.tgz
解压并Copy到/usr/bin/:
# tar xzvf docker-17.12.1-ce.tgz
# cp docker/* /usr/bin/
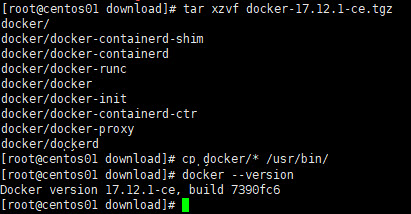
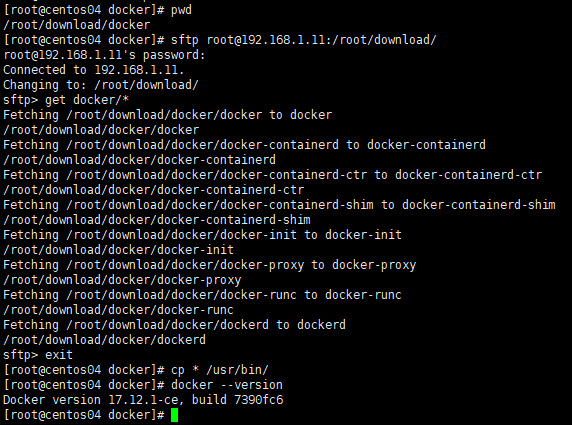
其他机器不用重复下载,sftp到第一台机器直接copy过来:
#sftp [email protected]:/root/download/
sftp> get docker/*
sftp> exit
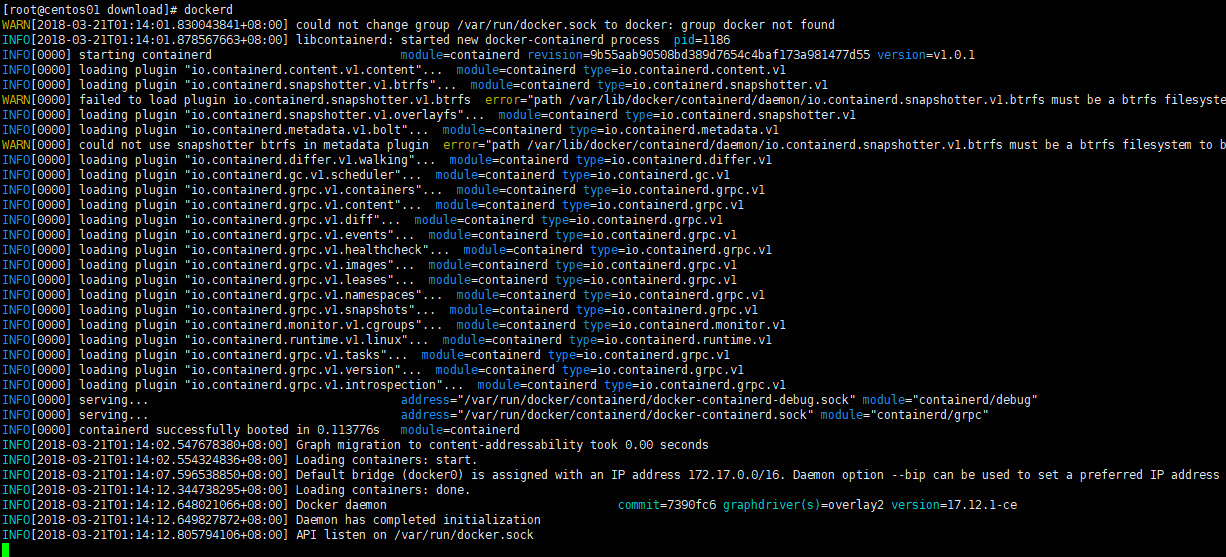
直接运行dockerd
测试一下看能否成功启动docker daemon:
接下来需要把dockerd配置成系统服务自动启动。
参照官方文档:https://docs.docker.com/config/daemon/systemd/#manually-create-the-systemd-unit-files
从https://github.com/moby/moby/tree/master/contrib/init/systemd把docker.service和docker.socket下载到/etc/systemd/system/目录
# curl -o /etc/systemd/system/docker.service https://raw.githubusercontent.com/moby/moby/master/contrib/init/systemd/docker.service
# curl -o /etc/systemd/system/docker.socket https://raw.githubusercontent.com/moby/moby/master/contrib/init/systemd/docker.socket

# systemctl daemon-reload
# systemctl enable docker

然后通过# systemctl start docker 启动docker服务,如果在启动过程中遇到如下错误:
- Unit docker.socket has begun starting up.
3月 22 00:47:07 centos02 systemd[1148]: Failed to chown socket at step GROUP: No such process
3月 22 00:47:07 centos02 systemd[1]: docker.socket control process exited, code=exited status=216
3月 22 00:47:07 centos02 systemd[1]: Failed to listen on Docker Socket for the API.
-- Subject: Unit docker.socket has failed
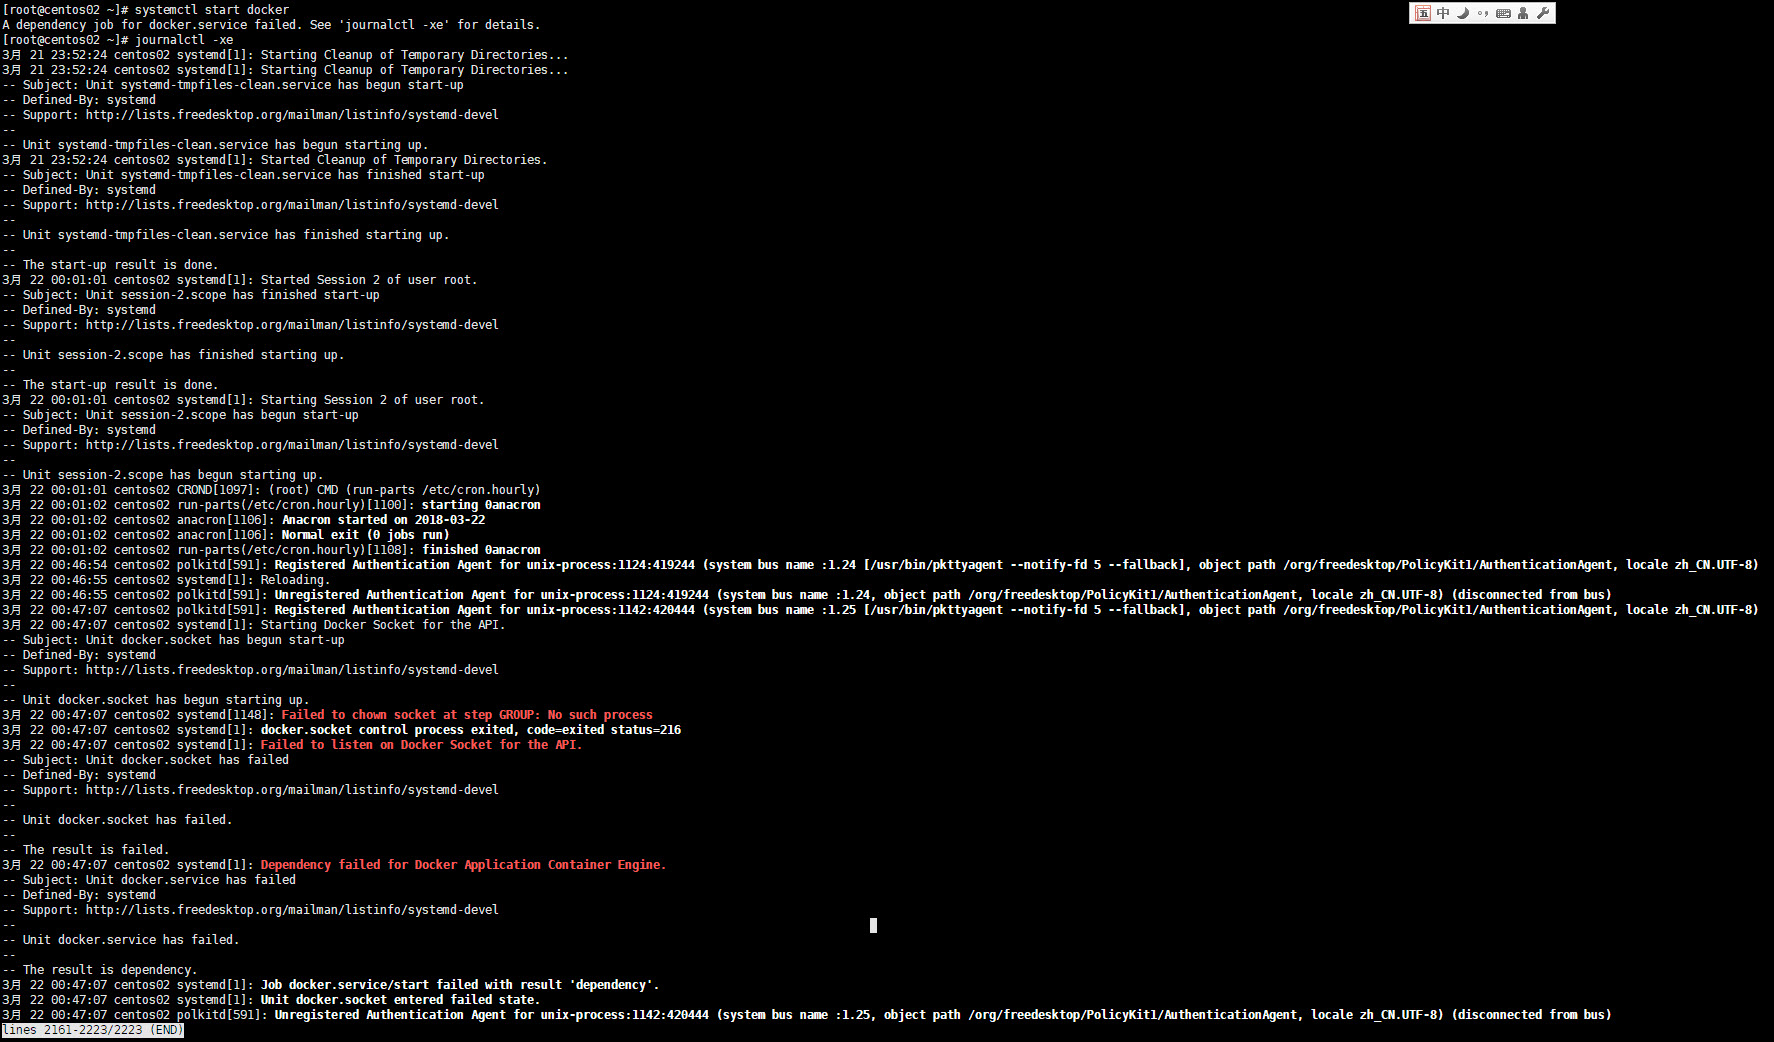
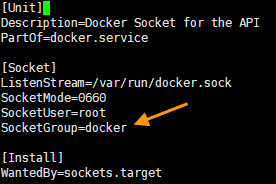
请检查/etc/systemd/system/docker.socket文件中配置的SockerGroup对应的组是否存在,如果不存在则通过# groupadd添加后再启动docker服务,从github上下载的docker.socket中配置的SockerGroup是docker,需要先添加该group:
# groupadd docker
然后再启动docker服务,启动成功: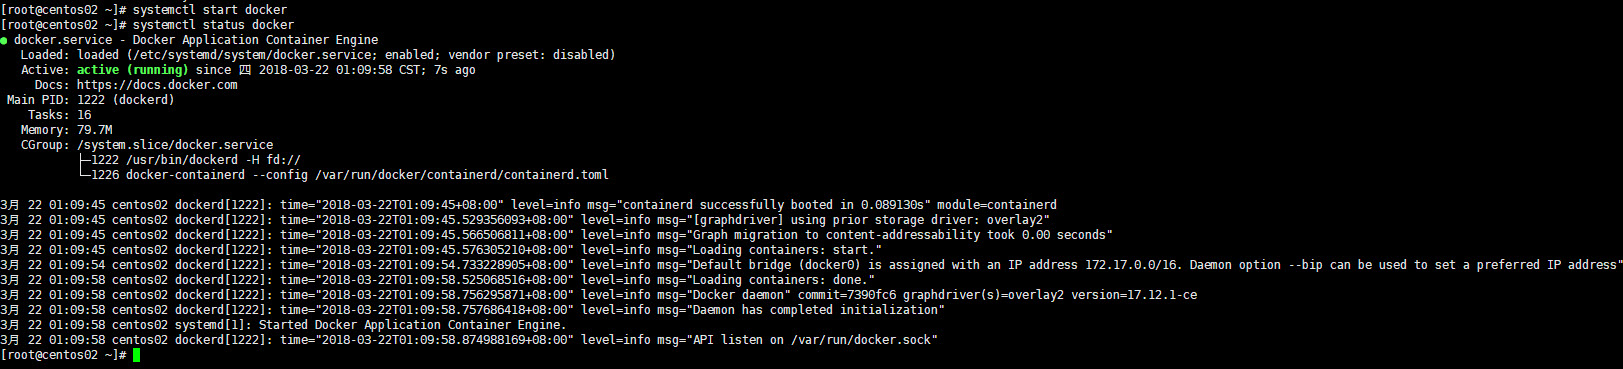
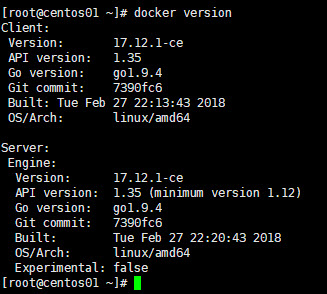
docker服务启动后,通过#docker version查询client与server端版本信息:
其它自定义的docker daemon启动参数及环境变量可参考官方文档:https://docs.docker.com/config/daemon/systemd/, 通过systemd drop-in和 /etc/docker/daemon.json配置。
2. 通过yum repo安装docker
手动下载binary包的安装方式略显繁琐,通过yum安装的方式就会自动化和简单很多:
a) 添加yum repo
# tee /etc/yum.repos.d/docker.repo <<-'EOF'
[dockerrepo]
name=Docker Repository
baseurl=https://yum.dockerproject.org/repo/main/centos/$releasever/
enabled=1
gpgcheck=1
gpgkey=https://yum.dockerproject.org/gpg
EOF
b) 安装docker
# yum install docker-engine
c) 启动docker服务并开机自动启动
# systemctl start docker
# systemctl enable docker
3. bridge-nf-call-iptables问题
运行docker info, 查看是否有提示bridge-nf-call-iptables is disabled和bridge-nf-call-ip6tables is disabled 的 WARNNING:
# docker info
Containers: 0
 Running: 0
 Paused: 0
 Stopped: 0
Images: 1
Server Version: 17.12.1-ce
Storage Driver: overlay2
 Backing Filesystem: xfs
 Supports d_type: true
 Native Overlay Diff: true
Logging Driver: json-file
Cgroup Driver: cgroupfs
Plugins:
 Volume: local
 Network: bridge host macvlan null overlay
 Log: awslogs fluentd gcplogs gelf journald json-file logentries splunk syslog
Swarm: inactive
Runtimes: runc
Default Runtime: runc
Init Binary: docker-init
containerd version: 9b55aab90508bd389d7654c4baf173a981477d55
runc version: 9f9c96235cc97674e935002fc3d78361b696a69e
init version: 949e6fa
Security Options:
 seccomp
  Profile: default
Kernel Version: 3.10.0-862.2.3.el7.x86_64
Operating System: CentOS Linux 7 (Core)
OSType: linux
Architecture: x86_64
CPUs: 1
Total Memory: 991.7MiB
Name: centos01
ID: KL2R:7F52:M5SV:T3U7:GL3Y:UU6F:KGE2:DM3Y:STSY:MLEZ:XXEL:EWG3
Docker Root Dir: /var/lib/docker
Debug Mode (client): false
Debug Mode (server): false
Registry: https://index.docker.io/v1/
Labels:
Experimental: false
Insecure Registries:
 127.0.0.0/8
Live Restore Enabled: false

WARNING: bridge-nf-call-iptables is disabled
WARNING: bridge-nf-call-ip6tables is disabled
通过添加以下配置解决:
# tee -a /etc/sysctl.conf <<-'EOF'
net.bridge.bridge-nf-call-iptables=1
net.bridge.bridge-nf-call-ip6tables=1
EOF
# sysctl -p
详细参见:关于bridge-nf-call-iptables的设计问题
3. 为docker daemon配置代理
有时候docker环境会运行在一个代理或防火墙内部,为了让docker daemon从外网pull镜像,就需要给docker daemon配置代理。有两种配置方式:
a) 通过Service Drop-In文件
例如我的代理地址为http://192.168.1.3:1080/:
# mkdir -p /etc/systemd/system/docker.service.d/
# tee /etc/systemd/system/docker.service.d/http-proxy.conf <<-'EOF'
[Service]
Environment="HTTP_PROXY=http://192.168.1.3:1080/" "HTTPS_PROXY=http://192.168.1.3:1080/" "NO_PROXY=192.168.1.1,192.168.1.3,192.168.1.11,192.168.1.12,192.168.1.13,192.168.1.14,192.168.1.99,127.0.0.1,localhost"
EOF
# systemctl daemon-reload
# systemctl restart docker
b) 修改/etc/systemd/system/docker.service文件,在[Service]配置节添加Environment:
[Service]
Environment="HTTP_PROXY=http://192.168.1.3:1080/" "HTTPS_PROXY=http://192.168.1.3:1080/" "NO_PROXY=192.168.1.1,192.168.1.3,192.168.1.11,192.168.1.12,192.168.1.13,192.168.1.14,192.168.1.99,127.0.0.1,localhost"
如果代理服务器需要认证,则配置格式为:http://username:[email protected]:1080/, 如果username或password中有特殊字符,则必须进行encode。 如#要改成%23
c) 验证
# systemctl show --property Environment docker
Environment=HTTP_PROXY=http://192.168.1.3:1080/ HTTPS_PROXY=http://192.168.1.3:1080/ NO_PROXY=192.168.1.1,192.168.1.3,192.168.1.11,192.168.1.12,192.168.1.13,192.168.1.14,192.168.1.99,127.0.0.1,localhost
如果你的代理服务器是HTTPS的,有自己的HTTPS证书,那就更麻烦一些,你需要:
- 安装ca-certificates包
- 下载该HTTPS证书的PEM格式,保存到指定目录(CentOS是放在/etc/pki/ca-trust/source/anchors/, Ubuntu是放在/usr/local/share/ca-certificates/)
- 执行命令刷新信任证书(CentOS中执行update-ca-trust, Ubuntu中执行update-ca-certificates)
详见:
https://docs.docker.com/engine/reference/commandline/dockerd/#running-a-docker-daemon-behind-an-https_proxy
https://manuals.gfi.com/en/kerio/connect/content/server-configuration/ssl-certificates/adding-trusted-root-certificates-to-the-server-1605.html
4.其它配置参数
docker服务还有很多其它参数可以通过Drop-In, docker.service或/etc/docker/daemon.json进行配置,如添加一个本地镜像库,可以通过几种方式进行配置 :
a) 修改docker.service文件,在dockerd后面添加一个或多个–insecure-registry 192.168.1.3:10000
b) 修改/etc/docker/daemon.json,添加insecure-registries配置
{
    "insecure-registries": ["192.168.1.3:10000"]
}
更新配置参数请参见:
https://docs.docker.com/engine/reference/commandline/dockerd/#daemon
https://docs.docker.com/engine/reference/commandline/dockerd/#daemon-configuration-file
附:安装docker-compose
# curl -L https://github.com/docker/compose/releases/download/1.21.0/docker-compose-$(uname -s)-$(uname -m) -o /usr/bin/docker-compose
# chmod +x /usr/bin/docker-compose
# docker-compose --version
docker-compose version 1.21.0, build 5920eb0
最新Community 19.3.2的安装方法
# yum remove docker \
                  docker-client \
                  docker-client-latest \
                  docker-common \
                  docker-latest \
                  docker-latest-logrotate \
                  docker-logrotate \
                  docker-engine

# yum install -y yum-utils \
  device-mapper-persistent-data \
  lvm2

# yum-config-manager \
    --add-repo \
    https://download.docker.com/linux/centos/docker-ce.repo

# yum list docker-ce --showduplicates | sort -r

# yum install docker-ce docker-ce-cli containerd.io