Kubernetes
An exception about FlexVolume SMB storage plugin
-
使用了Microsoft的一个FlexVolume SMB插件在Kubernetes Windows容器中挂载SMB存储 microsoft.com~smb.cmd
-
其中一个节点上的容器偶发性的挂载不上:
E1114 09:48:35.398102    4496 driver-call.go:267] Failed to unmarshal output for command: init, output: "RunFlexVolume : \xce\u07b7\xa8\xbd\xab\xa1\xb0RunFlexVolume\xa1\xb1\xcf\xeeʶ\xb1\xf0Ϊ cmdlet\xa1\xa2\xba\xaf\xca\xfd\xa1\xa2\xbdű\xbe\xceļ\xfe\xbb\xf2\xbf\xc9\xd4\xcb\xd0г\xcc\xd0\xf2\xb5\xc4\xc3\xfb\xb3ơ\xa3\xc7\xeb\xbc\xec\xb2\xe9\xc3\xfb\xb3Ƶ\xc4ƴд\xa3\xac\xc8\xe7\xb9\xfb\xb0\xfc\xc0\xa8·\r\n\xbe\xb6\xa3\xac\xc7\xebȷ\xb1\xa3·\xbe\xb6\xd5\xfdȷ\xa3\xacȻ\xba\xf3\xd4\xd9\xca\xd4һ\xb4Ρ\xa3\r\n\xcb\xf9\xd4\xdaλ\xd6\xc3 C:\\usr\\libexec\\kubernetes\\kubelet-plugins\\volume\\exec\\microsoft.com~smb.cmd\\smb.ps1:89 \xd7ַ\xfb: 1\r\n+ RunFlexVolume\r\n+ ~~~~~~~~~~~~~\r\n    + CategoryInfo          : ObjectNotFound: (RunFlexVolume:String) [], ParentContainsErrorRecordException\r\n    + FullyQualifiedErrorId : CommandNotFoundException\r\n \r\n", error: invalid character 'R' looking for beginning of value

E1114 09:48:35.398102 4496 plugins.go:766] Error dynamically probing plugins: Error creating Flexvolume plugin from directory microsoft.com~smb.cmd, skipping. Error: invalid character 'R' looking for beginning of value -
Exception内容一堆乱码, cmdlet后的内存去除干扰后感觉像是什么路径不存在:
、函数、骄牺或可运刑序的名常请检查名衬,如果包括径,请保径正,后再试矗所在置 -
最后发现是C:\usr\libexec\kubernetes\kubelet-plugins\volume\exec\microsoft.com~smb.cmd\flexvolume.ps1的文件内容为空, 不知道为什么DaemonSet没有运行成功. 删除该节点上flexvolume对应的pod后重新挂载,问题解决
基于Upstream-ToR网络的Kubernetes Windows Node配置
前言
Kubernetes集群中Windows节点引入的成功与否主要决定于Kubernetes网络组件的成熟程度及Windows Server的SDN能力. Kubernetes从1.5版本基于Windows Server 2016(1607)开始引入Windows容器, 发展到目前的最新版本1.18; Windows Server也从1607经历了1709/1803/1809/1903/1909几个版本的发展, 在容器化支持及SDN方面也做了很多的功能改进
常用的Kubernetes集群网络组件有很多, 但能同时支持Linux/Windows混合集群的网络组件比较少(最起码之前是的), 之前搭建过基于Windows Server 1709和OVS/OVN网络的混合集群, 但由于OVS网络的基础组件太多(Open vSwitch, Central Database, Northbound Database, Southbound Database…), 安装配置过程较复杂并且难维护,加上ovn-kubernetes在当时还不太成熟, 试用了一段时间后放弃. 经过近两年的发展, Windows容器环境已经能达到准生产环境的标准, 所以本文基于社区大神们提供的开源组件及相关文档,阐述基于L3 Upstream ToR网络模型的Linux/Windows混合集群的网络配置过程
本文目的
在不修改原有的Kubernetes Linux集群网络的基础上加入Windows节点, 实现Windows/Linux节点间的网络互通:
- Container to Container
- Pod to Pod
- Container to Service
- Pod to Service
关于L3 Upstream ToR
首先引用官方一张图说明一下upstream ToR网络模型:
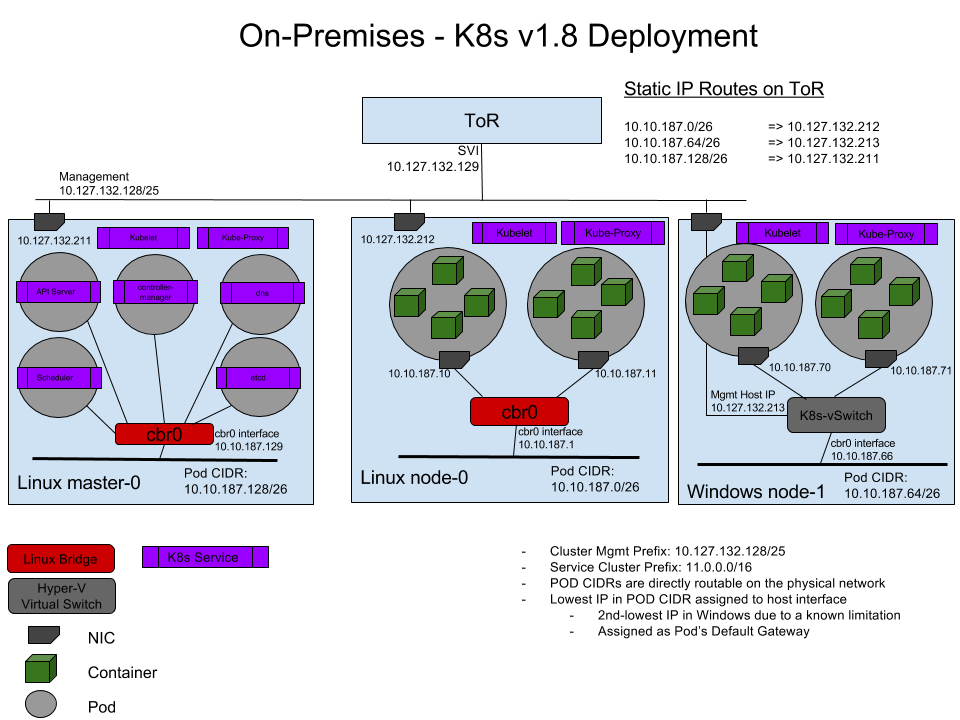
这张图来源于Kubernetes官网文档 – 在 Kubernetes 中使用 Windows Server 容器, 通过一个配置了静态路由的ToR(Top of Rack)实现Linux节点容器与Windows节点Pod之间的互联互通.
知识结构
假设阅读者有如下知识基础:
- 了解基础网络概念: IP, CIDR, 网关, 路由, 桥接
- 了解DOS批处理及相关的一些网络操作, ipconfig, route等
- 了解Powershell的基本使用
- 了解bash/sh及一些相关的网络操作, ip, ifconfig等
- 了解VIP, keepalived
- 了解Docker, Container的基本概念
- 了解容器网络的基本概念
- 了解Windows SDN网络的概念和操作, Hyper-V的 vSwitch, Endpoint等
- 了解Kubernetes的基本概念, Cluster Networking, Container, Deployment, Service
- …
参考资料
基于以上假设及知识点, 本文参考了如下资料文档:
- Windows容器化文档主页: Containers on Windows Documentation
- Windows容器网络的基础概念: Windows container networking
- Windows容器网络的几种网络模式: Windows container network drivers, NAT/Transparent/Overlay/L2bridge/L2tunnel等
- L2brdige网络模型的详解: L2bridge Container Networking
- Windows容器的两种隔离模式: Isolation Modes, Process和Hyper-V
- Windows容器在两种隔离模式下的Host/Container操作系统兼容性: Windows container version compatibility
- Windows Server 1909中开始提供的高效Load Balancing方案 – DSR: Direct Server Return (DSR) in a nutshell
- 来自David Schott的关于Windows 网络问题的详尽Troubleshooting: Troubleshooting Kubernetes Networking on Windows: Part 1, David Schott在github上的title是Microsoft容器网络的PM
- 来自倪朋飞/feiskyer的(github – feiskyer, Twitter, Linkedin, Microsoft Azure员工, Microsoft SDN/Kubernetes相关的Code Review都有他, 坐标上海)的:
- 几个重要的github开源项目:
- https://github.com/microsoft/SDN, Micrsoft SDN, Windows容器化相关的HNS网络脚本, 节点初始化脚本都可以从该项目中获取
- https://github.com/containernetworking/plugins, 提供了CNI网络插件, 后面使用至的win-bridge将从该项目下载
- https://github.com/kubernetes-sigs/sig-windows-tools, 提供了Windows容器化及Kubernetes Windows环境部署的工具及脚本
- Ian Lewis的两篇文章关于Pod和Pause Pod
一、准备环境
1.1、Kubernetes Cluster
添加Windows节点的前置条件是已经存在一个Kubernetes集群, 集群中有一个或多个master节点, 一个或多个linux minion节点. 集群中原来使用了CNI网络插件, 如Calico, Flannel等
以一个使用中的Kubernetes集群为例, 该集群的Pod/Service CIDR如下:
- Pod CIDR: 10.160.0.0/12
- Svc CIDR: 10.176.0.0/12
后续描述也以这个集群为例, 后称”该K8s集群”.
1.2、Windows Node
安装了Windows Server 2019的Windows服务器, 要求发行版本号在1803以上, 推荐采用1809(Build Number 10.0.17763).
Windows新版本修复了容器化及SDN相关的一些bug, 1909(10.0.18363)中提供了新特性DSR的支持, 但1909在kube-proxy运行在Windows Service模式时会有一些小问题, 需要修改Windows Service运行账户解决.
目前的最优选择为1809(10.0.17763.*)
Windows 1803以前版本跟kube-proxy相关的bug信息参考: https://github.com/kubernetes/kubernetes/issues/62029
二、配置步骤
配置过程会描述记录一些初始化的步骤, 这些在生产环境中是必要的, 但又不是实现Linux/Windows的混合集群的必须步骤, 会加上”可选”字样
2.1、Windows节点基础配置
2.1.1、网络配置(可选)
残留配置清理
如果Windows节点之前被使用过, 为确保Hyper-V SDN中没有残留配置, 最好执行一次网络清理.
1709和1909的Windows版本, 在CMD shell中执行netcfg -d, 然后重启Windows节点,可完成网络配置复位, 所有网络适配器的IP/DNS配置会被清空, 需要控制台登录重新配置
实际使用中发现在Windows Server version 1809(OS Build 17763.973)中执行netcfg -d 并不能清除所有的虚拟网络适配器, 需要在注册表路径下删除:HKLM\SYSTEM\CurrentControlSet\Control\Network中的相关项.
如果还清除不掉: 在Powershell中使用 Get-PnpDevice -class net | ? Status -eq Error | Select InstanceId查询网络适配器, 然后根据InstanceId在 HKLM\SYSTEM\CurrentControlSet\Enum
然后重启Windows Node
IP/DNS配置
为了提高K8s集群节点间通讯效率, 减少业务通讯数据对Kubernetes集群内部通讯的影响, 该K8s集群采用了双网络, 一块网卡用于连接办公网, 一块网卡用于连接Kubernetes节点内网.
其中:
- 办公网CIDR: 172.16.126.0/24
- K8内网CIDR: 100.100.126.0/23
准备加入Kubernetes集群的Windows节点的两块网卡配置分别为:
- 办公网: MAC 00-15-00-00-00-01, IP 172.16.126.216, GW 172.16.126.1
- K8内网: MAC 00-15-00-00-00-02, IP 100.100.126.216
为便于后续配置, 办公网网卡命名为eth0, K8内网网卡合名为eth1, 该K8s集群内网配置有主/备两个DNS服务器: 100.100.126.205/100.100.126.206, 负责集群内部的域名解析及转发, DNS Suffix为 mylan.k8s
通过Powershell完成IP配置, 网卡改名和DNS配置:
# Net Adapter 0
$adapter0=Get-NetAdapter | Where-Object {$_.MacAddress -eq "00-15-00-00-00-01"}
New-NetIPAdaddress -InterfaceIndex $adapter0.InterfaceIndex -IPAddress "172.16.126.216" -PrefixLength 24 -DefaultGateway 172.16.126.1
Rename-NetAdapter -Name $adapter0.Name -NewName "eth0"

# Net Adapter 1
$adapter1=Get-NetAdapter | Where-Object {$_.MacAddress -eq "00-15-00-00-00-02"}
New-NetIPAddress -InterfaceIndex $adapter1.InterfaceIndex -IPAddress "100.100.126.216" -PrefixLength 23
Rename-NetAdapter -Name $adapter1.Name -NewName "eth1"

# Configure DNS Server and Domain Suffix
Set-DnsClientServerAddress -InterfaceIndex $adapter1.InterfaceIndex -ServerAddresses ("100.100.126.205","100.100.126.206")
Set-ItemProperty -Path HKLM:\SYSTEM\CurrentControlSet\Services\Tcpip\Parameters -Name 'NV Domain' -Value 'mylan.k8s'
Set-DnsClientGlobalSetting -SuffixSearchList @("mylan.k8s")
2.1.2、时区设置及时钟同步(可选)
Windows容器中的时区会跟随Windows宿主节点的时区, 需要根据业务需要对Windows节点的进区进行设置, 并确保集群内所有计算节点的时钟同步,并通过NTP服务器与互联网授时中心同步, 该K8s集群内部有ntp1.mylan.k8s, ntp2.mylan.k8s两个ntp服务器.
通过powershell脚本完成时区更改, ntp服务器设置和时间强制同步:
Set-TimeZone -Id "China Standard Time"
Set-ItemProperty -Path HKLM:\SOFTWARE\Microsoft\Windows\CurrentVersion\DateTime\Servers -Name 1 -Value "ntp1.mylan.k8s"
Set-ItemProperty -Path HKLM:\SOFTWARE\Microsoft\Windows\CurrentVersion\DateTime\Servers -Name 2 -Value "ntp2.mylan.k8s"
Set-ItemProperty -Path HKLM:\SOFTWARE\Microsoft\Windows\CurrentVersion\DateTime\Servers -Name "(default)" -Value 1
Get-ItemProperty -Path HKLM:\SOFTWARE\Microsoft\Windows\CurrentVersion\DateTime\Servers
Set-Service w32time -StartupType Automatic
Restart-Service w32time
w32tm /config /manualpeerlist:"ntp1.mylan.k8s ntp2.mylan.k8s" /syncfromflags:MANUAL /reliable:yes /update
w32tm /query /peers
w32tm /config /reliable:no /syncfromflags:manual /update
W32tm /resync
2.1.3、启用SSH(可选)
容器环境使用的Windows Server大多为无图形版本, 为方便远程管理和文件传输, 需要安装OpenSSH.
之前的Windows Server版本安装OpenSSH一般是从github(https://github.com/PowerShell/Win32-OpenSSH/releases)下载发布包, 然后执行包里的install-sshd.ps1进行安装, 不过现在不用手动下载了, Windows中已经内置了OpenSSH, 直接执行在线安装即可:
# Query all OpenSSH packages:
Get-WindowsCapability -Online | ? Name -like 'OpenSSH*'

# Install OpenSSH.Server
Add-WindowsCapability -Online -Name OpenSSH.Server~~~~0.0.1.0

# Configure auto-start for sshd & ssh-agent
Set-Service sshd -StartupType Automatic
Set-Service ssh-agent -StartupType Automatic

# Start Service: sshd & ssh-agent
Start-Service sshd
Start-Service ssh-agent
安装/启动OpenSSH后, 需要为SSHD的22端口配置一条防火墙规则:
# Configure Firewall to open SSH port
New-NetFirewallRule -Name sshd -DisplayName 'OpenSSH Server (sshd)' -Enabled True -Direction Inbound -Protocol TCP -Action Allow -LocalPort 22
或者通过netsh或Set-netFirewallProfile直接禁用防火墙(生产环境不建议:
CMD shell中执行:
netsh advfirewall set allprofiles state off
或Powershell中执行:
Set-NetFirewallProfile -Profile Domain,Public,Private -Enabled False
2.1.4、安装配置Docker
安装
如果安装Windows节点时使用的操作系统镜像不是”With Containers”版本, 则需要手工安装Docker. 安装Docker时建议Windows节点直连外网, 通过代理会比较麻烦。
通过Powershell脚本安装Docker
Install-Module -Name DockerMsftProvider -Repository PSGallery -Force
Install-Package -Name Docker -ProviderName DockerMsftProvider
配置
如果Windows容器所使用的Docker Image存在于基于http发布的镜像库中, 则需要为Docker daemon配置incecure-registry.
创建docker daemon配置文件:C:\ProgramData\Docker\config\daemon.json, 顺便关闭docker默认的bridge网络, 配置insecure-registries: repo.mylan.k8s:8888, repo.mylan.k8s:9999. 文件内容如下:
{
    "bridge" : "none",
    "insecure-registries": [
        "repo.mylan.k8s:8888",
        "repo.mylan.k8s:9999"
    ]
}
如果新安装了Docker, 需要重启Windows节点
Restart-Computer -Force
如果只是更改了Docker daemon配置文件, 重启Docker服务即可:
Restart-Service docker
2.2、准备Kubernetes所需组件及插件
- Node Binaries
从 https://github.com/kubernetes/kubernetes/tree/master/CHANGELOG 下载与Linux节点相同版本的Node Binaries
设定一个Kubernetes Home目录, 如C:/k/, 从Node Binary包中解压出kubelet.exe, kube-proxy.exe, 放到C:/k/目录下- kubelet
> kubelet是每个Kubernetes节点上运行的一个代理, 负责节点向K8s apiserver的注册, 节点上容器生命周期及状态的维护, CNI网络组件的调用等.
> 具体请参考: https://kubernetes.io/docs/reference/command-line-tools-reference/kubelet/
- kubelet
-
kube-proxy
kube-proxy, 又叫Kubernetes network proxy, 负责把对Service IP的访问负载均衡/端口映射到Pod IP上. Linux节点上使用的底层组件为iptables或ipvs, Windows节点上使用的底层组件为VFP(Virtual Filtering Platform)和HNS Load-Balancing
具体请参考: - Kubernetes中的服务
- CNI网络插件
CNI网络插件的作用是对接Pod网络和宿主机(K8s节点)网络, 通过CNI网络插件实现跨宿主机间的Pod通信. 本次配置使用的网络模式二层桥接l2bridge, 关于网络模式的解释参见前面提到的参考资料
从 https://github.com/containernetworking/plugins/releases 下载windows-amd64架构的cni插件包, 实测v0.8.5版本没有发现bug, 从包中解压win-bridge.exe,放到C:/k/cni/bin目录下
- CNI网络插件
2.3、把Windows节点添加到Kubernetes集群
把Windows节点加入Kubernetes集群, 以获取apiserver为该节点分配的Pod CIDR, 便于进行后续网络配置.
如果Kubernetes集群是通过kubeadm配置的, 可以通过kubeadm join添加节点到集群, 参见: https://kubernetes.io/docs/reference/setup-tools/kubeadm/kubeadm-join/
也可以通过启动kubelet把节点加入到Kubernetes集群, 需要先从master节点把kubeconfig Copy到节点.
此处采用启动kubelet的方式把Windows节点加入集群:
- 从master节点复制kubeconfig文件, 存放到Windows节点的 C:/k/kubeconfig.conf, 该文件在master节点上的存放路径一般是: /etc/kubernetes/admin.conf
- 配置简单参数, 从命令行启动kubelet, 加入当前Windows节点到Kubernetes集群
c:/k/kubelet.exe --kubeconfig=c:/k/kubeconfig.conf --node-ip=100.100.126.216 --hostname-override=node009 --cgroups-per-qos=false --enforce-node-allocatable=
参数说明
- –kubeconfig 指定从master copy过来的kubeconfig文件路径, kubelet将从该文件中获取apiserver的地址及认证所需的证书
- –node-ip 因为该K8s集群中的节点采用双网络, 因此需要指定使用哪一个IP地址用于Kubernetes集群内通信
- –hostname-override 如果不想kubelet使用hostname作为节点名称, 可通过该参数指定节点名称, 这里我们指定节点名称为node009
- –cgroups-per-qos 设置为false, 因Windows上不支持cgroups qos, 不设置为false则不能启动
- –enforce-node-allocatable 依赖启用–cgroups-per-qos选项进行系统资源分配管理, 由于cgroups在Windows上不被支持, 需要设置为空值
基于以上参数配置启动kubelet, 当在日志输出中看到”Successfully registered node node009″字眼时通过Ctrl+C中止kubelet进程, 说明节点已经成功加入Kubernetes集群:
Flag --cgroups-per-qos has been deprecated, This parameter should be set via the config file specified by the Kubelet's --config flag. See https://kubernetes.io/docs/tasks/administer-cluster/kubelet-config-file/ for more information.
Flag --enforce-node-allocatable has been deprecated, This parameter should be set via the config file specified by the Kubelet's --config flag. See https://kubernetes.io/docs/tasks/administer-cluster/kubelet-config-file/ for more information.
I0508 08:36:41.082361    3936 server.go:416] Version: v1.17.0
I0508 08:36:41.097352    3936 plugins.go:100] No cloud provider specified.
E0508 08:36:43.672910    3936 server.go:749] kubelet needs to run as uid `0`. It is being run as -1
W0508 08:36:43.672910    3936 server.go:757] setting OOM scores is unsupported in this build
I0508 08:36:43.678954    3936 kubelet.go:311] Watching apiserver
W0508 08:36:43.710187    3936 iptables.go:165] Error checking iptables version, assuming version at least 1.4.11: executable file not found in %PATH%
I0508 08:36:43.827904    3936 client.go:104] Start docker client with request timeout=2m0s
W0508 08:36:43.854900    3936 docker_service.go:563] Hairpin mode set to "promiscuous-bridge" but kubenet is not enabled, falling back to "hairpin-veth"
I0508 08:36:43.855908    3936 docker_service.go:240] Hairpin mode set to "hairpin-veth"
W0508 08:36:43.883897    3936 cni.go:237] Unable to update cni config: no networks found in /etc/cni/net.d
W0508 08:36:43.905891    3936 plugins.go:193] can't set sysctl net/bridge/bridge-nf-call-iptables: open /proc/sys/net/bridge/bridge-nf-call-iptables: The system cannot find the path specified.
I0508 08:36:43.906910    3936 docker_service.go:255] Docker cri networking managed by kubernetes.io/no-op
I0508 08:36:43.916935    3936 docker_service.go:260] Docker Info: &{ID:I2KD:5NR6:55IH:GRAW:RS56:XX36:I2JQ:HOQ4:554R:PL5V:V36P:YFGX Containers:2 ContainersRunning:1 ContainersPaused:0 ContainersStopped:1 Images:62 Driver:windowsfilter DriverStatus:[[Windows ]] SystemStatus:[] Plugins:{Volume:[local] Network:[ics internal l2bridge l2tunnel nat null overlay private transparent] Authorization:[] Log:[awslogs etwlogs fluentd gcplogs gelf json-file local logentries splunk syslog]} MemoryLimit:false SwapLimit:false KernelMemory:false KernelMemoryTCP:false CPUCfsPeriod:false CPUCfsQuota:false CPUShares:false CPUSet:false PidsLimit:false IPv4Forwarding:true BridgeNfIptables:true BridgeNfIP6tables:true Debug:false NFd:-1 OomKillDisable:false NGoroutines:36 SystemTime:2020-05-08T08:36:43.9148839+08:00 LoggingDriver:json-file CgroupDriver: NEventsListener:0 KernelVersion:10.0 17763 (17763.1.amd64fre.rs5_release.180914-1434) OperatingSystem:Windows Server 2019 Datacenter Version 1809 (OS Build 17763.107) OSType:windows Architecture:x86_64 IndexServerAddress:https://index.docker.io/v1/ RegistryConfig:0xc0007d75e0 NCPU:4 MemTotal:8588910592 GenericResources:[] DockerRootDir:D:\docker HTTPProxy: HTTPSProxy: NoProxy: Name:WIN-BB525IA80ES Labels:[] ExperimentalBuild:false ServerVersion:19.03.5 ClusterStore: ClusterAdvertise: Runtimes:map[] DefaultRuntime: Swarm:{NodeID: NodeAddr: LocalNodeState:inactive ControlAvailable:false Error: RemoteManagers:[] Nodes:0 Managers:0 Cluster:<nil> Warnings:[]} LiveRestoreEnabled:false Isolation:process InitBinary: ContainerdCommit:{ID: Expected:} RuncCommit:{ID: Expected:} InitCommit:{ID: Expected:} SecurityOptions:[] ProductLicense: Warnings:[]}
W0508 08:36:43.918885    3936 docker_service.go:265] No cgroup driver is set in Docker
W0508 08:36:43.919917    3936 docker_service.go:266] Falling back to use the default driver: "cgroupfs"
I0508 08:36:43.923893    3936 docker_service.go:273] Setting cgroupDriver to cgroupfs
W0508 08:36:43.934888    3936 docker_service.go:427] initialization error: unable to list values under registry key "SOFTWARE\\Microsoft\\Windows NT\\CurrentVersion\\Virtualization\\Containers\\CredentialSpecs": Access is denied.
I0508 08:36:43.943882    3936 remote_runtime.go:59] parsed scheme: ""
I0508 08:36:43.944890    3936 remote_runtime.go:59] scheme "" not registered, fallback to default scheme
I0508 08:36:43.945887    3936 passthrough.go:48] ccResolverWrapper: sending update to cc: {[{//./pipe/dockershim 0  <nil>}] <nil>}
I0508 08:36:43.948886    3936 clientconn.go:577] ClientConn switching balancer to "pick_first"
I0508 08:36:43.951897    3936 remote_image.go:50] parsed scheme: ""
I0508 08:36:43.952892    3936 remote_image.go:50] scheme "" not registered, fallback to default scheme
I0508 08:36:43.953883    3936 passthrough.go:48] ccResolverWrapper: sending update to cc: {[{//./pipe/dockershim 0  <nil>}] <nil>}
I0508 08:36:43.954899    3936 clientconn.go:577] ClientConn switching balancer to "pick_first"
I0508 08:36:43.955889    3936 state_mem.go:36] [cpumanager] initializing new in-memory state store
I0508 08:36:43.962897    3936 fake_topology_manager.go:29] [fake topologymanager] NewFakeManager
E0508 08:36:43.969893    3936 aws_credentials.go:77] while getting AWS credentials NoCredentialProviders: no valid providers in chain. Deprecated.
        For verbose messaging see aws.Config.CredentialsChainVerboseErrors
I0508 08:36:44.362997    3936 kuberuntime_manager.go:211] Container runtime docker initialized, version: 19.03.5, apiVersion: 1.40.0
W0508 08:36:44.365010    3936 probe.go:268] Flexvolume plugin directory at /usr/libexec/kubernetes/kubelet-plugins/volume/exec/ does not exist. Recreating.
I0508 08:36:44.373997    3936 server.go:1113] Started kubelet
I0508 08:36:44.373997    3936 server.go:143] Starting to listen on 0.0.0.0:10250
E0508 08:36:44.376011    3936 processstarttime.go:48] Could not get process start time, could not read /proc: CreateFile /proc: The system cannot find the file specified.
E0508 08:36:44.376011    3936 processstarttime.go:48] Could not get process start time, could not read /proc: CreateFile /proc: The system cannot find the file specified.
I0508 08:36:44.378007    3936 fs_resource_analyzer.go:64] Starting FS ResourceAnalyzer
I0508 08:36:44.382054    3936 status_manager.go:157] Starting to sync pod status with apiserver
I0508 08:36:44.378007    3936 image_gc_manager.go:300] [imageGCManager]: Disk usage on image filesystem is at 91% which is over the high threshold (85%). Trying to free 11687732838 bytes down to the low threshold (80%).
I0508 08:36:44.378007    3936 server.go:354] Adding debug handlers to kubelet server.
I0508 08:36:44.382054    3936 volume_manager.go:265] Starting Kubelet Volume Manager
I0508 08:36:44.383007    3936 desired_state_of_world_populator.go:138] Desired state populator starts to run
I0508 08:36:44.383007    3936 kubelet.go:1820] Starting kubelet main sync loop.
I0508 08:36:44.384012    3936 kubelet_node_status.go:294] Setting node annotation to enable volume controller attach/detach
E0508 08:36:44.389022    3936 kubelet.go:1844] skipping pod synchronization - container runtime status check may not have completed yet
I0508 08:36:44.403014    3936 plugin_manager.go:114] Starting Kubelet Plugin Manager
E0508 08:36:44.408005    3936 eviction_manager.go:246] eviction manager: failed to get summary stats: failed to get node info: node "node009" not found
E0508 08:36:44.411020    3936 reflector.go:156] k8s.io/client-go/informers/factory.go:135: Failed to list *v1beta1.RuntimeClass: the server could not find the requested resource (get runtimeclasses.node.k8s.io)
E0508 08:36:44.472000    3936 reflector.go:156] k8s.io/client-go/informers/factory.go:135: Failed to list *v1beta1.CSIDriver: the server could not find the requested resource
E0508 08:36:44.480010    3936 controller.go:227] failed to get node "node009" when trying to set owner ref to the node lease: nodes "node009" not found
E0508 08:36:44.483016    3936 kubelet.go:2263] node "node009" not found
I0508 08:36:44.483016    3936 kubelet_node_status.go:294] Setting node annotation to enable volume controller attach/detach
I0508 08:36:44.491494    3936 kubelet_node_status.go:70] Attempting to register node node009
E0508 08:36:44.525004    3936 kubelet.go:1302] Image garbage collection failed once. Stats initialization may not have completed yet: failed to garbage collect required amount of images. Wanted to free 11687732838 bytes, but freed 0 bytes
I0508 08:36:44.527001    3936 kubelet_node_status.go:73] Successfully registered node node009
...
- 获取新加入Node的Pod CIDR
在master节点上执行kubectl get nodes, 使用go-template过滤所需信息得到每个节点的Pod CIDR:
# kubectl get nodes -o go-template=' {{range .items}}{{.metadata.name}}:{{" "}}{{.spec.podCIDR}}{{"\n"}} {{end}}'
 master1: 10.160.0.0/24
 master2: 10.160.1.0/24
 master3: 10.160.2.0/24
 node001: 10.160.3.0/24
 node002: 10.160.4.0/24
 node003: 10.160.5.0/24
 node004: 10.160.6.0/24
 node005: 10.160.7.0/24
 node006: 10.160.8.0/24
 node007: 10.160.9.0/24
 node008: 10.160.10.0/24
 node009: 10.160.11.0/24
node009就是新加入的节点, 该节点上的Pod CIDR就是10.160.11.0/24, 也就是说运行在该节点上的Pod将从这个IP段中分配IP地址.
顺便获取该K8s集群中DNS Server的Service IP, 后续配置网络参数要使用到, DNS Server的 VIP是10.176.0.10:
[root@master1 ~]# kubectl get svc -n kube-system kube-dns
NAME       TYPE        CLUSTER-IP    EXTERNAL-IP   PORT(S)                  AGE
kube-dns   ClusterIP   10.176.0.10   <none>        53/UDP,53/TCP,9153/TCP   349d
2.4、为Windows节点配置网络
获取到节点的Pod CIDR后, 即可为Windows节点配置网络. Windows 节点配置选用的是5种网络模式中的l2bridge, 具有单独subnet和compartent的L2bridge网络, 优点是不需要对已有Linux节点的网络组件进行更改, 无损插接式集成
2.4.1、创建L2Bridge虚拟交换机及端口
- 下载HNS网络脚本Module
从https://github.com/microsoft/SDN/tree/master/Kubernetes/windows 下载hns.psm1, 假设存放到c:/k/hns.psm1 - 创建L2Bridge类型的vSwitch, Endpoint
ipmo c:\k\hns.psm1

# 创建 L2Bridge类型的vSwitch, 使其绑定到eth1物理网关
$podCIDR = "10.160.11.0/24"
$podGW = "10.160.11.1"
$hnsNetwork = New-HNSNetwork -Type L2Bridge -AddressPrefix $podCIDR -Gateway $podGW -Name "l2bridge" -AdapterName "eth1" -Verbose

# 在vSwitch上创建Endpoint, 一个交换机端口
$endpointName = "cbr0"
$podEndpointGW = "10.160.11.2"
$hnsEndpoint = New-HnsEndpoint -NetworkId $hnsNetwork.Id -Name $endpointName -IPAddress $podEndpointGW -Gateway "0.0.0.0" -Verbose

# 添加Endpoint到默认的host network compartment
Attach-HnsHostEndpoint -EndpointID $hnsEndpoint.Id -CompartmentID 1

# 在Endpoint对应的虚拟网卡上启用Forwarding (forwarding=enabled)
$vnicName = "vEthernet ($endpointName)"
netsh int ipv4 set int "$vnicName" for=en
在Powershell中执行上面的脚本:
- 使用ipmo (Import-Moudle的)导入hns.psm1
- 指定vSwitch的CIDR为节点的Pod CIDR
- 指定网段网关为10.160.11.1, 后续创建的ToR地址
- 使用hns.psm1中提供的New-HNSNetwork创建一个类型为L2Bridge, 名称为l2bridge, 绑定到网卡eth1的虚拟交换机
- 创建后该网卡所在的网络会发起闪断, 原网卡eth1上的配置会被移到虚拟网卡”vEthernet (eth1)”上
- 在vSwitch上创建一个名称为cbr0的Endpoint, 一个交换机端口
- Endpoint的IP地址为10.160.11.2, Pod CIDR段中的第二个地址
- Endpoint的Gateway为0.0.0.0, 意为直连,没有跃点
- 添加Endpoint到默认的Compartment中
- 启动Endpoint对应的虚拟网卡的包转发
针对上述的创建脚本, 如果在执行过程中出现了错误, 相应的清理/删除脚本是:
ipmo c:\k\hns.psm1
$endpointName = "cbr0"
$hnsEndpoint = Get-HnsEndpoint | ? Name -eq $endpointName
Detach-HnsHostEndpoint -EndpointID $hnsEndpoint.Id
Remove-HnsEndpoint $hnsEndpoint
$hnsNetworkName = "l2bridge"
$hnsNetwork = Get-HnsNetwork | ? Name -eq $hnsNetworkName
Remove-HnsNetwork $hnsNetwork
2.4.2、创建CNI网络插件配置文件
假设cni config目录为: C:\k\cni\config, kubelet启动时需要通过–cni-conf-dir参数指定该目录.
确保cni config下没有其它配置文件, 然后在该目录下创建l2bridge.conf文件(文件名随意, 扩展名必须是.conf):
{
  "cniVersion": "0.2.0",
  "name": "l2bridge",
  "type": "win-bridge",
  "capabilities": { "portMappings": true },
  "dns" : {
    "Nameservers" : [ "10.176.0.10" ],
    "Search": [
        "default.svc.cluster.local",
        "svc.cluster.local",
        "cluster.local",
        "mylan.k8s"]
  },
  "AdditionalArgs" : [
    {
      "Name" : "EndpointPolicy", "Value" : { "Type" : "OutBoundNAT", "ExceptionList": [ "10.160.0.0/12", "10.176.0.0/12" ] }
    },
    {
      "Name" : "EndpointPolicy", "Value" : { "Type" : "ROUTE", "DestinationPrefix": "10.176.0.0/12", "NeedEncap" : true }
    }
  ]
}
配置文件中的几个要点:
- name 指定L2Bridge所接入的Hyper-V vSwitch, 就是前面创建的虚拟交换机”l2bridge”
- type 指定所使用的cni 插件binary, kubelet会自动从–cni-bin-dir指定的目录下找寻type指定的可执行文件
- ipam 指定cni网络的网段和网关, 创建虚拟交换机中已经配置了网段和网关, 对L2Bridge来说不需要配置
- capabilities 指定网络插件要启用的功能. 此处启用端口映射, Service的基本功能
- dns 指定k8s中DNS server的IP和Suffix列表, 前3个是k8s中的默认域名后缀, 最后一个是该K8s集群自定义的域名, 如果kubelet启动时指定了–cluster-dns和–resolv-conf参数, dns也可以不配置
- AddtionalArgs 中配置了两种策略:
- Type 为OutBoundNAT的策略指定了哪些网段出网需要NAT, 哪些不需要NAT. 结合我们的环境, Pod CIDR(10.160.0.0/12), K8s Service(10.176.0.0/12), 通过ToR进行路由,不需要NAT
- Type 为ROUTE的策略指定了哪些网段在Hyper-V vSwitch上走路由策略.
2.5、创建pause镜像
pause镜像是infrastructure container要使用的基础镜像, 每一个POD启动前都会先为该POD启动一个infrastructure container, 关于Pause Pod的说明请参见文首提到的Ian Lewis的文章
对于Windows节点, 我们使用nanoserver的镜像创建一个”永不退出”的pause镜像.
The Dockerfile:
FROM mcr.microsoft.com/windows/nanoserver:10.0.17763.973
CMD ping 127.0.0.1 -t
打镜像并推到集群内的镜像库:
docker build -t repo.mylan.k8s:8888/q1winpause:10.0.17763.973 -f Dockerfile .
docker push repo.mylan.k8s:8888/q1winpause:10.0.17763.973
pause镜像可以事先从镜像库pull到节点上. 否则如果pause镜像保存在私有镜像库中, 需要确保kubelet进程的运行账户下有该镜像库的登录凭证
2.6、配置Upstream ToR
前文提到的官方文档中的Upstream ToR网络模型中, 需要在ToR中配置指定每个节点的Pod CIDR的静态路由, 以实现不同节点间Pod的网络互通.
其实在已经配置好CNI网络组件的Kubernetes集群中, 每一个Linux节点上都有指向每个节点的Pod CIDR的完整路由表. 来看一个用了Calico网络的集群中的master节点的路由表:
[root@master1 ~]# route -n
Kernel IP routing table
Destination     Gateway         Genmask         Flags Metric Ref    Use Iface
0.0.0.0         172.16.126.1    0.0.0.0         UG    100    0        0 eth0
10.161.40.64    0.0.0.0         255.255.255.192 U     0      0        0 *
10.161.40.82    0.0.0.0         255.255.255.255 UH    0      0        0 cali1e2a8bc209e
10.161.40.87    0.0.0.0         255.255.255.255 UH    0      0        0 cali148cf153bff
10.164.136.0    100.100.126.204 255.255.255.192 UG    0      0        0 tunl0
10.166.4.128    100.100.126.214 255.255.255.192 UG    0      0        0 tunl0
10.167.98.192   100.100.126.208 255.255.255.192 UG    0      0        0 tunl0
10.167.99.0     100.100.126.208 255.255.255.192 UG    0      0        0 tunl0
10.168.112.128  100.100.126.209 255.255.255.192 UG    0      0        0 tunl0
10.168.112.192  100.100.126.209 255.255.255.192 UG    0      0        0 tunl0
10.169.104.128  100.100.126.203 255.255.255.192 UG    0      0        0 tunl0
10.169.105.0    100.100.126.215 255.255.255.192 UG    0      0        0 tunl0
10.171.253.0    100.100.126.210 255.255.255.192 UG    0      0        0 tunl0
10.172.99.64    100.100.126.213 255.255.255.192 UG    0      0        0 tunl0
10.173.193.0    100.100.126.211 255.255.255.192 UG    0      0        0 tunl0
10.175.39.64    100.100.126.212 255.255.255.192 UG    0      0        0 tunl0
100.100.126.0   0.0.0.0         255.255.254.0   U     101    0        0 eth1
172.16.126.0    0.0.0.0         255.255.255.0   U     100    0        0 eth0
Calico是通过隧道实现的overlay网络, 从路由表中可以看到:
- 本节点Pod CIDR的Gateway为0.0.0.0, 通过本地接口转发
- 其它节点Pod CIDR的Gateway为节点IP(100.100.126.*), 通道隧道接口tunl0转发
只需要把新添加的Windows节点Pod CIDR的网关地址10.160.11.1, “放”到任意一个Linux节点上就行了. 用keepalived可以很简单实现.
- 安装keepalived
选任意三个Linux节点, 安装keepalived, 三个linux节点是互备关系, keepalived的特性可以确保一个节点挂掉时把Windows节点的网关地址秒切到其它节点.
CentOS通过yum安装keepalived
yum install -y keepalived
- 为keepalived 创建配置文件 /etc/keepalived/keepalived.conf
! Configuration File for keepalived

global_defs {
   router_id LVS_WIN_GW_1
   vrrp_skip_check_adv_addr
   vrrp_garp_interval 0
   vrrp_gna_interval 0
}

vrrp_instance VI_MYLAN_K8S_WIN_GATE_ETH1 {
    state BACKUP
    interface eth1
    virtual_router_id 188
    priority 150
    nopreempt
    advert_int 1
    authentication {
        auth_type PASS
        auth_pass lvs#Win.Gate@Q1
    }

    unicast_src_ip 100.100.126.202
    unicast_peer {
        100.100.126.203
        100.100.126.204
    }

    virtual_ipaddress {
        10.160.11.1/24 dev eth1 label eth1:1
    }
}
简单说明一下:
- 每个keepavlied实例上的router_id不同
- 所有keepavlied实例上的vrrp_instance ID相同, 但同一个广播域中不能有相同的ID
- 所有keepalived实例上的virtual_router_id相同, 但同一个广播域中不能有相同的ID
- 通过配置state, priority, nopreempt, keepalived实例之前为互备非争抢模式
- 为减少网段内广播, vrrp配置为定向单播
- 最重要的就是virtual_ipaddress了,在争抢到优先权的keepalived实例上生成VIP 10.160.11.1, 该IP绑在eth1网卡上
- 启动keepalived服务, 检查路由表
CentOS上通过systemctl 启动keepalived服务.
可以看到100.100.126.204成为主节点, 启动了虚拟网卡eth1:1及IP地址10.160.11.1
[root@master3 ~]# ifconfig
eth1: flags=4163<UP,BROADCAST,RUNNING,MULTICAST>  mtu 1500
        inet 100.100.126.204  netmask 255.255.254.0  broadcast 100.100.127.255
        inet6 fe80::21d:d8ff:feb7:1c16  prefixlen 64  scopeid 0x20<link>
        ether 00:1d:d8:b7:1c:16  txqueuelen 1000  (Ethernet)
        RX packets 1000976669  bytes 241389143859 (224.8 GiB)
        RX errors 0  dropped 0  overruns 0  frame 0
        TX packets 1060914164  bytes 195256066096 (181.8 GiB)
        TX errors 0  dropped 0 overruns 0  carrier 0  collisions 0

eth1:1: flags=4163<UP,BROADCAST,RUNNING,MULTICAST>  mtu 1500
        inet 10.160.11.1  netmask 255.255.255.0  broadcast 0.0.0.0
        ether 00:1d:d8:b7:1c:16  txqueuelen 1000  (Ethernet)
查看100.100.126.204节点上的路由表:
[root@master3 ~]# route -n
Kernel IP routing table
Destination     Gateway         Genmask         Flags Metric Ref    Use Iface
0.0.0.0         172.16.126.1    0.0.0.0         UG    100    0        0 eth0
10.160.11.0     0.0.0.0         255.255.255.0   U     0      0        0 eth1
...
- 到10.160.11.0段的请求会由本机的eth1网卡转发, eth1网卡与Windows节点的eth1网卡属同一个广播域, 可由交换机转发至Windows节点的eth1网卡, 再经由前文配置的cbr0网卡和虚拟交换机转发至Windows节点上的Pod网络
再看其它节点上的路由表:
[root@master1 ~]# route -n
Kernel IP routing table
Destination     Gateway         Genmask         Flags Metric Ref    Use Iface
0.0.0.0         172.16.126.1    0.0.0.0         UG    100    0        0 eth0
10.160.11.0     100.100.126.204 255.255.255.0   UG    0      0        0 tunl0
...
- 到10.160.11.0段的请求经本节点tunl0接口隧道到100.100.126.204, 再由100.100.126.204转发到Windows节点
再想一下Windows节点上的Pod出网:
- 到本节点内的其它Pod IP, 经由本节点上的虚拟交换机直接转发
- 到其它节点的Pod IP或到外部网络, 经10.160.11.1由100.100.126.204转发
最终, 不管是Linux节点到Windows节点, 还是Windows节点到Linux节点, Pod全通.
承担了ToR角色的Linux节点变成了一个路由器, 这些Linux节点上要开启ip_forward功能, 不必担心的是安装Docker时已经打开了
net.ipv4.ip_forward = 1
2.7、启动节点上的kubelet和kube-proxy
2.7.1、kubelet
- 配置kubelet参数
c:/k/kubelet.exe --v=2 --kubeconfig=c:/k/kubeconfig.conf --node-ip=100.100.126.216 --hostname-override=node009 --pod-infra-container-image=repo.mylan.k8s:9999/q1winpause:10.0.17763.973 --network-plugin=cni --cni-bin-dir=c:/k/cni/bin --cni-conf-dir=c:/k/cni/config --cert-dir=c:/k/pki --log-dir=c:/k/log --log-file=c:/k/log/kubelet.log --logtostderr=false --cgroups-per-qos=false --enforce-node-allocatable= --cluster-dns=10.176.0.10 --resolv-conf= --feature-gates=HyperVContainer=true --image-pull-progress-deadline=30m --log-flush-frequency=3s --logtostderr=false
解释一下之前没提到的参数
- –pod-infra-container-image 指定pause镜像
- –network-plugin 指定网络插件类型, cni
- –cni-bin-dir 指定cni插件可执行文件的存放目录
- –cni-conf-dir 指定cni插件配置文件的存放目录
- –cert-dir 指定kubelet客户端证书的存放目录
- –log-dir 指定log目录
- –log-file 指定log文件, 会覆盖–log-dir的配置
- –log-file-max-size 当指定了–log-file参数后, 用于配置–log-file参数指向的log文件的最大尺寸, 以MB为单位. 如果不指定max-size, 则log文件的最大尺寸为1800MB
- –logtostderr 是否把error log 输入到stderr, 而不是log文件
- –cluster-dns 指定Kubernetes DNS Service的Service IP. cni config中配置了dns可以不指定该参数
- –resolv-conf 指定resolv.conf的文件路径, 适用于linux, 在Windows节点上指定为空值
- –feature-gates 用于开启kubelet的一些处于预览阶段/未正式发布的功能, 在此我们开启了hyperv isolation
- –image-pull-progress-deadline 指定镜像下载时下载进度等待超时. 默认值为1m0s, Windows镜像下载时会超时, 修改为30分钟
配置完kubelet的参数后, 可以在CMD shell中附带这些参数运行kubelet, 看kubelet能否正常运行, 不出错退出, 通过kubectl get nodes查询节点的状态为Ready, 说明参数配置没问题, 可以以服务方式启动kubelet.
关于Log file max size的issue供参考: https://github.com/kubernetes/kubernetes/issues/86984
resolv.conf文件的内容供参考:
nameservers 10.176.0.10
search default.svc.cluster.local svc.cluster.local cluster.local mylan.k8s
options ndots:4
文件中指定了:
- DNS name servers
- DNS suffix search list
- ndots, 当域名解析不到并且待解决域中的.数量小于ndots配置值时会自动附加suffix search list中的后缀进行尝试
- 创建kubelet服务
停掉CMD shell中的kubelet, 使用sc指令为kubelet创建Windows服务
sc create kubelet binPath= "<...> --windows-service" depend= docker DisplayName= "Kubernetes Node Agent" start= auto
说明:
- 以Windows服务方式运行kubelet时要加上–windows-service参数
- 服务名称为kubelet
- 依赖docker服务
- 显示名称为Kubernetes Node Agent
- 启动方式为自动
创建完成后使用sc start kubelet启动kubelet服务, 其它指令参考:
- sc query kubelet 查询状态
- sc qc kubelet 查询详细参数
2.7.2、kube-proxy
前面提到过, kube-proxy的作用是proxy Service.
- 配置kube-proxy参数
c:/k/kube-proxy.exe --v=2 --kubeconfig=c:/k/kubeconfig.conf --proxy-mode=kernelspace --hostname-override=node009 --network-name=l2bridge --bind-address=100.100.126.216 --cluster-cidr=10.160.0.0/12 --log-file=c:/k/log/kube-proxy.log --log-flush-frequency=3s --logtostderr=false
解释一下之前没提到的参数, 详细参数看kube-proxy –help:
- –proxy-mode 指定kube-proxy运行在kernelspace
- –network-name 指定kube-proxy使用的网络名称, 需指向前文中创建的l2bridge网络. 也可以通过环境变量KUBE_NETWORK指定network name
- –bind-address 多网卡时需要指定kube-proxy的绑定地址
- –cluster-cidr 告诉kube-proxy该K8s集群的Pod CIDR, 对Pod CIDR内的访问不会被proxy
另外kube-proxy也有–feature-gates参数, 可以打开目前处于预览阶段的一些新特性. 如Windows 1909中的Overlay和DSR特性可以通过如下方式打开:
c:/k/kubelet.exe –feature-gates=”WinOverlay=true,WinDSR=true” –enable-dsr=true
配置完kube-proxy的参数后, 也一样建议先在CMD shell中附带这些参数运行, 如果对所有的Service访问正常, 说明参数配置没问题, 再以服务方式启动.
- 创建kubeproxy服务
停掉CMD shell中的kube-proxy, 使用sc指令为kube-proxy创建Windows服务
sc create kubeproxy binPath= "... --windows-service" depend= docker/kubelet DisplayName= "Kubernetes Network Proxy" start= auto
创建方式与kubelet服务相同, 不同之处就是kube-proxy服务同时依赖docker和kubelet两个服务. 创建完成后通过sc start kubeproxy指令启动kube-proxy服务.
—–至此, 所有的配置就完成了—–
附录
注意事项
Linux/Windows混合集群要注意的一个点是: 要避免Linux容器被分配到Windows节点, 或Windows容器被分配到Linux节点, 所以在创建Deployment/Pod时要指定nodeSelector:
For Linux:
...
      nodeSelector:
        kubernetes.io/os: linux
...
For Windows:
...
      nodeSelector:
        kubernetes.io/os: windows
        node.kubernetes.io/windows-build: 10.0.18363
...
对于Windows节点, 由于不同版本的不兼容性, 还可以通过node.kubernetes.io/windows-build标签选择不同操作系统版本的节点
Known issues
目前这种方案的一个已知问题是:在Windows Pod内通过域名访问集群内Service时, 要写全域名. 比如:
- 在Linux容器内, 访问apiserver可以直接使用kubernetes访问
- 而在Windows容器内, 访问apiserver要通过全域名kubernetes.default.svc.cluster.local访问
问题跟踪在github上: https://github.com/kubernetes/kubernetes/issues/65016#issuecomment-625695523
FAQ
1. 安装OpenSSH Server时报错
Add-WindowsCapability : Add-WindowsCapability failed. Error code = 0x8024402c
At line:1 char:1
+ Add-WindowsCapability -Online -Name OpenSSH.Server~~~~0.0.1.0
+ ~~~~~~~~~~~~~~~~~~~~~~~~~~~~~~~~~~~~~~~~~~~~~~~~~~~~~~~~~~~~~
    + CategoryInfo          : NotSpecified: (:) [Add-WindowsCapability], COMException
    + FullyQualifiedErrorId : Microsoft.Dism.Commands.AddWindowsCapabilityCommand
遇到此类错误, 一般是Windows节点不访问外网或DNS配置问题导致不能解析外网地址
2. Windows Pod启动失败: open /etc/resolv.conf: The system cannot find the file specified
通过kubectl describe pod XXX查看:
Events:
  Type     Reason                  Age                 From               Message
  ----     ------                  ----                ----               -------
  Normal   Scheduled               <unknown>           default-scheduler  Successfully assigned default/iis-test-5696fcc9c5-n6pht to node009
  Warning  FailedCreatePodSandBox  10m (x12 over 13m)  kubelet, node009   Failed to create pod sandbox: open /etc/resolv.conf: The system cannot find the file specified.
kubelet启动参数中把–resolv-conf参数配置为空
3. Windows Pod启动失败: kubelet does not have ClusterDNS IP configured and cannot create Pod using…
通过kubectl describe pod XXX查看:
Events:
  Type     Reason             Age        From               Message
  ----     ------             ----       ----               -------
  Normal   Scheduled          <unknown>  default-scheduler  Successfully assigned default/iis-test-5696fcc9c5-2rh4f to node009
  Warning  MissingClusterDNS  6m58s      kubelet, node009   pod: "iis-test-5696fcc9c5-2rh4f_default(0ee7604e-61fa-401b-8433-84c7e48752f2)". kubelet does not have ClusterDNS IP configured and cannot create Pod using "ClusterFirst" policy. Falling back to "Default" policy.
cni config中未指定dns.nameservers配置, 同时kubelet的–cluster-dns参数也未配置
4. kube-proxy启动失败: unable to create proxier: Environment variable KUBE_NETWORK and network-flag not initialized
F0421 01:08:30.053087 2668 server.go:485] unable to create proxier: Environment variable KUBE_NETWORK and network-flag not initialized
启动kube-proxy时既没有通过–network-name参数也没有通过环境变量KUBE_NETWORK指定network name
5. kube-proxy日志中报错: Policy creation failed: hcnCreateLoadBalancer failed in Win32: The specified port already exists.
E0425 01:27:31.053862    8064 proxier.go:1231] Policy creation failed: hcnCreateLoadBalancer failed in Win32: The specified port already exists. (0x803b0013) {"Success":false,"Error":"The specified port already exists. ","ErrorCode":2151350291}
E0425 01:27:31.053862    8064 proxier.go:1192] Endpoint information not available for service rtx/rtx-service:rtx-service. Not applying any policy
通过Windows命令行工具hnsdiag诊断kube-proxy启动时的Load Balancer创建情况
列出所有Load Balancer:
hnsdiag list loadbalancers
清除所有Load Balancer(Windows 1809与1909略有不同):
- 1809
for /f "tokens=1 delims=|" %i in ('hnsdiag list loadbalancers') do hnsdiag delete loadbalancers %i - 1909
for /f "tokens=2 delims=:" %i in ('hnsdiag list loadbalancers ^| findstr "Load Balancer"') do hnsdiag delete loadbalancers %i
6. Windows 1909与cni plugin 0.8.5的不兼容的情况
Windows Server 1909与CNI plugin 0.8.5中的win-bridge配合会出现replicaset中的多个实例只有最后一个能获取到IP的情况.
当scale一个replicaset时, 前一个Pod获取到的IP对应的Endpoint的IsRemoteEndpoint属性会被改成True,导致该Pod网络不通
异常的Endpoint:
PS C:\Users\Administrator> get-hnsendpoint | ? ipaddress -eq 10.160.11.169


ActivityId         : 1185C970-0100-47B4-BABD-C91DDED5F7F6
AdditionalParams   :
DNSServerList      : 100.100.126.205,100.100.126.206
EncapOverhead      : 50
Flags              : 0
Health             : @{LastErrorCode=0; LastUpdateTime=132324094457531973}
ID                 : 92C2BD57-33F7-4B73-9AE7-A57A5832F637
IPAddress          : 10.160.11.169
IsRemoteEndpoint   : True
MacAddress         : 02-11-0a-a0-0b-a9
Name               : Ethernet
Policies           : {@{Type=L2Driver}}
PrefixLength       : 24
SharedContainers   : {}
State              : 1
Type               : L2Bridge
Version            : 42949672963
VirtualNetwork     : 11956f7b-7f42-4ba0-b62c-e7d6a7835ad4
VirtualNetworkName : l2bridge
Resources          : @{AdditionalParams=; AllocationOrder=1; Allocators=System.Object[]; CompartmentOperationTime=0; Flags=0; Health=; ID=1185C970-0100-47B4-BABD-C91DDED5F7F6; PortOperationTime=0; State=1; SwitchOperationTime=0; VfpOperationTime=0;
                     parentId=7F3F9AC2-C5D6-4EF9-A55E-B4C21D53316A}
正常的Endpoint:
PS C:\Users\Administrator> get-hnsendpoint | ? ipaddress -eq 10.160.11.99


ActivityId                : A8556439-A18D-458B-B21C-B45D063084CC
AdditionalParams          :
CreateProcessingStartTime : 132324094384739259
DNSServerList             : 10.176.0.10
DNSSuffix                 : default.svc.cluster.local,svc.cluster.local,cluster.local,mylan.k8s
EncapOverhead             : 50
Flags                     : 0
GatewayAddress            : 10.160.11.1
Health                    : @{LastErrorCode=0; LastUpdateTime=132324094384729261}
ID                        : CF73A2BC-F00F-4D71-B00A-07FA2D9FB9E3
IPAddress                 : 10.160.11.99
MacAddress                : 00-15-5D-D3-D8-DE
Name                      : b9c11271e2bddf50f8e80edd225af5f61e76381c69478ed73433c603de151200_l2bridge
Policies                  : {@{Type=L2Driver}}
PrefixLength              : 24
SharedContainers          : {b9c11271e2bddf50f8e80edd225af5f61e76381c69478ed73433c603de151200, 4001edf71e1cda3383b53b2fc83ae42fcf7f0e60618368f2cf0211b5b9d8d0ea}
StartTime                 : 132324094388092185
State                     : 3
Type                      : L2Bridge
Version                   : 42949672963
VirtualNetwork            : 11956F7B-7F42-4BA0-B62C-E7D6A7835AD4
VirtualNetworkName        : l2bridge
Resources                 : @{AdditionalParams=; AllocationOrder=3; Allocators=System.Object[]; CompartmentOperationTime=0; Flags=0; Health=; ID=A8556439-A18D-458B-B21C-B45D063084CC; PortOperationTime=0; State=1; SwitchOperationTime=0; VfpOperationTime=0;
                            parentId=7F3F9AC2-C5D6-4EF9-A55E-B4C21D53316A}
经多次测试发现通过命令行启动kube-proxy时没问题, 以sc screate –windows-service启动时才有这个问题. 尝试把服务的启动账户改成”NT AUTHORITY\LocalService”或”NT AUTHORITY\NetworkService”后可解决此问题, 默认启动账户LocalSystem有问题
sc config kubeproxy obj= "NT AUTHORITY\NetworkService"
TODO: report bug to win-bridge plugin
7. 其它
E0426 02:11:29.241699    5992 cni.go:385] Error deleting default_netfx-test-1909-85f54f7bf-bfwq9/485cc61b9dd9c9bcca246249a0866622842285db589df78842d8c60834e73155 from network win-bridge/l2bridge: no plugin name provided
E0426 02:11:29.242532    5992 remote_runtime.go:128] StopPodSandbox "485cc61b9dd9c9bcca246249a0866622842285db589df78842d8c60834e73155" from runtime service failed: rpc error: code = Unknown desc = networkPlugin cni failed to teardown pod "netfx-test-1909-85f54f7bf-bfwq9_default" network: no plugin name provided
现在大多的Windows容器配置文档并没有更新, 一些关于l2bridge/host-gw网络的配置大多把插件下载引导到了 https://github.com/microsoft/SDN/tree/master/Kubernetes/windows/cni 下的wincni.exe, 但该插件版本太老了, 存在很多bug.
比如上面的报错, 或是配置了ExceptionList外网不通, 不配置ExcetionList服务不通等, 还会出现有配置的DNS Suffix: default.svc.cluster.local, 在容器中变成了default.default.svc.cluster.local等问题.
所以要从https://github.com/containernetworking/plugins/releases下载新版的CNI Plugin
How to install specific hotfix on Windows Server
Windows容器环境有个特点, Host与Container的OS Builder Number必须匹配, 有点场景甚至要求Revision Number匹配, 所以经常要为K8s Node安装指定Revision 的hotfix, 用powershell在线安装时下载过程缓慢而不可控, 体验最好的路径还是直接找到相应Revision Number的msu安装包,直接安装:
1. 从Windows Update History网站找到版本对应的KB. 如: Windows Server 1809 OS Build 10.0.17763.1158
https://support.microsoft.com/en-us/help/4549949
2. 在Windows Update Catelog按KB搜索: https://www.catalog.update.microsoft.com/
找到相应的下载包. 如17763.1158对应的KB4549949: https://www.catalog.update.microsoft.com/Search.aspx?q=KB4549949
3. 下载msu安装包后使用wusa指令安装即可:
wusa windows10.0-kb4549949-x64_90e8805e69944530b8d4d4877c7609b9a9e68d81.msu
附:
为了防止Windows Node版本变更, 还要关闭Windows Auto Update, 防止Node OS自己变更版本:
a). 查看Auto Update 状态:
%systemroot%\system32\Cscript %systemroot%\system32\scregedit.wsf /AU /v
b). 禁用 Windows Auto Update:
Net stop wuauserv
%systemroot%\system32\Cscript %systemroot%\system32\scregedit.wsf /AU 1
Net start wuauserv
PS: 可使用wmic qfe list查看已安装的hostfix
Reference:
https://docs.microsoft.com/en-us/windows-server/administration/server-core/server-core-servicing
For Windows Container, you need to set –image-pull-progress-deadline for kubelet
Windows镜像动则几个G, 基于Windows Server Core的镜像5~10G, Windows节点上的kubelet在下载镜像的时候经常会cancel掉:
Failed to pull image "XXX": rpc error: code = Unknown desc = context canceled
造成这个问题的原因是因为默认的image pulling progress deadline是1分钟, 如果1分钟内镜像下载没有任何进度更新, 下载动作就会取消, 比较大的镜像就无法成功下载. 见官方文档:
If no pulling progress is made before this deadline, the image pulling will be cancelled. This docker-specific flag only works when container-runtime is set to docker. (default 1m0s)
解决方法是为kubelet配置–image-pull-progress-deadline参数, 比如指定为30分钟:
"c:/k/kubelet.exe ... --image-pull-progress-deadline=30m"
对于Windows服务, 使用sc指令修改kubelet的binPath:
sc config kubelet binPath= " --image-pull-progress-deadline=30m
然后重启kubelet及依赖服务:
sc stop kubeproxy && sc stop kubelet && sc start kubelet && sc start kubeproxy && sc query kubelet && sc query kubeproxy
Refer to: https://kubernetes.io/docs/reference/command-line-tools-reference/kubelet/
Implementing Graceful Shutdown in Windows Container
Kubernetes Linux Pod中,当通过kubectl删除一个Pod或rolling update一个Pod时, 每Terminating的Pod中的每个Container中PID为1的进程会收到SIGTERM信号, 通知进程进行资源回收并准备退出. 如果在Pod spec.terminationGracePeriodSeconds指定的时间周期内进程没有退出, 则Kubernetes接着会发出SIGKILL信号KILL这个进程。
通过 kubectl delete –force –grace-period=0 … 的效果等同于直接发SIGKILL信号.
但SIGTERM和SIGKILL方式在Windows Container中并不工作, 目前Windows Container的表现是接收到Terminating指令5秒后直接终止。。。
- V1.Pod.terminationGracePeriodSeconds – this is not fully implemented in Docker on Windows, see: reference. The behavior today is that the ENTRYPOINT process is sent CTRL_SHUTDOWN_EVENT, then Windows waits 5 seconds by default, and finally shuts down all processes using the normal Windows shutdown behavior. The 5 second default is actually in the Windows registry inside the container, so it can be overridden when the container is built.
基于社区的讨论结果及多次尝试, 目前Windows容器中行之有效的Graceful Shutdown方法是:
1. Build docker image时通过修改注册表延长等待时间
...
RUN reg add hklm\system\currentcontrolset\services\cexecsvc /v ProcessShutdownTimeoutSeconds /t REG_DWORD /d 300 && \
    reg add hklm\system\currentcontrolset\control /v WaitToKillServiceTimeout /t REG_SZ /d 300000 /f
...
上面两个注册表位置, 第1个单位为秒, 第2个为毫秒
2. 在应用程序中注册kernel32.dll中的SetConsoleCtrlHandler函数捕获CTRL_SHUTDOWN_EVENT事件, 进行资源回收
以一个.net framework 的Console App为例说明用法:
using System;
using System.Runtime.InteropServices;
using System.Threading;

namespace Q1.Foundation.SocketServer
{
    class Program
    {
        internal delegate bool HandlerRoutine(CtrlType CtrlType);
        private static HandlerRoutine ctrlTypeHandlerRoutine = new HandlerRoutine(ConsoleCtrlHandler);

        private static bool cancelled = false;
        private static bool cleanupCompleted = false;

        internal enum CtrlType
        {
            CTRL_C_EVENT = 0,
            CTRL_BREAK_EVENT = 1,
            CTRL_CLOSE_EVENT = 2,
            CTRL_LOGOFF_EVENT = 5,
            CTRL_SHUTDOWN_EVENT = 6
        }

        [DllImport("Kernel32")]
        internal static extern bool SetConsoleCtrlHandler(HandlerRoutine handler, bool add);

        static void Main()
        {
            var result = SetConsoleCtrlHandler(handlerRoutine, true);

            // INITIAL AND START APP HERE

            while (true)
            {
                if (cancelled) break;
            }

            // DO CLEANUP HERE
            ...
            cleanupCompleted = true;
        }

        private static bool ConsoleCtrlHandler(CtrlType type)
        {
            cancelled = true;

            while (!cleanupCompleted)
            {
                // Watting for clean-up to be completed...
            }

            return true;
        }
    }
}
代码解释:
- 引入Kernel32并声明extern函数SetConsoleCtrlHandler
- 创建static的HandlerRoutine.
- 调用SetConsoleCtrlHandler注册处理函数进行事件捕获
- 捕获后在HandlerRoutine应用程序中进行资源清理
- 清理完成后在HandlerRoutine中返回true允许应用程序退出
上述两个步骤即完成了Graceful Shutdown.
需要注意的点是:
1. 传统.net Console App中的事件捕获( 比如: Console.CancelKeyPress, SystemEvents.SessionEnding )在容器中都不会生效,AppDomain.CurrentDomain.ProcessExit的触发时间又太晚, 只有SetConsoleCtrlHandler可行. 更多的尝试代码请参见: https://github.com/moby/moby/issues/25982#issuecomment-250490552
2. 要防止程序退出前HandlerRoutine实例被回收, 所以上面示例中使用了static的HandlerRoutine. 这点很重要, 如果HandlerRoutine在应用程序未结束的时候被回收掉, 就会引发错误, 看如下代码:
static void Main()
{
    // Initialize here

    ...
    using
    {
        var sysEventHandler = new HandlerRoutine(type =>
        {
            cancelled = true;

            while (!cleanCompleted)
            {
                // Watting for clean-up to be completed...
            }

            return true;
        });

        var sysEventSetResult = SetConsoleCtrlHandler(sysEventHandler, true);
        ...
    }
    ...

    // Cleanup here
}
在应用程序退出前, HandlerRoutine实例已经被回收掉了,在CTRL_SHUTDOWN_EVENT 被触发时就会引发NullReferenceException, 具体错误信息如下:
Managed Debugging Assistant 'CallbackOnCollectedDelegate':
A callback was made on a garbage collected delegate of type 'Program+HandlerRoutine::Invoke'. This may cause application crashes, corruption and data loss. When passing delegates to unmanaged code, they must be kept alive by the managed application until it is guaranteed that they will never be called.
类似场景: CallbackOnCollectedDelegate was detected
关于SetConsoleCtrlHandler的使用参考:
SetConsoleCtrlHandler function
HandlerRoutine callback function
最后, 如果要处理的应用程序类型不是Console App, 而是图形化的界面应用,则要处理的消息应该是WM_QUERYENDSESSION, 参见文档:
https://docs.microsoft.com/en-us/windows/console/setconsolectrlhandler#remarks
Describe Kubelet Service Parameters on Azure Windows node
Query Kubelet service
Managed by nssm
C:\k>sc qc kubelet
[SC] QueryServiceConfig SUCCESS

SERVICE_NAME: kubelet
        TYPE               : 10  WIN32_OWN_PROCESS
        START_TYPE         : 2   AUTO_START
        ERROR_CONTROL      : 1   NORMAL
        BINARY_PATH_NAME   : C:\k\nssm.exe
        LOAD_ORDER_GROUP   :
        TAG                : 0
        DISPLAY_NAME       : Kubelet
        DEPENDENCIES       : docker
        SERVICE_START_NAME : LocalSystem
Query kubelet AppParameters by nssm
C:\k>nssm get kubelet Application
C:\Windows\System32\WindowsPowerShell\v1.0\powershell.exe

C:\k>nssm get kubelet AppParameters
c:\k\kubeletstart.ps1
Powershell scripts to start kubelet
$global:MasterIP = "q1game-q1game-6adca6-e3314a8c.hcp.westus2.azmk8s.io"
$global:KubeDnsSearchPath = "svc.cluster.local"
$global:KubeDnsServiceIp = "10.0.0.10"
$global:MasterSubnet = "10.240.0.0/16"
$global:KubeClusterCIDR = "10.240.0.0/16"
$global:KubeServiceCIDR = "10.0.0.0/16"
$global:KubeBinariesVersion = "1.17.3"
$global:CNIPath = "c:\k\cni"
$global:NetworkMode = "L2Bridge"
$global:ExternalNetwork = "ext"
$global:CNIConfig = "c:\k\cni\config\$global:NetworkMode.conf"
$global:HNSModule = "c:\k\hns.psm1"
$global:VolumePluginDir = "c:\k\volumeplugins"
$global:NetworkPlugin="azure"
$global:KubeletNodeLabels="kubernetes.azure.com/role=agent,agentpool=q1win,storageprofile=managed,storagetier=Premium_LRS,kubernetes.azure.com/cluster=MC_q1game_q1game_westus2"
Write-Host "NetworkPlugin azure, starting kubelet."

# Turn off Firewall to enable pods to talk to service endpoints. (Kubelet should eventually do this)
netsh advfirewall set allprofiles state off
# startup the service

# Find if network created by CNI exists, if yes, remove it
# This is required to keep the network non-persistent behavior
# Going forward, this would be done by HNS automatically during restart of the node

$hnsNetwork = Get-HnsNetwork | ? Name -EQ azure
if ($hnsNetwork)
{
    # Cleanup all containers
    docker ps -q | foreach {docker rm $_ -f}

    Write-Host "Cleaning up old HNS network found"
    Remove-HnsNetwork $hnsNetwork
    # Kill all cni instances & stale data left by cni
    # Cleanup all files related to cni
    taskkill /IM azure-vnet.exe /f
    taskkill /IM azure-vnet-ipam.exe /f
    $cnijson = [io.path]::Combine("c:\k", "azure-vnet-ipam.json")
    if ((Test-Path $cnijson))
    {
        Remove-Item $cnijson
    }
    $cnilock = [io.path]::Combine("c:\k", "azure-vnet-ipam.json.lock")
    if ((Test-Path $cnilock))
    {
        Remove-Item $cnilock
    }

    $cnijson = [io.path]::Combine("c:\k", "azure-vnet.json")
    if ((Test-Path $cnijson))
    {
        Remove-Item $cnijson
    }
    $cnilock = [io.path]::Combine("c:\k", "azure-vnet.json.lock")
    if ((Test-Path $cnilock))
    {
        Remove-Item $cnilock
    }
}

# Restart Kubeproxy, which would wait, until the network is created
# This was fixed in 1.15, workaround still needed for 1.14 https://github.com/kubernetes/kubernetes/pull/78612
Restart-Service Kubeproxy

$env:AZURE_ENVIRONMENT_FILEPATH="c:\k\azurestackcloud.json"

c:\k\kubelet.exe --address=0.0.0.0 --anonymous-auth=false --authentication-token-webhook=true --authorization-mode=Webhook --azure-container-registry-config=c:\k\azure.json --cgroups-per-qos=false --client-ca-file=c:\k\ca.crt --cloud-config=c:\k\azure.json --cloud-provider=azure --cluster-dns=10.0.0.10 --cluster-domain=cluster.local --dynamic-config-dir=/var/lib/kubelet --enforce-node-allocatable="" --event-qps=0 --eviction-hard="" --feature-gates=RotateKubeletServerCertificate=true --hairpin-mode=promiscuous-bridge --image-gc-high-threshold=85 --image-gc-low-threshold=80 --image-pull-progress-deadline=20m --keep-terminated-pod-volumes=false --kube-reserved=cpu=100m,memory=1843Mi --kubeconfig=c:\k\config --max-pods=30 --network-plugin=cni --node-status-update-frequency=10s --non-masquerade-cidr=0.0.0.0/0 --pod-infra-container-image=kubletwin/pause --pod-max-pids=-1 --protect-kernel-defaults=true --read-only-port=0 --resolv-conf="" --rotate-certificates=false --streaming-connection-idle-timeout=4h --system-reserved=memory=2Gi --tls-cipher-suites=TLS_ECDHE_ECDSA_WITH_AES_128_GCM_SHA256,TLS_ECDHE_RSA_WITH_AES_128_GCM_SHA256,TLS_ECDHE_ECDSA_WITH_CHACHA20_POLY1305,TLS_ECDHE_RSA_WITH_AES_256_GCM_SHA384,TLS_ECDHE_RSA_WITH_CHACHA20_POLY1305,TLS_ECDHE_ECDSA_WITH_AES_256_GCM_SHA384,TLS_RSA_WITH_AES_256_GCM_SHA384,TLS_RSA_WITH_AES_128_GCM_SHA256 --node-labels=$global:KubeletNodeLabels --volume-plugin-dir=$global:VolumePluginDir --cni-bin-dir=c:\k\azurecni\bin --cni-conf-dir=c:\k\azurecni\netconf
Enable Hyper-V Isolation by modify kubelet parameters
1. Modify c:\k\kubeletstart.ps1 to add parameter to kubelet
--feature-gates="XXX=true,HyperVContainer=true"
2. Restart kubelet
C:\k>nssm restart kubelet
Kubelet: STOP: A stop control has been sent to a service that other running services are dependent on.

C:\k>sc queryex kubelet

SERVICE_NAME: kubelet
        TYPE               : 10  WIN32_OWN_PROCESS
        STATE              : 4  RUNNING
                                (STOPPABLE, PAUSABLE, ACCEPTS_SHUTDOWN)
        WIN32_EXIT_CODE    : 0  (0x0)
        SERVICE_EXIT_CODE  : 0  (0x0)
        CHECKPOINT         : 0x0
        WAIT_HINT          : 0x0
        PID                : 4044
        FLAGS              :

C:\k>taskkill /PID 4044 /F

C:\k>sc start kubelet
Restart the Windows node if necessary
Run Windows container with Hyper-V isolation mode in Kubernetes
Windows Container有两种隔离运行模式Hyper-V和Process, 参见:Isolation Modes
两种模式下的host的OS版本与containter的OS版本存在兼容性又不相同,参见:Windows container version compatibility
很明显Hyper-V模式的兼容性要比Process模式要好,向下兼容,也就是高版本的host OS可以运行低版本的container OS, 反之不行;
而Process模式下Windows Server中则要求host OS与container OS的版本完全相同, Windows 10中则不支持Process模式.
某一天,我想在Kubernetes Windows 节点中以Hyper-V模式运行Container, 于是乎发现1.17的文档中写道:
Note: In this document, when we talk about Windows containers we mean Windows containers with process isolation. Windows containers with Hyper-V isolation is planned for a future release.
不甘心又google了一下,发现:
1. 有人提了bug, 已经被修复了: https://github.com/kubernetes/kubernetes/issues/58750
2. 代码也merge了: https://github.com/kubernetes/kubernetes/pull/58751
3. 有人在测试过程中遇到问题,也解决了: https://github.com/kubernetes/kubernetes/issues/62812
但我测试的过程中却提示:
Error response from daemon: CreateComputeSystem test: The container operating system does not match the host operating system.
我的环境:
Kubernetes Ver: 1.14.8
Kubernetes Node OS Ver: Windows Server Datacenter 10.0.17763.504, 属于1809的版本
Container Base Image: windowsservercore-1709
Deployment yaml:
apiVersion: apps/v1beta2
kind: Deployment
metadata:
  labels:
    app: test
  name: test
  namespace: default
spec:
  replicas: 1
  selector:
    matchLabels:
      app: test
  template:
    metadata:
      annotations:
        experimental.windows.kubernetes.io/isolation-type: hyperv
      labels:
        app: test
...
然后对比了下github别人试成功的deployment yaml, 发现人家用的是apps/v1
apiVersion: apps/v1
kind: Deployment
metadata:
  name: whoami
  labels:
    app: whoami
spec:
  ...
目前在k8s中启用hyperv isolation的三个条件:
- kubelet 启用参数: –feature-gates=HyperVContainer=true
- Pod/Deployment apiVersion: apps/v1
- spec.template.metadata.annotations[].experimental.windows.kubernetes.io/isolation-type:hyperv
目前我的云提供商给的kubernetes 1.14.8又不支持apps/v1 …
于是乎,我要么等提供商升级kubernetes,要么自己升级container OS跟kubernetes node OS一样…
ernel:unregister_netdevice: waiting for eth0 to become free. Usage count = 1
RHEL7 and kubernetes: kernel:unregister_netdevice: waiting for eth0 to become free. Usage count = 1
Issue
- We are trying to prototype kubernetes on top of RHEL and encounter the situation that the device seems to be frozen. There are repeated messages similar to:
[1331228.795391] unregister_netdevice: waiting for eth0 to become free. Usage count = 1
[1331238.871337] unregister_netdevice: waiting for eth0 to become free. Usage count = 1
[1331248.919329] unregister_netdevice: waiting for eth0 to become free. Usage count = 1
[1331258.964322] unregister_netdevice: waiting for eth0 to become free. Usage count = 1
- This problem occurs when scaling down pods in kubernetes. A reboot of the node is required to rectify.
- This has been seen after customers upgraded to a kernel with the fix for https://access.redhat.com/solutions/3105941 But after that the messages appear on ethX instead of lo.
Environment
- Red Hat Enterprise Linux 7
- kernel-3.10.0-862.el7.x86_64
- kernel-3.10.0-957.el7.x86_64
- upstream Kubernetes
- upstream docker
refer:
https://github.com/kubernetes/kubernetes/issues/70427
[Kubernetes] Create deployment, service by Python client
Install Kubernetes Python Client and PyYaml:
# pip install kubernetes pyyaml
1. Get Namespaces or Pods by CoreV1Api:
# -*- coding: utf-8 -*-
from kubernetes import client, config, utils

config.kube_config.load_kube_config(config_file="../kubecfg.yaml")
coreV1Api = client.CoreV1Api()

print("\nListing all namespaces")
for ns in coreV1Api.list_namespace().items:
    print(ns.metadata.name)

print("\nListing pods with their IP, namespace, names:")
for pod in coreV1Api.list_pod_for_all_namespaces(watch=False).items:
    print("%s\t\t%s\t%s" % (pod.status.pod_ip, pod.metadata.namespace, pod.metadata.name))
2. Create Deployment and Service by AppsV1Api:
# -*- coding: utf-8 -*-
from kubernetes import client, config, utils
import yaml

config.kube_config.load_kube_config(config_file="../kubecfg.yaml")
yamlDeploy = open( r'deploy.yaml')
jsonDeploy = yaml.load(yamlDeploy, Loader = yaml.FullLoader)

yamlService = open(r'service.yaml')
jsonService = yaml.load(yamlService, Loader = yaml.FullLoader)

appsV1Api = client.AppsV1Api()

if jsonDeploy['kind'] == 'Deployment':
    appsV1Api.create_namespaced_deployment(
        namespace="default", body = jsonDeploy
    )

if jsonService['kind'] == 'Service':
    coreV1Api.create_namespaced_service(
        namespace="default",
        body=jsonService
    )
3. Create ANY type of objects from a yaml file by utils.create_from_yaml, you can put multiple resources in one yaml file:
# -*- coding: utf-8 -*-
from kubernetes import client, config, utils

config.kube_config.load_kube_config(config_file="../kubecfg.yaml")

k8sClient = client.ApiClient()
utils.create_from_yaml(k8sClient, "deploy-service.yaml")
Reference:
https://github.com/kubernetes-client/python/blob/6709b753b4ad2e09aa472b6452bbad9f96e264e3/examples/create_deployment_from_yaml.py
https://stackoverflow.com/questions/56673919/kubernetes-python-api-client-execute-full-yaml-file